
If you’re looking to dive into quilting, the Snail Trail Easy Block Quilt Tutorial – Free Pattern is the perfect starting point. Quilting is a fantastic creative outlet, and this tutorial will help you craft a beautiful quilt block using a simple yet elegant design.
Whether you’re a seasoned quilter or just beginning, this free pattern offers step-by-step instructions to guide you through the process of creating your very own Snail Trail quilt block.
The Snail Trail pattern is a classic in the quilting world, known for its swirling, geometric design that evokes a sense of movement, similar to the winding path a snail might leave behind.
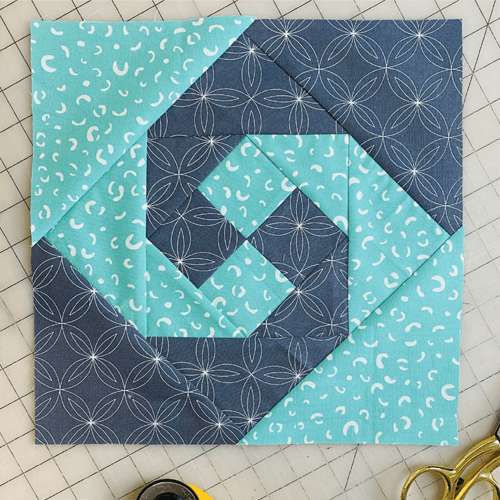
This block is not only visually appealing but also relatively easy to make, making it a great choice for quilters of all skill levels. By following the steps outlined in this tutorial, you’ll learn how to make the Snail Trail block and how to incorporate it into larger quilt projects.
In this article, we’ll provide you with everything you need to create your own Snail Trail Easy Block Quilt. From fabric selection to sewing tips, you’ll be ready to make beautiful quilt blocks that can be used in blankets, throws, or decorative pieces. Let’s begin!
1. Materials Needed for Snail Trail Quilt Block
Before you start sewing your Snail Trail Easy Block Quilt, it’s essential to gather all the necessary materials. Having everything prepared ahead of time will streamline the process and help you stay organized.
-
Fabric: For a traditional Snail Trail block, you’ll need two main fabric colors – a background fabric (typically a solid color) and a contrast fabric (which can be a patterned or different solid fabric). These two fabrics will form the swirling effect of the pattern.
-
Quilting Ruler: A quilting ruler is a must-have tool when cutting your fabric into precise shapes. It will help you cut accurate pieces and ensure your quilt block is even.
-
Rotary Cutter: Using a rotary cutter will make your cutting much more efficient. It allows you to cut through multiple layers of fabric at once, saving you time and energy.
-
Sewing Machine: A reliable sewing machine is necessary for sewing the fabric pieces together. Make sure your machine is set up with the appropriate needle and thread for quilting.
-
Quilting Pins: Quilting pins are used to hold your fabric pieces in place as you sew. These will help keep the edges aligned and prevent any shifting during the sewing process.
-
Iron and Ironing Board: Pressing your seams is an essential step in quilting. An iron will help flatten your seams, ensuring that your quilt block lies flat and the pieces align properly.
Once you have these materials ready, you’re all set to start working on the Snail Trail quilt block! Let’s move on to the next step: cutting the fabric pieces.
2. Cutting the Fabric for Snail Trail Quilt Block
Accurate fabric cutting is crucial to the success of your Snail Trail Easy Block Quilt. If your fabric pieces are not cut to the correct size, the quilt block may not align properly, and your finished quilt may not have the clean, polished look you desire.
-
Measure and Cut the Background Fabric: Start by measuring and cutting your background fabric. You’ll need to cut squares and triangles from this fabric, depending on the design layout you choose. A good rule of thumb is to cut the squares at 3 ½ inches and the triangles at 2 inches. You’ll need enough background fabric to create the spiral effect of the Snail Trail block.
-
Cutting the Contrast Fabric: For the contrast fabric, you’ll need to cut it into squares and triangles as well. These pieces will form the swirling pattern that gives the Snail Trail its signature look. Cut the contrast fabric pieces into similar sizes as the background fabric.
-
Cut the Border Fabric: If you’re planning to add a border around your quilt block, now is the time to cut the border fabric. You can choose a simple fabric or a coordinating print that complements the background and contrast fabrics.
-
Use the Quilting Ruler for Precision: When cutting the fabric pieces, use your quilting ruler to ensure the cuts are straight and even. The more precise your cuts, the more professional your quilt block will look.
-
Organize Your Pieces: Once all the fabric pieces are cut, lay them out in a way that makes sense for the pattern. It can be helpful to label each piece with a small piece of masking tape so that you don’t get confused during the sewing process.
-
Press the Fabric: After cutting, press your fabric pieces to remove any wrinkles. This will help your fabric lay flat and make the sewing process much easier.
Now that the fabric is ready, let’s move on to assembling the Snail Trail quilt block.
3. Assembling the Snail Trail Quilt Block
With all the pieces cut and prepared, it’s time to start assembling your Snail Trail Easy Block Quilt. This is where the magic happens, as you’ll begin to see the swirl pattern form.
-
Start with the Center Block: The first step is to sew the center square. This piece will be the focal point of your Snail Trail block. Place your contrast fabric square in the center, and sew it to the background fabric.
-
Attach the First Set of Triangles: Next, take your triangles and begin attaching them to the center square. Use the quilting pins to hold the pieces in place and sew each triangle to the center square. This will create the first round of the spiral effect.
-
Add Additional Triangles: Continue sewing more triangles around the center, making sure to keep the pieces aligned. Each round of triangles should gradually get larger as you move outward from the center.
-
Check the Alignment: As you sew, take time to check the alignment of the fabric pieces. This will ensure the swirling effect of the Snail Trail pattern is even and smooth.
-
Press the Seams: After each round of sewing, press the seams to ensure they are flat and neat. This will help your quilt block maintain its shape and keep the pieces from shifting.
-
Trim Any Excess Fabric: Once all the pieces are sewn together, trim any excess fabric to make sure the block is the correct size. The finished Snail Trail block should be neat and precise, ready to be added to your quilt.
With your Snail Trail quilt block assembled, you’re ready to move on to the next stage: putting the blocks together into a larger quilt.
4. Joining Snail Trail Blocks and Finishing the Quilt
Now that you’ve mastered creating a Snail Trail Easy Block Quilt, it’s time to learn how to join your blocks and finish your quilt.
-
Arrange the Blocks: Before you start sewing the blocks together, arrange them in the desired pattern. You can place the blocks in rows or columns, depending on how large you want your quilt to be.
-
Sew the Blocks Together: Once the blocks are arranged, begin sewing them together. Start with the first row, and then connect the rows to form the quilt top. Be sure to pin the blocks together to ensure the seams match up perfectly.
-
Press the Seams: After each row is sewn together, press the seams to make them flat. This will help the quilt lie smoothly and prevent any puckering.
-
Attach the Quilt Border: Once the quilt top is assembled, you can add a border. The border adds a finishing touch and frames the quilt design. Cut the border fabric to size and sew it around the edges of the quilt top.
-
Quilt the Layers: To complete your quilt, you’ll need to quilt the layers together. You can do this by hand or using a sewing machine. Quilting adds texture and helps hold the layers together.
-
Bind the Edges: Finally, finish the quilt by binding the edges. You can create your own binding from fabric or purchase pre-made binding. Sew it around the edges of the quilt to give it a clean, finished look.
Your Snail Trail Easy Block Quilt is now complete! Enjoy the fruits of your labor and show off your beautiful quilt.
FAQ: Frequently Asked Questions
-
How long does it take to make a Snail Trail Quilt Block? The time it takes to complete a Snail Trail quilt block depends on your skill level, but it typically takes about 1 to 2 hours per block.
-
Can I use different fabrics for the contrast? Yes! You can use any fabric you like for the contrast. Mix and match patterns or use different colors to create a more personalized look.
-
What size quilt will this pattern make? The size of your quilt depends on how many Snail Trail blocks you make and how you arrange them. This pattern can be adapted to any quilt size, from a small lap quilt to a large bedspread.
-
Can I hand-sew the blocks instead of using a machine? While using a sewing machine is quicker, you can definitely hand-sew the blocks if you prefer. Just be sure to use accurate stitching and take your time.
-
Do I need to pre-wash the fabric? It’s recommended to pre-wash your fabric to prevent shrinking or bleeding of colors later on. This step is especially important if you are using cotton fabrics.
-
Can I add other designs to my quilt? Yes! Once you’ve mastered the Snail Trail block, you can incorporate other blocks and designs into your quilt, creating a unique and complex pattern.
Join our VIP broadcast list and gain access to exclusive patterns, all for free. As a VIP member, you’ll receive the best patterns daily, delivered directly to your device. ✨📱 It’s a unique opportunity to stay up-to-date with the latest trends and designs, curated just for you. Don’t miss out on enhancing your projects and discovering new inspirations with the best patterns every day! 🎨🔝
Conclusion
The Snail Trail Easy Block Quilt Tutorial – Free Pattern is a fun and rewarding quilting project. With its simple yet beautiful design, you can create a stunning quilt that will be treasured for years to come. Whether you’re a beginner or an experienced quilter, this pattern provides all the steps you need to make a gorgeous quilt block and complete your quilt.
We hope you enjoyed this tutorial! Feel free to leave your thoughts and suggestions in the comments. We’d love to hear how your Snail Trail quilt project turned out!