
Crochet lovers are always looking for creative and practical projects, and the Crochet Butterfly Basket – Free Pattern is the perfect combination of beauty and functionality.
This delightful basket adds a charming touch to any room while serving as a useful storage solution. Whether you are a beginner or an experienced crocheter, this tutorial will guide you step by step to create your own butterfly-inspired basket.
Using soft and durable yarn, this pattern allows you to craft a unique basket that can hold small items like keys, jewelry, or crafting supplies.
The butterfly design adds a whimsical and elegant aesthetic, making it a great gift or home décor item. With easy-to-follow instructions, you will enjoy every stitch as you bring this beautiful crochet piece to life.
This Crochet Butterfly Basket – Free Pattern tutorial includes all the details you need, from materials to finishing touches.
You will learn essential crochet techniques while working on a project that is both fun and rewarding. Let’s dive into this creative journey together and make a stunning butterfly basket!
1. Materials and Tools Needed
To start your Crochet Butterfly Basket – Free Pattern, gather the following materials:
- Yarn Selection: Choose a soft and sturdy yarn, preferably cotton or acrylic, for durability and structure.
- Crochet Hook: The recommended hook size is typically mentioned in the pattern, but a 4.5mm or 5mm hook is commonly used.
- Scissors and Tapestry Needle: These will help in finishing off your work and weaving in the ends neatly.
- Stitch Markers: Useful for keeping track of stitches and ensuring consistency.
- Optional Embellishments: Beads, ribbons, or buttons can enhance the butterfly effect.
Having the right materials ensures your project turns out as expected. Make sure to check your gauge before starting to avoid sizing issues. Proper preparation leads to a smoother crocheting experience and a beautiful final result.
Using high-quality yarn enhances durability and aesthetics. Acrylic yarn is budget-friendly and easy to care for, while cotton yarn offers a natural feel and excellent stitch definition. Choose a color that complements your décor or adds a pop of contrast.
2. Step-by-Step Crochet Instructions
Now that you have your materials ready, let’s start crocheting your Crochet Butterfly Basket – Free Pattern step by step.
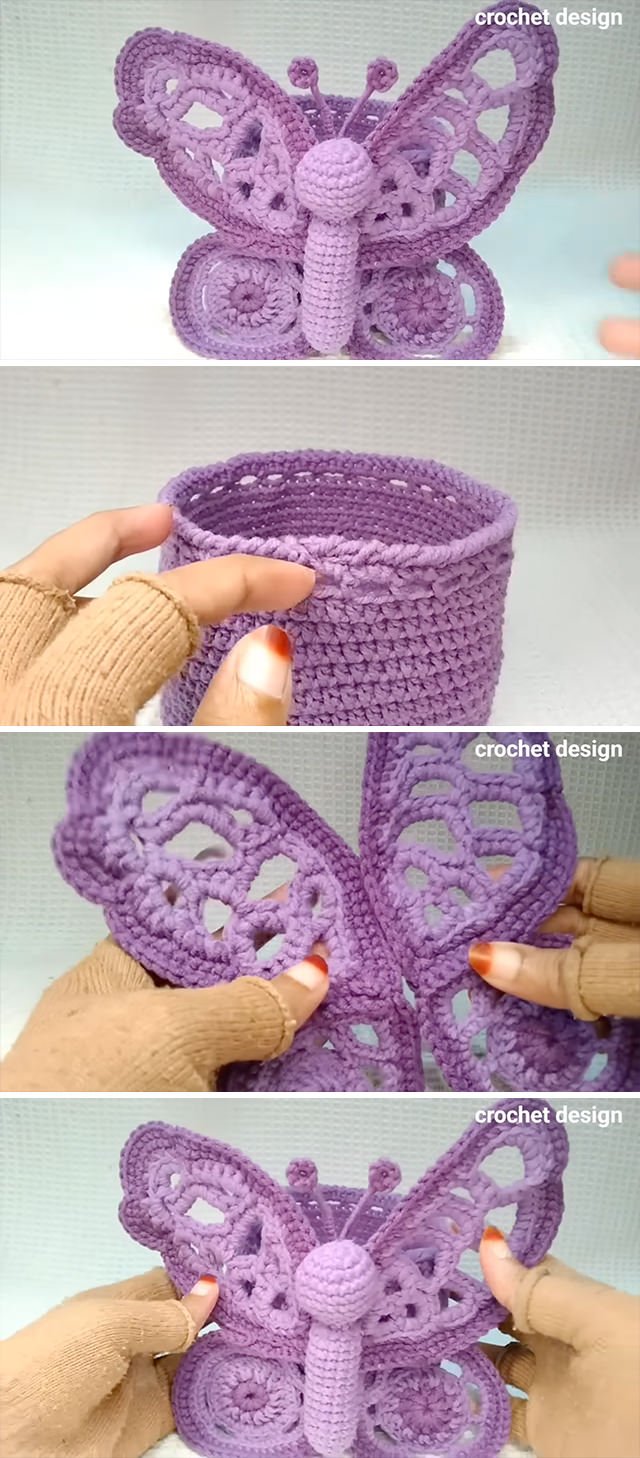
- Step 1: Create the Base: Begin with a magic ring or chain stitches to form the circular base of the basket. Work in rounds, increasing stitches evenly to achieve the desired size.
- Step 2: Build the Basket Walls: Once the base is complete, transition to single or double crochet stitches to create the walls. Adjust the height according to your preference.
- Step 3: Shape the Butterfly Details: Crochet small butterfly appliqués separately and attach them strategically to enhance the basket’s design.
- Step 4: Strengthen the Structure: To add stability, consider working a row of slip stitches or using a tighter stitch pattern.
- Step 5: Finishing Touches: Weave in all loose ends neatly and secure any embellishments if desired.
- Step 6: Block and Shape: Lightly block the basket to ensure proper shape retention and a polished finish.
Crocheting in the round requires maintaining an even tension. If you notice curling or uneven edges, adjust your stitch count or tension slightly. A well-shaped base ensures a sturdy basket that holds its form.
3. Customization and Variations
Personalizing your Crochet Butterfly Basket – Free Pattern makes it truly special. Here are some creative ideas:
- Color Combinations: Use gradient or variegated yarn for a vibrant effect.
- Size Adjustments: Increase or decrease the number of rounds to modify the basket’s dimensions.
- Different Butterfly Designs: Experiment with various butterfly motifs for a unique touch.
- Add a Handle: Attach a sturdy handle to make the basket more functional.
- Incorporate Lace Edging: A delicate lace border enhances the overall elegance.
- Use a Stiffener: Applying fabric stiffener can help maintain the basket’s shape.
Customization allows you to create a basket that matches your personal style or serves as a thoughtful handmade gift. Have fun exploring different designs and techniques!
4. Frequently Asked Questions (FAQ)
Q1: Is this pattern suitable for beginners? A: Yes! The Crochet Butterfly Basket – Free Pattern includes simple stitches and clear instructions, making it ideal for beginners.
Q2: What type of yarn is best for this project? A: Cotton yarn is recommended for its durability and stitch definition, but acrylic yarn can also work well.
Q3: How can I make my basket sturdier? A: Using a tighter stitch, adding an extra layer of yarn, or applying a fabric stiffener can help reinforce the structure.
Q4: Can I sell items made from this pattern? A: Most free patterns allow personal use and small-scale selling, but always check the pattern’s copyright terms.
Q5: How do I attach the butterfly appliqué securely? A: Use a tapestry needle and yarn to sew the appliqué onto the basket firmly, ensuring it stays in place.
Join our VIP broadcast list and gain access to exclusive patterns, all for free. As a VIP member, you’ll receive the best patterns daily, delivered directly to your device. ✨📱 It’s a unique opportunity to stay up-to-date with the latest trends and designs, curated just for you. Don’t miss out on enhancing your projects and discovering new inspirations with the best patterns every day! 🎨🔝
Conclusion
The Crochet Butterfly Basket – Free Pattern is a delightful and practical project that combines creativity with functionality. This tutorial has guided you through the entire process, from selecting materials to adding final touches. Whether you are making it for yourself or as a gift, this basket is a wonderful addition to any crochet collection.
Have you tried making this basket? Share your experience and suggestions in the comments! Your feedback helps improve future patterns and tutorials. Happy crocheting!