
Sewing with hexagons can be a fun and creative experience, but many quilters find Y seams challenging.
If you’ve been hesitant to try them, this guide on Easy Y Seams for 3D Hexagons – PATTERN will walk you through the process in a simple and approachable way. Mastering Y seams opens the door to stunning quilting designs with depth and dimension.
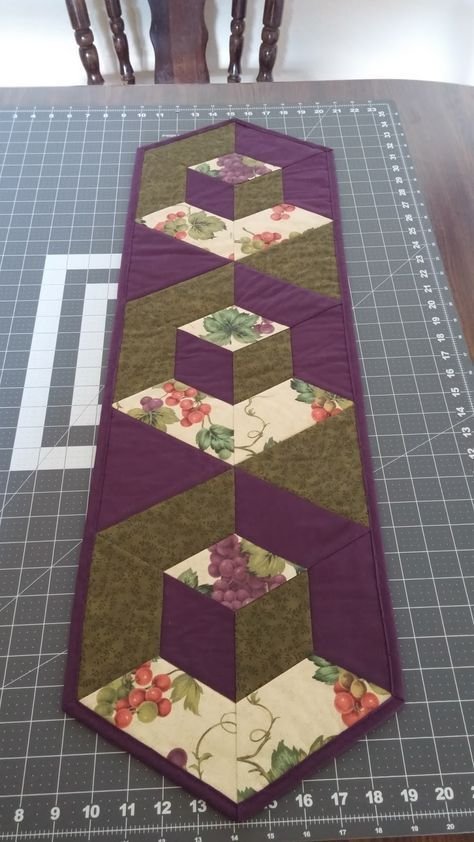
Hexagonal quilts create visually striking patterns that stand out from traditional square or rectangular blocks. However, their unique shape requires a different sewing technique.
The Y seam method helps connect hexagons seamlessly, preventing puckering and ensuring a professional finish.
In this tutorial, you’ll learn how to make Easy Y Seams for 3D Hexagons – PATTERN, including step-by-step instructions, tips to improve accuracy, and common mistakes to avoid. Let’s dive into the process and make your quilting projects even more exciting!
1. Understanding Y Seams and Their Importance
Y seams are essential when sewing hexagonal or diamond-shaped pieces together. Unlike traditional straight seams, Y seams require a precise approach to ensure smooth transitions between fabric pieces.
- Y seams occur when three fabric edges meet at a single point. Unlike straight seams, they require pivoting and careful stitching.
- Mastering Y seams allows quilters to create intricate patterns like tumbling blocks, 3D cubes, and honeycomb layouts.
- Without proper technique, Y seams can result in puckered or misaligned fabric, which affects the overall quilt appearance.
- Sewing with Y seams is easier when using lightweight fabric and proper seam allowances.
- Precision is key—marking seam allowances before sewing ensures accuracy.
- Learning to sew Y seams opens the door to advanced quilting techniques and patterns that bring depth to your projects.
2. Tools and Materials for 3D Hexagon Patterns
Before getting started, having the right tools and materials will make the process smoother and more enjoyable.
- Fabric: Choose high-quality quilting cotton for a clean and professional finish.
- Rotary cutter and mat: Precision cutting is essential for aligning hexagons correctly.
- Quilting ruler: Helps measure and cut hexagons with accurate seam allowances.
- Sewing machine: A machine with adjustable stitch length and needle position is helpful.
- Fabric markers or chalk: Marking seam allowances ensures precise stitching.
- Pins or clips: Secure pieces in place before sewing to avoid misalignment.
- Iron and pressing board: Pressing seams between steps improves accuracy and overall quilt appearance.
3. Step-by-Step Guide to Sewing Easy Y Seams
Now that you have the necessary tools and materials, let’s go through the step-by-step process to create Easy Y Seams for 3D Hexagons – PATTERN.
- Step 1: Cut your hexagons – Use a rotary cutter and ruler to cut fabric pieces precisely.
- Step 2: Mark seam allowances – Use fabric chalk to mark the quarter-inch seam allowance on each piece.
- Step 3: Sew the first seam – Stitch two hexagons together, stopping precisely at the marked seam allowance.
- Step 4: Pivot the fabric – Align the third hexagon and carefully adjust the fabric to form a Y seam.
- Step 5: Sew the second seam – Stitch along the marked line, pivoting at the intersection point.
- Step 6: Press the seams open – Use an iron to flatten the seams, reducing bulk and ensuring a smooth finish.
4. Troubleshooting Common Y Seam Mistakes
Even with careful preparation, mistakes can happen. Here are common Y seam issues and how to fix them.
- Puckering at the seam intersection – This happens when fabric is not pivoted correctly. Always stop stitching at the exact seam allowance mark.
- Gaps between seams – If there are gaps, double-check your stitching and ensure you are stopping and starting precisely at the marked points.
- Misaligned hexagons – Cutting inaccuracies can cause misalignment. Always use a quilting ruler and rotary cutter for clean cuts.
- Fabric stretching – Using lightweight cotton prevents stretching. Also, avoid pulling the fabric while sewing.
- Bulky seams – Pressing seams open or to the side based on quilt design can minimize bulk.
- Skipping pinning – Skipping this step can cause shifting. Use pins or clips to hold fabric in place before sewing.
FAQ: Easy Y Seams for 3D Hexagons – PATTERN
1. What is a Y seam in quilting?
A Y seam occurs when three pieces of fabric meet at a single intersection, requiring pivoting instead of straight-line stitching.
2. Do I need a special sewing machine to sew Y seams?
No, any standard sewing machine can sew Y seams. Using an adjustable stitch length can help improve accuracy.
3. How can I prevent puckering in Y seams?
Puckering can be avoided by stopping at the seam allowance mark and pivoting the fabric correctly before stitching the next seam.
4. What are the best fabrics for sewing Y seams?
Lightweight quilting cotton works best, as it prevents stretching and allows for precise sewing.
5. Can I hand-sew Y seams instead of using a machine?
Yes! Hand-sewing can provide better control, especially for intricate patterns. Using small stitches ensures durability.
6. How do I press Y seams?
Press seams open or to one side based on the quilt’s design. Using an iron reduces bulk and gives a polished finish.
Join our VIP broadcast list and gain access to exclusive patterns, all for free. As a VIP member, you’ll receive the best patterns daily, delivered directly to your device. ✨📱 It’s a unique opportunity to stay up-to-date with the latest trends and designs, curated just for you. Don’t miss out on enhancing your projects and discovering new inspirations with the best patterns every day! 🎨🔝
Conclusion
Learning Easy Y Seams for 3D Hexagons – PATTERN is a valuable skill that enhances your quilting projects. With the right tools, techniques, and a bit of practice, Y seams become much easier to master. By following the step-by-step guide and troubleshooting common mistakes, you can create beautiful and professional-looking quilts with hexagons.
Now it’s your turn! Have you tried sewing Y seams before? Share your experience, tips, or suggestions in the comments. Happy quilting!