
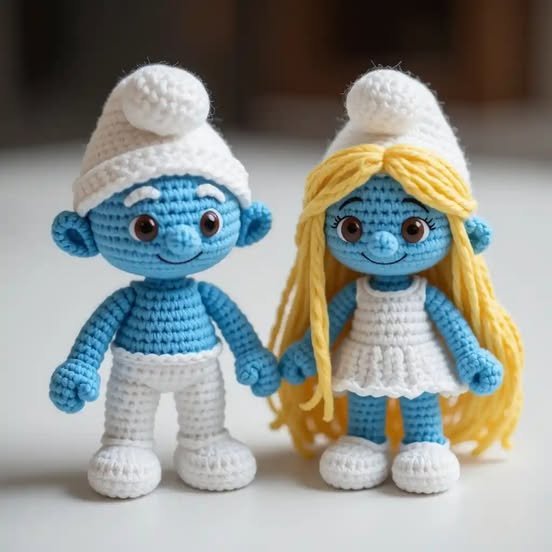
Creating adorable amigurumi dolls is a fun and rewarding crochet project. If you love soft, huggable toys, this Free Amigurumi Pattern will guide you through making a charming blue doll with whimsical details.
Whether you’re a beginner or an experienced crocheter, this pattern will help you craft a unique piece to gift or keep as part of your collection.
The beauty of amigurumi lies in its endless possibilities. By using different yarns and accessories, you can personalize your blue doll with unique features.
This tutorial covers everything from basic stitches to assembling the final piece, ensuring a smooth and enjoyable crochet experience.
If you’ve never tried making an amigurumi doll before, don’t worry! This guide is structured step-by-step to help you follow along easily. Gather your crochet hook, yarn, and stuffing, and let’s get started on this Free Amigurumi Pattern for a charming blue doll!
1. Materials and Tools Needed
Before diving into the crochet process, ensure you have all the necessary materials to bring your blue doll to life.
- Yarn Choice: Soft cotton or acrylic yarn in shades of blue, white, and optional accent colors.
- Hook Size: A 2.5mm or 3mm crochet hook for tight stitches.
- Stuffing: Polyester fiberfill to give your doll a soft and huggable texture.
- Stitch Markers: Helps in tracking rounds.
- Safety Eyes: Recommended for a professional look, or embroidery for child-safe options.
- Tapestry Needle: For sewing parts together and weaving in ends.
- Scissors: For trimming excess yarn.
Having high-quality materials will enhance the durability and overall appearance of your amigurumi doll. Always choose soft and hypoallergenic stuffing if gifting the toy to children.
2. Step-by-Step Crochet Instructions
Now that you have all the materials ready, let’s begin crocheting the different parts of your blue amigurumi doll.
- Creating the Head: Start with a magic ring and work in continuous rounds to form a smooth, rounded head. Increase stitches gradually to shape it properly.
- Body Formation: Using the same technique as the head, gradually shape the torso, ensuring a smooth transition in stitch size for a proportional look.
- Arms and Legs: Crochet these separately and stuff them lightly before attaching them to the body for a movable, flexible feel.
- Ears and Facial Features: Add small ears using simple rounds, and embroider a friendly smile or nose to enhance the doll’s character.
- Adding Accessories: You can customize with a tiny scarf, hat, or even a cute overall outfit to give your doll a personal touch.
- Final Assembly: Sew all the parts securely, making sure they are well-positioned for a balanced and adorable look.
Taking your time to shape each part correctly will ensure a polished final piece. Stuff each section evenly to avoid lumps and bumps.
3. Customizing Your Amigurumi Doll
One of the best parts about amigurumi is the freedom to customize and add personal flair to your creation.
- Changing Colors: Try different shades of blue or even mix pastels for a unique gradient effect.
- Hair and Hats: Add yarn hair or a crocheted hat to give your doll more personality.
- Facial Expressions: Experiment with different embroidery styles to create happy, sleepy, or surprised expressions.
- Outfits and Accessories: Design tiny shirts, dresses, or even a small bag for your doll to carry.
- Texture Variations: Use fluffy yarn for a softer feel or variegated yarn for an interesting multicolor effect.
- Safety Enhancements: If making this for a baby or toddler, replace safety eyes with embroidered ones to avoid choking hazards.
Experimenting with different features can make each doll truly one-of-a-kind. Whether making it for yourself or as a gift, these small details make a huge difference.
4. Care Tips and Maintenance
Handmade crochet toys require gentle care to maintain their quality and longevity. Here are some tips:
- Washing Instructions: Hand wash with mild detergent and let air dry to prevent yarn from stretching.
- Storage: Keep in a dry place away from direct sunlight to avoid fading.
- Repairing Loose Stitches: If a stitch comes undone, carefully use a tapestry needle to fix it before it unravels further.
- Preventing Pilling: Using high-quality yarn can help prevent pilling, but a fabric shaver can remove small fuzz balls over time.
- Safe for Children: Ensure all parts are securely attached to prevent small pieces from becoming a choking hazard.
- Refreshing the Stuffing: Over time, stuffing can flatten—gently fluff it up or add extra filling for a fresh look.
With proper care, your blue amigurumi doll will stay in excellent condition for years to come.
FAQ – Frequently Asked Questions
Q1: How long does it take to make an amigurumi doll?
A: Depending on skill level and pattern complexity, it can take between 5 to 10 hours.
Q2: Can I use different yarn types?
A: Yes! Cotton is great for structure, while acrylic offers a softer feel. Avoid fuzzy yarns if you’re a beginner.
Q3: How do I make my stitches tighter?
A: Use a smaller hook size than recommended for your yarn and maintain even tension while crocheting.
Q4: What if I don’t have safety eyes?
A: You can embroider the eyes using black thread or crochet small circles for a similar effect.
Q5: Can I sell amigurumi dolls made from this pattern?
A: Yes, as long as you credit the original designer if using a free pattern.
Join our VIP broadcast list and gain access to exclusive patterns, all for free. As a VIP member, you’ll receive the best patterns daily, delivered directly to your device. ✨📱 It’s a unique opportunity to stay up-to-date with the latest trends and designs, curated just for you. Don’t miss out on enhancing your projects and discovering new inspirations with the best patterns every day! 🎨🔝
Conclusion
Creating a Free Amigurumi Pattern for a cute blue doll is a fantastic way to explore your creativity and improve your crochet skills. From choosing the right materials to adding personal touches, this tutorial covered all the essential steps for making an adorable and unique crochet doll.
We hope you enjoyed this guide! Let us know in the comments your thoughts, experiences, or any suggestions for future patterns. Happy crocheting!