
The 3D Pinwheel Tutorial quilt is a delightful and dynamic quilting project that adds texture and movement to your quilt blocks. Unlike traditional flat pinwheel designs, the 3D version brings each pinwheel to life with a folded fabric technique that gives the illusion of spinning motion. Whether you’re a beginner looking to expand your skills or an experienced quilter seeking a new creative challenge, this pattern is a beautiful addition to your quilting repertoire.
In this article, we will walk you through a full 3D Pinwheel Tutorial quilt pattern, with easy-to-follow instructions, clear fabric cutting guidelines, and sewing tips. You’ll learn how to create perfect dimensional pinwheels that pop off the surface of your quilt, adding visual interest and a playful touch. The results are striking and can be used for baby quilts, wall hangings, or full-sized bed quilts.
This comprehensive guide includes everything from fabric selection to step-by-step assembly of the blocks. You’ll also find useful tricks for achieving accuracy, as well as inspiration for color combinations and quilt layout ideas. Follow along to master this stunning 3D Pinwheel Tutorial quilt pattern.
Choosing Fabrics and Cutting Instructions for the 3D Pinwheel Block
When starting your 3D Pinwheel Tutorial quilt, fabric selection is key. Choose two high-contrast fabrics for each pinwheel—one for the background and one for the folded triangle pieces. This contrast helps the 3D effect stand out. Solids and small prints work best for the folded triangles, while a neutral background keeps the focus on the dimensional design.
To create one 3D pinwheel block, you will need the following fabric cuts:
-
(4) 4½″ x 4½″ squares for the pinwheel triangles (choose a bold color or print)
-
(4) 4½″ x 4½″ squares for the background (neutral or light tone)
-
(1) 6″ x 6″ square of batting (optional if quilting as you go)
-
(1) 6½″ x 6½″ backing square (if assembling quilt-as-you-go blocks)
Cut all squares precisely using a rotary cutter and a quilting ruler. Precision is critical to ensure that the 3D pinwheel folds correctly and that your finished block lies flat.
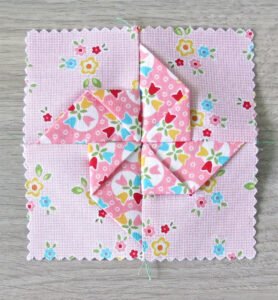
Once your fabric is cut, press all the squares to remove any wrinkles. Fold each of the four pinwheel triangle squares in half diagonally to create triangles. Press the fold sharply with an iron. These will become the 3D pinwheel blades.
Each block requires careful layering. First, place a background square right side up. Then, position one folded triangle on top, aligning the raw edges. Repeat with the remaining squares to form the pinwheel layout. The folded edges should all point toward the center.
Pin the layers carefully to hold everything in place. Take time with this step—it ensures your 3D Pinwheel Tutorial quilt blocks turn out clean and crisp. Now you’re ready to sew the pieces together!
Assembling the 3D Pinwheel Quilt Block
Now that your pieces are cut and folded, it’s time to sew your 3D Pinwheel Tutorial quilt block. This process involves assembling the pinwheel in quadrants, which gives you precision and control over the folds.
Begin by pairing one background square with one folded triangle. Layer them as explained in the previous section and sew along one side using a ¼″ seam. Repeat this for all four pairs. These will form the foundation of your pinwheel block.
Next, join two pairs together to make the top row, then the other two for the bottom row. Press the seams open or to one side depending on your preference. You’ll now have two rows that each contain half of the 3D pinwheel shape.
Join the two rows together, carefully matching the center point where all four folded triangles meet. Pin securely to ensure the pinwheel lines up. Sew across the center and press the block flat from the back, being careful not to crush the folded 3D edges.
Once the block is pressed, check the alignment of the pinwheel blades. If any look uneven, adjust gently by re-pressing or resewing that portion. Perfect alignment enhances the 3D effect and gives your 3D Pinwheel Tutorial quilt a professional finish.
If you’re doing a quilt-as-you-go method, now is the time to layer your backing and batting under the finished block. You can stitch around the perimeter or use decorative quilting stitches inside the block to secure the layers.
Repeat this entire process to make as many pinwheel blocks as needed for your quilt. Whether you’re making a table runner or a queen-sized quilt, consistent block construction is the secret to a cohesive and beautiful finished project.
Layout and Design Tips for the 3D Pinwheel Quilt
With your pinwheel blocks ready, it’s time to explore layout options for your 3D Pinwheel Tutorial quilt. One of the great advantages of this pattern is its versatility. You can keep it simple with rows and columns or get creative with diagonal layouts, alternating block directions for a swirling visual effect.
Start by laying out your blocks on a design wall or the floor. This lets you experiment with color placement and block orientation. Rotate some blocks to see how the pinwheels interact when facing different directions. The dimensional folds catch the light in unique ways depending on their position.
Consider sashing between the blocks if you want to give the pinwheels some breathing room. A solid sashing in a light or dark color can help each block stand out while creating structure across the quilt top.
Borders can also enhance your layout. Try a coordinating print border or a bold solid color that complements your pinwheel blades. This framing technique draws attention to the center design and gives your quilt a polished look.
If you’re making a baby quilt, a layout of 3 blocks by 4 blocks works well, resulting in a finished size of approximately 36″ x 48″ (depending on seam allowances and border width). For a throw-size quilt, aim for 5×6 blocks or more.
As you assemble the quilt top, sew the blocks together using ¼″ seams. Press rows in opposite directions to help seams nest neatly. This technique reduces bulk and helps the points match up where the blocks join.
Don’t rush the layout phase. Play with your design until you’re happy with the composition. The visual impact of a well-thought-out layout is what makes the 3D Pinwheel Tutorial quilt so memorable and eye-catching.
Quilting and Finishing Your 3D Pinwheel Quilt
Once your quilt top is assembled, the next step in the 3D Pinwheel Tutorial quilt is quilting. Because the pinwheel blades are dimensional, choose a quilting style that complements the texture rather than flattening it. Light quilting around the blocks and in the sashing is ideal.
Start by making your quilt sandwich: lay the backing fabric face down, then the batting, and finally your quilt top face up. Smooth all layers carefully and baste using pins or spray basting to hold everything in place.
When quilting, avoid stitching directly over the folded edges of the 3D pinwheels, as this will reduce their raised effect. Instead, outline around each block or use echo quilting to follow the shape of the pinwheel blades. This keeps the texture intact and enhances the illusion of movement.
A walking foot or free-motion quilting foot can help with more intricate designs. Try simple meandering stitches in the background, or a starburst pattern radiating from the center of each pinwheel for added drama.
Once quilting is complete, trim the edges of your quilt to square it up. Bind your quilt with double-fold binding in a coordinating fabric. A bold binding color can frame your design, while a neutral one lets the blocks shine.
Don’t forget a label! Add your name, date, and a special message to the back of your quilt. It’s a meaningful finishing touch, especially if you’re gifting the quilt to someone special.
Your 3D Pinwheel Tutorial quilt is now complete! Take time to admire your work, photograph it, and enjoy the satisfaction of completing such a vibrant, tactile project. Whether displayed on a wall or used daily, this quilt is sure to draw attention and compliments.
By following this detailed 3D Pinwheel Tutorial quilt, you can create a quilt that’s both fun to make and visually stunning. The 3D pinwheel technique adds an exciting twist to traditional quilting, and with precise cutting, careful piecing, and creative layout choices, your finished quilt will be a true work of art. Keep experimenting with fabrics and styles, and let your creativity spin just like those folded blades!