
If you’re a fan of cozy crafts and feline companions, making a Cat Quilt is the ideal way to blend both passions. A Cat Quilt is not just a beautiful home accessory, but also a heartwarming project that brings comfort and joy to anyone who loves cats. Whether you’re a seasoned quilter or just getting started, this tutorial will guide you through every step with clear instructions, fabric measurements, and creative ideas.
In this article, we’ll explore the charm of Cat Quilts, help you choose the best fabrics, guide you through assembling the quilt block by block, and provide a complete step-by-step pattern to create your own. With the right materials and a bit of patience, you’ll soon have a handmade treasure that celebrates your love for cats and quilting alike.
Let’s dive into the world of whiskers and patchwork and create a stunning Cat Quilt that will make you purr with pride. Get ready for a fun, fabric-filled journey into this adorable and rewarding quilting project.
Choosing the Perfect Fabric for Your Cat Quilt
The first step in creating your Cat Quilt is selecting the right fabrics. Since this project is meant to showcase the playful and charming nature of cats, you’ll want to choose prints and textures that reflect that theme.
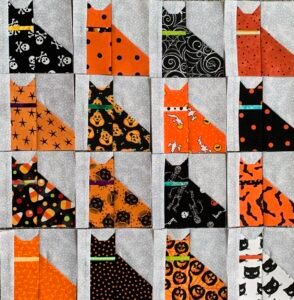
Look for fabrics with cat motifs, paw prints, fish bones, or even yarn balls. These designs will tie into your theme and make your Cat Quilt stand out. You can also mix in solids or geometric patterns to balance out the busier prints and give the quilt a modern look.
When it comes to color, choose a palette that suits your personal style or the room where the quilt will be used. Neutral backgrounds with pops of bright color can highlight the cat patterns, while pastels create a soft, cozy vibe. Don’t be afraid to mix textures like flannel and cotton for a warm, inviting touch.
You’ll need about:
-
¼ yard of six different cat-themed prints
-
½ yard of background fabric (solid or low-volume print)
-
½ yard of border fabric
-
½ yard for binding
-
1 yard for backing (or more depending on the size of your quilt)
-
Batting: crib size or custom to your measurements
Make sure to prewash your fabrics to prevent any shrinking or bleeding of colors after quilting. Iron them flat before you start cutting to ensure precise pieces.
With your materials in place, you’re ready to start crafting your adorable Cat Quilt. Having the right fabric is key to bringing personality and charm to each block.
Cutting Instructions and Layout
Precision is everything when it comes to quilting. Follow these exact cutting instructions to ensure your Cat Quilt pieces fit together seamlessly and result in a professional-looking finish.
For each Cat Quilt block, you’ll need to cut:
-
(1) 5” square for the cat’s head (print fabric)
-
(2) 2.5” x 5” rectangles for the ears (same print)
-
(2) 2.5” squares (background fabric)
-
(1) 2.5” x 5” rectangle for the neck (print)
-
(1) 5” x 7” rectangle for the body (print)
-
(2) 1.5” x 7” strips (background) for side borders
-
(2) 1.5” x 9” strips (background) for top and bottom borders
Start by laying out the pieces for one block. The cat’s head goes at the top center, with two triangles sewn to the top corners to form the ears. The neck and body follow below. Border strips go around the block to frame the cat.
Cut all the pieces for each block before beginning assembly. This ensures consistency and lets you chain piece sections, saving time. For a quilt with 9 cat blocks (3×3 layout), multiply the block cutting instructions by nine.
Make sure your rotary cutter is sharp, and use a quilting ruler to maintain clean, straight cuts. Label your pieces with sticky notes or clips to keep your blocks organized.
Once everything is cut and labeled, lay out all the blocks on a flat surface or design wall to visualize your Cat Quilt before you begin sewing.
Sewing Your Cat Quilt Blocks
Now it’s time to bring your Cat Quilt to life! Start by constructing one block to understand the process, then repeat for the rest.
Begin with the cat’s head. Sew a background square to each corner of the 5” head square using the “snowball” method (draw a diagonal line on the back of each small square, sew on the line, trim the excess, and press open). These will become the ears when attached to the head rectangle.
Attach the neck rectangle below the head. Align edges and press the seam downward. Then sew the body rectangle below the neck. Press seams as you go to keep everything flat and neat.
Add the side borders using the 1.5” x 7” strips. Sew one to each side and press open. Then attach the top and bottom borders using the 1.5” x 9” strips.
Repeat the process for all your blocks. Once finished, arrange the blocks into rows and sew them together. Press the seams of each row in opposite directions so the seams will nest when you join rows.
Join the rows to complete the quilt top. Once the blocks are all sewn together, you’ll have the full Cat Quilt top ready to be quilted.
At this stage, step back and admire your hard work. The quilt is starting to look like a celebration of your favorite furry friends!
Quilting, Binding, and Finishing Touches
Now that your Cat Quilt top is complete, it’s time to finish your quilt. This stage includes layering, quilting, binding, and labeling.
Start by making a quilt sandwich: lay your backing fabric right side down, place the batting on top, and then center your quilt top on the batting, right side up. Smooth out any wrinkles and baste the layers together using pins, spray adhesive, or basting stitches.
Quilt as desired. You can stitch in the ditch along the block seams or do a free-motion quilting pattern like loops, paws, or meandering lines. Choose a quilting method that complements the playful theme of the Cat Quilt.
Once the quilting is complete, trim the excess batting and backing. Next, prepare your binding by cutting 2.5” strips from the binding fabric. Sew the strips together end to end, fold in half lengthwise, and press.
Attach the binding to the front of the quilt using a ¼” seam. Fold it over to the back and hand-stitch or machine-stitch it in place. Make sure your corners are neat and square for a professional look.
Finally, add a label to the back of your Cat Quilt with your name, date, and a fun message like “Made with love for my favorite feline friend.” This adds a personal touch and marks your creative achievement.
With your Cat Quilt now bound and finished, it’s ready to be used, gifted, or displayed proudly!
FAQ: Cat Quilt
Q: What size is a typical Cat Quilt?
A: A common Cat Quilt made with 9 blocks measures approximately 36″ x 36″, perfect as a lap quilt or wall hanging.
Q: Can I use different cat prints for each block?
A: Absolutely! Using a variety of cat-themed fabrics adds charm and personality to each block.
Q: What type of batting works best?
A: A lightweight cotton or cotton-blend batting is ideal for a soft, cozy Cat Quilt.
Q: Can I make a larger quilt?
A: Yes! Simply add more blocks or increase the size of each block. You can also add borders to make it larger.
Q: How should I wash my Cat Quilt?
A: Wash on a gentle cycle in cold water and tumble dry low, or air dry to preserve fabric and stitching.
Q: Is this project beginner-friendly?
A: Definitely! The simple construction of the Cat Quilt blocks makes this an excellent project for beginners.
Creating a Cat Quilt is a delightful way to combine your love of sewing and furry friends. With its playful charm, easy-to-follow construction, and customizable design, it’s a project that brings joy at every step. Whether you’re making it for yourself, a loved one, or a fellow cat lover, the finished quilt will surely be cherished.
From selecting fabrics to finishing the last stitch on the binding, every part of making a Cat Quilt allows you to express creativity and affection for cats. Plus, it’s a perfect gift for anyone who adores cozy crafts and feline flair.
Ready to start your own Cat Quilt journey? Grab your favorite cat fabrics and sewing tools, follow the steps above, and create a quilt full of charm, comfort, and personality. Let us know how your quilt turns out or share pictures—we’d love to see your creative twist on this purr-fect pattern!