
is a creative and practical way to combine functionality with handmade charm, making it an increasingly popular project among craft lovers. Whether you are preparing a beautiful table setting for a special occasion or simply want to add a personal touch to your everyday meals, learning this technique can elevate your crochet skills while producing something truly useful. In this article, you will discover how to create your own crocheted cutlery holder step by step pattern with detailed explanations, helpful tips, and beginner-friendly guidance.
Creating a crocheted cutlery holder step by step pattern is not only about following instructions but also about understanding the logic behind stitches, textures, and design choices. Many crafters enjoy this project because it allows flexibility in color combinations, yarn types, and decorative elements. Additionally, this type of crochet project is quick to complete, making it ideal for gifts, seasonal decorations, or even small business ideas. By mastering this pattern, you open the door to endless customization possibilities.
Another important aspect of the crocheted cutlery holder step by step pattern is its accessibility. Even beginners can successfully complete this project with basic crochet knowledge such as chain stitches, single crochet, and slip stitches. As you progress through this guide, you will gain confidence and improve your technique, ensuring that your final piece looks polished and professional. Let’s dive into the details and explore everything you need to know.
Materials and Preparation for a Crocheted Cutlery Holder Step by Step Pattern
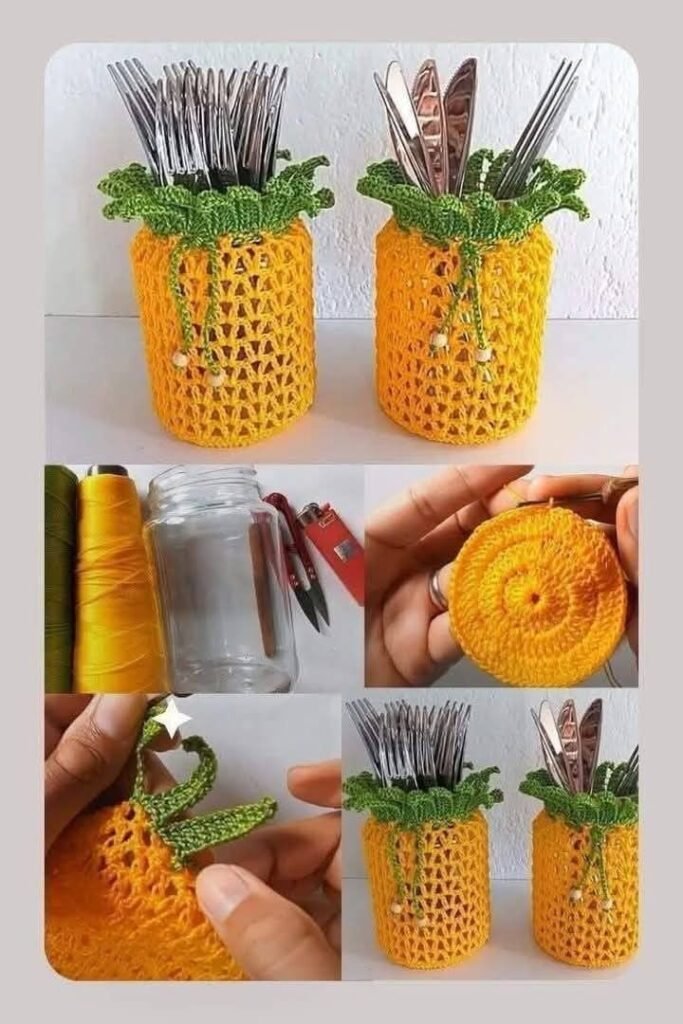
Before starting your crocheted cutlery holder step by step pattern, it is essential to gather all the necessary materials. The most commonly used items include cotton yarn, a crochet hook suitable for your yarn weight, scissors, and a yarn needle. Cotton yarn is highly recommended because it is durable, easy to wash, and maintains its shape well, which is important for functional items like cutlery holders.
Choosing the right yarn color is another important step in your crocheted cutlery holder step by step pattern. Neutral tones like beige, white, or gray are perfect for elegant table settings, while vibrant colors such as red, green, or yellow can bring a festive and cheerful look. You can also mix colors to create stripes or patterns that reflect your personal style.
The crochet hook size will affect the final texture of your crocheted cutlery holder step by step pattern. A smaller hook creates tighter stitches, resulting in a firmer structure, while a larger hook produces a softer and more flexible piece. It is important to test your tension before starting to ensure consistency throughout your project.
Preparing your workspace is often overlooked but plays a key role in the success of your crocheted cutlery holder step by step pattern. Make sure you have good lighting, a comfortable seating position, and all materials within reach. This will help you stay focused and enjoy the process without unnecessary interruptions.
Understanding basic stitches is crucial when working on a crocheted cutlery holder step by step pattern. If you are new to crochet, take some time to practice chain stitches, single crochet, and double crochet before starting. These foundational skills will make the process smoother and more enjoyable.
Finally, setting a clear goal for your project can make a big difference. Decide how many holders you want to create and for what purpose. Whether it’s for daily use, a party, or as a handmade gift, having a vision will keep you motivated throughout your crocheted cutlery holder step by step pattern journey.
Step by Step Instructions for Crocheted Cutlery Holder
To begin your crocheted cutlery holder step by step pattern, start by making a foundation chain. The length of this chain will determine the width of your holder, so consider the size of your cutlery set before proceeding. Typically, a chain of 15 to 20 stitches works well for standard utensils.
Once your foundation chain is ready, work a row of single crochet stitches across the chain. This creates a solid base for your crocheted cutlery holder step by step pattern. Make sure to maintain even tension to ensure a neat and uniform appearance.
Continue building your piece by adding rows of stitches. You can use single crochet for a tighter texture or double crochet for a more open design. The choice depends on your desired look and functionality for the crocheted cutlery holder step by step pattern.
As you progress, keep checking the size of your work. Fold the piece to see if it can comfortably hold your cutlery. This step is essential in ensuring that your crocheted cutlery holder step by step pattern is both practical and visually appealing.
Once you reach the desired height, it’s time to shape your holder. Fold the bottom part upward to create a pocket and secure the sides using slip stitches or sewing with a yarn needle. This forms the basic structure of your crocheted cutlery holder step by step pattern.
To finish, fasten off the yarn and weave in any loose ends. At this stage, your crocheted cutlery holder step by step pattern is complete, but you can further enhance it with decorative details if desired.
Creative Variations and Design Ideas
One of the most exciting aspects of the crocheted cutlery holder step by step pattern is the opportunity for creativity. You can experiment with different stitch patterns such as shell stitches or bobble stitches to add texture and visual interest.
Adding embellishments is another way to personalize your crocheted cutlery holder step by step pattern. Consider attaching buttons, ribbons, or small crochet flowers to make your piece stand out. These details can transform a simple holder into a decorative centerpiece.
Seasonal themes are also a great idea. For example, use red and green for Christmas, pastel colors for Easter, or bright tones for summer gatherings. This approach makes your crocheted cutlery holder step by step pattern versatile and suitable for various occasions.
You can also create themed sets by making multiple holders with matching designs. This is especially useful for events like weddings, birthdays, or family dinners, where a cohesive look enhances the overall presentation of your crocheted cutlery holder step by step pattern.
For those who enjoy sustainability, using leftover yarn is an excellent option. This not only reduces waste but also adds a unique and colorful touch to your crocheted cutlery holder step by step pattern.
Lastly, consider adding functional features such as loops or ties to secure the cutlery. These small additions can improve usability and make your crocheted cutlery holder step by step pattern even more practical.
Tips for Perfecting Your Crocheted Cutlery Holder
Consistency is key when working on a crocheted cutlery holder step by step pattern. Maintaining even tension throughout your stitches ensures a clean and professional finish. Practice regularly to improve your control and precision.
Pay attention to counting stitches in each row. Missing or adding stitches can alter the shape of your crocheted cutlery holder step by step pattern, leading to uneven edges or incorrect sizing.
Blocking your finished piece can significantly enhance its appearance. This process helps set the shape and smooth out any irregularities in your crocheted cutlery holder step by step pattern.
Using high-quality materials can make a noticeable difference. Durable yarn and the right hook size contribute to the longevity and overall look of your crocheted cutlery holder step by step pattern.
Don’t be afraid to undo and redo sections if necessary. Mistakes are part of the learning process, and correcting them will improve the final result of your crocheted cutlery holder step by step pattern.
Finally, practice patience and enjoy the journey. Crochet is a relaxing and rewarding craft, and each project helps you grow your skills while creating something meaningful.
FAQ about Crocheted Cutlery Holder Step by Step Pattern
What is the best yarn for a crocheted cutlery holder step by step pattern?
Cotton yarn is the best choice because it is durable, washable, and holds its shape well, making it ideal for everyday use.
Is the crocheted cutlery holder step by step pattern suitable for beginners?
Yes, this project is beginner-friendly and requires only basic crochet stitches such as chain, single crochet, and slip stitch.
How long does it take to complete a crocheted cutlery holder step by step pattern?
Most people can complete one holder in one to two hours, depending on their skill level and the complexity of the design.
Can I customize the size of my crocheted cutlery holder step by step pattern?
Absolutely, you can adjust the number of foundation chains and rows to fit different sizes of cutlery.
How do I clean a crocheted cutlery holder step by step pattern?
Hand washing with mild detergent and air drying is recommended to maintain the shape and quality of the yarn.
Can I sell items made from a crocheted cutlery holder step by step pattern?
Yes, handmade items like these are great for selling at craft fairs or online, as long as they are your own creations.
VIDEO TUTORIAL
In this article, you learned how to create a crocheted cutlery holder step by step pattern from start to finish, including materials, instructions, creative variations, and expert tips. This project is not only practical but also a wonderful way to express creativity and enhance your crochet skills. By following these steps, you can produce beautiful and functional pieces suitable for any occasion.
Now it’s your turn to try the crocheted cutlery holder step by step pattern and explore your own ideas. Share your honest opinion about this guide and feel free to suggest improvements or new ideas. Your feedback is valuable and helps make future content even better!