
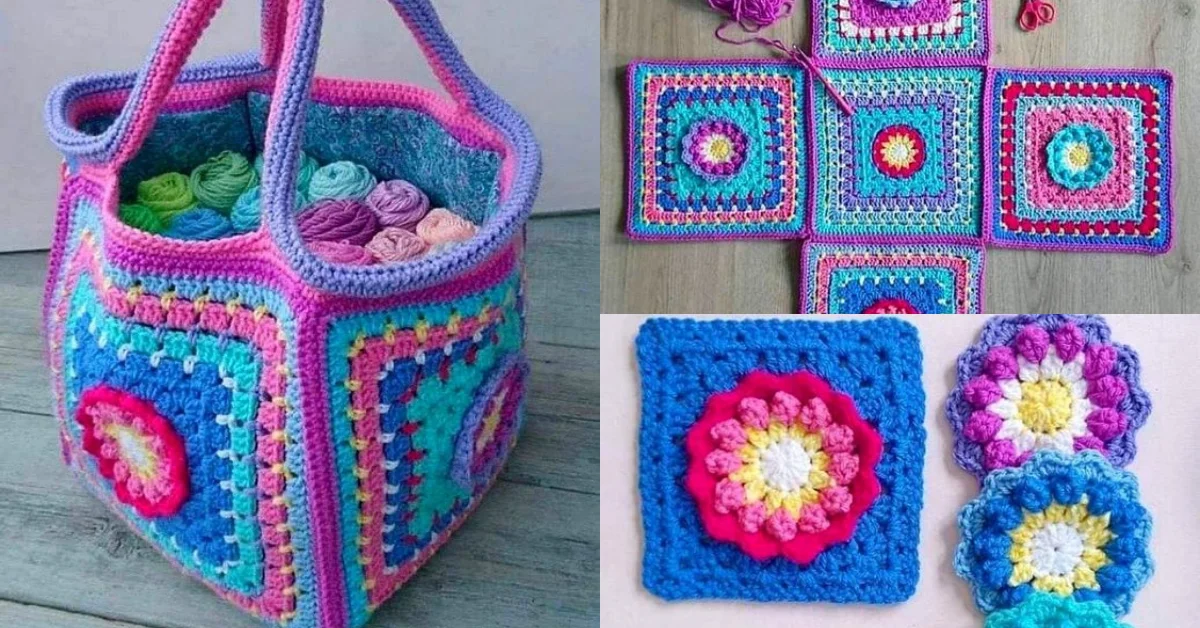
A bag made with squares of crochet flowers is a beautiful and unique handmade accessory that combines creativity and practicality. Whether you are a beginner or an experienced crocheter, this type of bag is an excellent project to showcase your skills.
The combination of floral motifs and square designs creates a visually appealing and customizable piece that can match any style.
Crochet flower squares are incredibly versatile. You can mix and match colors, use different yarn textures, and experiment with patterns to create a one-of-a-kind bag.
Handmade crochet bags are also eco-friendly alternatives to mass-produced accessories, allowing you to carry a piece of sustainable fashion wherever you go. Plus, they make wonderful gifts for loved ones who appreciate handcrafted items.
In this guide, we’ll walk you through everything you need to know about making a bag made with squares of crochet flowers.
From selecting materials to assembling the squares into a functional and stylish bag, this step-by-step tutorial will help you create a stunning crochet accessory. Let’s get started!
1. Materials Needed to Make a Bag with Squares of Crochet Flowers
Before you begin crocheting your bag, it’s essential to gather all the necessary materials. Having the right tools and yarn will ensure that your project turns out beautifully and lasts a long time.
Yarn Selection
Choose a durable yet soft yarn that is suitable for bags. Cotton yarn is a popular choice because it holds its shape well and provides a sturdy texture. You can also experiment with wool or blended fibers for a different look and feel.
Crochet Hook
The hook size depends on the yarn you choose. Most crochet flower squares work well with a hook size between 3.5mm and 5mm. Check your yarn label for recommended hook sizes.
Scissors and Tapestry Needle
A good pair of scissors is necessary for trimming excess yarn, and a tapestry needle will help weave in loose ends and sew the squares together.
Lining Fabric (Optional)
If you want your bag to have extra durability, consider adding a fabric lining. Choose a fabric that complements your crochet squares and provides additional support.
Straps or Handles
Depending on the style of your bag, you may need leather, fabric, or crocheted straps. Handles can be store-bought or handmade, depending on your preference.
Buttons, Zippers, or Magnetic Snaps
To secure the bag’s opening, you might want to add a closure mechanism such as buttons, a zipper, or a magnetic snap.
2. How to Crochet Flower Squares for Your Bag
The foundation of a bag made with squares of crochet flowers is the individual crochet squares. These squares are typically made using floral motifs that are joined together to form the bag.
Step 1: Choose a Crochet Flower Square Pattern
There are various crochet flower square patterns available online and in crochet books. Some common types include the granny square flower, African flower motif, and 3D crochet flowers. Pick a pattern that fits your desired aesthetic.
Step 2: Create the Flower Center
Begin by crocheting the center of the flower. Most designs start with a magic ring or a small circle, followed by petal stitches to create a blooming effect. Use contrasting colors for a vibrant look.
Step 3: Form the Square Around the Flower
Once your flower is complete, transform it into a square by adding rows of crochet stitches around it. This ensures that the square can be easily joined to other pieces.
Step 4: Repeat to Make Multiple Squares
Depending on the size of your bag, you will need multiple squares. A small handbag may require 8-10 squares, while a larger tote bag may need 16 or more.
Step 5: Block Your Squares
To ensure uniformity, block your crochet squares by pinning them to a foam board and lightly steaming or spraying them with water. This will help maintain their shape.
Step 6: Arrange Your Squares
Lay out your squares to decide the arrangement. You can create a symmetrical pattern or mix and match different colors for a patchwork effect.
3. Assembling the Crochet Flower Squares into a Bag
Once you have all your crochet squares ready, the next step is assembling them into a functional bag. This part requires careful stitching to ensure durability and a neat finish.
Step 1: Join the Squares
Use a slip stitch, whip stitch, or single crochet to join the squares together. Sew them side by side to create the main body of the bag. You can either join them with matching yarn for a seamless look or use a contrasting color for decorative seams.
Step 2: Shape the Bag
Fold the joined squares into the desired shape of your bag. A tote-style bag will have a rectangular shape, while a drawstring bag may require a different assembly.
Step 3: Sew the Bottom and Sides
After shaping the bag, stitch the bottom and side edges securely. Reinforce the seams to prevent stretching over time.
Step 4: Attach the Handles
Secure the bag handles or straps to the top of your bag using strong stitches. If using pre-made handles, sew them onto the crochet fabric carefully.
Step 5: Add Lining (Optional)
For extra durability, sew a fabric lining inside the bag. Attach it by hand or with a sewing machine, ensuring it fits snugly inside.
Step 6: Add Closures or Decorative Elements
If you want to add buttons, zippers, or other decorative elements, sew them securely to enhance both function and design.
4. Styling and Caring for Your Crochet Flower Bag
After completing your bag made with squares of crochet flowers, it’s important to maintain its beauty and structure over time.
Tip 1: Hand Wash Only
To prevent stretching or damaging the crochet stitches, always wash your bag by hand using mild detergent. Avoid machine washing unless the yarn label specifies otherwise.
Tip 2: Store Properly
Keep your crochet bag in a cool, dry place to prevent mold or mildew. Avoid hanging it on hooks for long periods to maintain its shape.
Tip 3: Reinforce Handles if Needed
If the handles start to loosen over time, reinforce them with additional stitches or replace them with stronger materials.
Tip 4: Refresh with Light Blocking
If your bag loses its shape, lightly block it again by pinning it to a board and steaming it.
Tip 5: Use Fabric Protector Spray
To prevent stains, consider spraying your bag with a fabric protector that repels dirt and moisture.
Tip 6: Rotate Your Bags
To extend the life of your crochet bag, rotate it with other bags in your collection.
FAQ: Common Questions About Bags Made with Crochet Flower Squares
1. How long does it take to make a crochet flower bag?
It depends on your skill level and the complexity of the pattern, but typically, a crochet bag takes 2-5 days to complete.
2. Can I make a crochet flower bag with different square sizes?
Yes! You can mix different-sized squares to create a unique, patchwork-style bag.
3. What type of yarn is best for crochet bags?
Cotton yarn is highly recommended for durability and structure.
4. Can I add a zipper to my crochet bag?
Yes, a zipper can be sewn into the lining or directly onto the crochet fabric for added security.
5. Can I sell crochet bags I make?
Absolutely! Handmade crochet bags are popular and sell well in craft fairs and online marketplaces.
Join our VIP broadcast list and gain access to exclusive patterns, all for free. As a VIP member, you’ll receive the best patterns daily, delivered directly to your device. ✨📱 It’s a unique opportunity to stay up-to-date with the latest trends and designs, curated just for you. Don’t miss out on enhancing your projects and discovering new inspirations with the best patterns every day! 🎨🔝
Conclusion
Making a bag with squares of crochet flowers is a fun and rewarding project. With the right materials, techniques, and a bit of creativity, you can craft a stylish and functional bag that showcases your love for crochet.
If you try this pattern, let us know your thoughts in the comments! Happy crocheting!
