
Crochet a Spiral Tutorial is one of the most satisfying and visually captivating techniques you can learn as a crocheter. Whether you are just starting your crochet journey or already have experience with different stitch patterns, mastering the spiral technique can open up a world of creative possibilities. From amigurumi toys to decorative coasters, bags, hats, and artistic home décor, spiral crochet adds movement and texture that instantly elevates any handmade piece. In this comprehensive guide, you will learn everything you need to know about creating a smooth, continuous spiral in crochet while keeping your projects neat and professional-looking.
When following a Crochet a Spiral Tutorial, the key difference from traditional circular crochet becomes immediately clear. Instead of closing each round with a slip stitch and starting a new round, you work continuously in a circular motion without joining. This creates a seamless spiral effect that eliminates visible round lines. The result is a fluid, modern design that looks especially beautiful in multi-colored yarns or gradient transitions. Understanding this fundamental concept is the first step toward mastering the technique.
Many beginners feel intimidated by spiral crochet at first, but the truth is that it relies on basic stitches like single crochet and simple increases. The real skill lies in tracking your rounds and maintaining consistent tension. By practicing the principles explained in this Crochet a Spiral Tutorial, you will gain confidence, precision, and a deeper understanding of stitch structure. Let’s explore the essential techniques and step-by-step instructions that will help you create flawless crochet spirals.
Understanding the Basics of Crochet a Spiral Tutorial
Before diving deeper into this Crochet a Spiral Tutorial, it’s important to understand what spiral crochet actually means. Unlike traditional circular crochet, spiral crochet does not have a visible beginning or end to each round. Instead, the stitches flow continuously upward in a helix-like shape. This makes it ideal for projects that require smooth edges, such as stuffed toys or cylindrical shapes.
To begin a spiral, you typically start with a magic ring or a chain-two method. The magic ring is especially popular because it allows you to tighten the center completely, avoiding any holes. After creating your starting circle, you work your stitches into the ring without joining at the end of the round. This continuous motion is the foundation of any Crochet a Spiral Tutorial.
One of the most important tools for spiral crochet is a stitch marker. Because you won’t be joining rounds, it can become difficult to identify where each round begins. Placing a marker in the first stitch of each round helps you track your progress and ensures accurate stitch counts.
Maintaining consistent tension is another crucial factor. Spiral crochet highlights uneven stitches more than traditional joined rounds. Try to keep your grip relaxed and uniform throughout your project to achieve a smooth and even surface.
Increases are used to shape your spiral. For flat circles, you increase evenly in each round to prevent curling. For three-dimensional shapes, such as amigurumi, increases and decreases are carefully calculated to form curves and contours.
Finally, patience is key. When following a Crochet a Spiral Tutorial, take your time counting stitches and checking your work. Small mistakes can shift the spiral pattern, but careful attention ensures professional results.
Step-by-Step Guide to Creating a Perfect Crochet Spiral
To start your spiral project, create a magic ring and work six single crochet stitches into it. Do not join with a slip stitch. Instead, place a stitch marker in the first stitch and continue crocheting directly into the first stitch of the previous round. This technique defines the structure of the Crochet a Spiral Tutorial.
In the second round, work two single crochet stitches into each stitch around. This will double your stitch count and begin forming a flat circle. Remember to move your stitch marker to the first stitch of each new round as you progress.
For the third round, follow a simple increase pattern: one single crochet in the first stitch, two single crochet stitches in the next stitch, and repeat around. This gradual increase keeps the circle flat and maintains the spiral effect.
As you continue, increase evenly in each round. A general rule for flat circles is to add six stitches per round. This mathematical consistency prevents ruffling or cupping, ensuring your spiral remains smooth and balanced.
If you want to create a three-dimensional shape, stop increasing once your base reaches the desired size. Continue working one stitch in each stitch around without increasing. This causes the piece to naturally curve upward, forming a tube-like structure.
Throughout the process, always count your stitches at the end of each round. Consistency is essential in any Crochet a Spiral Tutorial, and accurate stitch counts guarantee a clean and symmetrical finish.
Common Mistakes and How to Avoid Them
One common mistake in a Crochet a Spiral Tutorial is losing track of the beginning of the round. Without a stitch marker, it becomes nearly impossible to maintain consistent shaping. Always use a reliable marker and reposition it as needed.
Another frequent issue is uneven tension. If some stitches are tighter than others, the spiral may appear distorted. Practice maintaining a steady hand position and avoid pulling the yarn too tightly after each stitch.
Many crocheters accidentally add or skip stitches. This disrupts the increase pattern and affects the overall symmetry of the spiral. Counting your stitches at the end of every round can prevent this problem.
Curling edges are another challenge. If your circle begins to cup unintentionally, you may not be increasing enough. On the other hand, if it ruffles, you might be increasing too frequently. Adjust your pattern gradually to correct the issue.
Using the wrong hook size for your yarn can also impact your results. Always check the recommended hook size on your yarn label and adjust if necessary to achieve the desired tension and texture.
Finally, rushing through the project often leads to mistakes. A successful Crochet a Spiral Tutorial requires patience and attention to detail. Slow, mindful stitching produces the best outcome.
Creative Projects Using the Crochet Spiral Technique
Once you master the Crochet a Spiral Tutorial, you can apply the technique to countless creative projects. Amigurumi is one of the most popular applications. The seamless spiral structure is perfect for creating smooth, stuffed shapes without visible joins.
Spiral crochet is also ideal for making hats. The continuous rounds create a polished look, especially when using gradient or variegated yarn. The spiral effect naturally enhances color transitions, giving your hat a dynamic appearance.
Coasters and placemats are another excellent project idea. By adjusting your increase pattern, you can create perfectly flat circles that add a modern touch to your home décor.
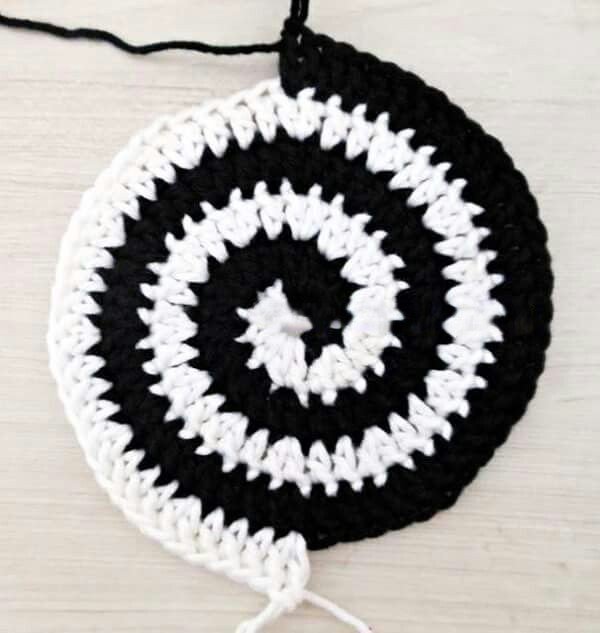
You can experiment with multi-colored spirals by changing yarn colors without joining rounds. This technique produces a striking candy-stripe effect that stands out in bags, baskets, and decorative items.
Blankets can also incorporate spiral motifs. Large spiral squares or circular designs can be joined together to create unique statement pieces that showcase your crochet skills.
Finally, decorative wall art is a creative way to showcase your spiral mastery. Combining different yarn textures and colors allows you to transform a simple Crochet a Spiral Tutorial into a stunning handmade artwork.
FAQ About Crochet a Spiral Tutorial
What is the difference between spiral crochet and joined rounds?
Spiral crochet works continuously without closing each round, while joined rounds use a slip stitch to connect the last stitch to the first stitch of each round.
Do I need special tools for a Crochet a Spiral Tutorial?
You only need basic crochet supplies, but a stitch marker is highly recommended to track your rounds accurately.
Why is my spiral circle curling?
Curling usually happens when there are not enough increases. Try adding increases evenly in the next round to flatten the piece.
Can beginners follow a Crochet a Spiral Tutorial?
Yes, beginners can easily learn spiral crochet since it mainly uses basic stitches like single crochet and simple increases.
How do I change colors in spiral crochet?
You can change colors at the end of a stitch by pulling through the new yarn color before completing the final loop, continuing the spiral seamlessly.
Is spiral crochet suitable for large projects?
Absolutely. Spiral techniques can be used in blankets, rugs, bags, and many other large-scale projects.
Conclusion
In this detailed Crochet a Spiral Tutorial, you have learned how to create seamless, continuous rounds that form a beautiful spiral effect. We explored the basics of spiral crochet, step-by-step instructions, common mistakes to avoid, and creative project ideas to inspire your next creation. By understanding stitch markers, consistent tension, proper increases, and accurate counting, you can confidently produce smooth and professional-looking crochet spirals.
Now that you have a complete guide to mastering the spiral technique, it’s time to practice and experiment with your own designs. Your creativity is the only limit. If you found this article helpful, please share your honest opinion and leave your suggestions. Your feedback helps improve future tutorials and inspires more crochet enthusiasts to explore the art of spiral crochet.