
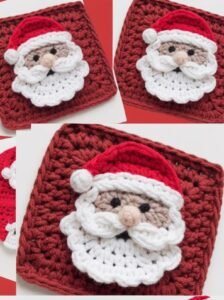
Creating a festive home during the holidays is a joy, especially when you can add handmade charm with your crochet projects. The Crochet Christmas Santa Granny Square is the perfect addition to your seasonal decorations. This adorable square combines the classic granny square technique with the cheerful face of Santa Claus, making it ideal for Christmas blankets, pillows, buntings, or even holiday sweaters. Whether you are a beginner or a seasoned crocheter, this project brings the spirit of Christmas right into your yarn.
In this tutorial, we’ll guide you through the full process of making a Crochet Christmas Santa Granny Square, from gathering your materials to completing the final stitches. Along the way, you’ll learn how to combine colors, shape facial features, and connect squares to create a cohesive festive piece. This pattern uses basic crochet stitches and is beginner-friendly, but offers plenty of opportunity for creative expression with colors and textures.
If you’re planning a handmade holiday or looking for a thoughtful gift idea, the Crochet Christmas Santa Granny Square is a wonderful project to add to your list. With just a few yarn scraps and some festive spirit, you can transform a simple square into a merry Santa motif that everyone will love. Now, let’s get started!
Materials and Fabric Cuts for the Crochet Christmas Santa Granny Square
Before diving into the pattern, it’s essential to gather all the necessary supplies. The right yarn and hook size will ensure your Crochet Christmas Santa Granny Square looks neat and festive. This project uses worsted weight yarn for a cozy, durable feel and vibrant color contrast.
Choose a medium-weight (worsted) acrylic or cotton yarn in the following colors: Red, White, Beige or Skin Tone, Black, and Pink (optional for cheeks). These colors bring Santa’s classic look to life and offer bold contrast. Be sure to have scissors, a tapestry needle for weaving in ends, and stitch markers if needed.
For the base square, you’ll be working in rounds, so you don’t need fabric cuts as in traditional quilting, but if you’re planning to sew or attach these squares onto fabric panels or quilts, cut cotton squares of 6.5″ x 6.5″ to match each completed granny square for backing purposes.
Use a 5.0 mm (H-8) crochet hook for a standard size square. Adjust your hook size if your tension is tight or loose. The finished Crochet Christmas Santa Granny Square should measure approximately 6″ x 6″ depending on your gauge and yarn choice.
This project is ideal for leftover yarn, making it eco-friendly and cost-effective. If you’re making multiple squares for a blanket or larger piece, consider purchasing 50g skeins of each color for consistency. Each square requires only small amounts of color.
Have your stitch guide handy: magic ring, chain (ch), slip stitch (sl st), single crochet (sc), half double crochet (hdc), and double crochet (dc) are the primary stitches used. A stitch counter or notebook can help track your progress if making multiples.
Now that your materials are ready and measured, you’re all set to begin crafting your festive Crochet Christmas Santa Granny Square.
Step-by-Step Instructions: How to Crochet the Santa Granny Square
This easy-to-follow pattern breaks the process into clear steps. Each part of the Crochet Christmas Santa Granny Square is made in rounds, beginning with Santa’s face and building outward with his hat and beard. Let’s begin with the magic ring.
Step 1: Santa’s Face (Beige Yarn)
Start with a magic ring, then chain 2 (does not count as stitch). Work 12 double crochets (dc) into the ring. Join with a slip stitch to the top of the first dc. Fasten off. This is the base of Santa’s face.
Step 2: Santa’s Hat (Red Yarn)
Attach red yarn in any stitch. Chain 2, then make 2 dc in the same stitch. In the next 5 stitches, make 2 dc each. In the last 6 stitches, work 1 dc in each. Join with a slip stitch. This forms the top portion of Santa’s hat.
Step 3: Santa’s Beard and Trim (White Yarn)
Attach white yarn to the first unworked stitch from round 1. Chain 1, work 1 sc in next 3 stitches, 1 hdc in next 3 stitches, 1 dc in next 3, and 1 sc in final 3 stitches. This creates the fluffy beard texture around the face.
Step 4: Eyes and Nose (Black and Pink/Beige Yarn)
Using black yarn, embroider or crochet two small French knots for the eyes. For the nose, use pink or beige yarn and create a small bobble stitch or embroider an oval shape at the center of the face.
Step 5: Square Formation (Red Yarn)
Now begin squaring off the circle to form the granny square. Join red yarn in the top of the hat. Chain 3 (counts as dc), 2 dc in the same stitch. Skip 2, 3 dc in next stitch — repeat around, placing (3 dc, ch 2, 3 dc) in the four corner spaces to shape the square. Finish with a slip stitch.
Step 6: Final Round (Optional White Trim)
To finish, add one final round in white to give a snowy effect. Work 1 dc in each stitch, placing (2 dc, ch 2, 2 dc) in each corner. Fasten off and weave in all loose ends.
Ideas to Use Your Crochet Christmas Santa Granny Square
Once your Crochet Christmas Santa Granny Square is complete, you’ll want to use it in fun and decorative ways. These squares are incredibly versatile and can be used to create a wide variety of holiday projects.
Turn your squares into a Christmas blanket or afghan. Make 12–20 Santa squares and alternate them with solid red or green granny squares. Join using the whip stitch or join-as-you-go method for a cohesive look.
Use a single Crochet Christmas Santa Granny Square as a festive coaster or mug rug. Add a felt or cotton fabric backing using your sewing machine or hand stitching. This makes a great holiday gift.
Create a holiday pillow by crocheting or sewing several squares together. Use four Santa squares on the front panel and a solid crochet back, then insert a cushion. Add pom-poms to the corners for extra cheer.
Sew several squares together to make a bunting or garland. Use a red chain or ribbon to attach them across a mantel, window, or wall for festive decor that’s reusable each year.
Make a Christmas stocking by joining two squares at the edges and adding a toe and heel section. Line with fabric if desired, and add a loop for hanging on the fireplace.
Another fun option is a holiday-themed tote or gift bag. Combine two squares, add a gusset and strap, and you have a reusable gift wrap or storage bag with handmade flair.
Tips for Perfecting the Crochet Christmas Santa Granny Square
Crocheting a detailed granny square like this requires patience and care. Here are some helpful tips to keep your Crochet Christmas Santa Granny Square looking crisp and professional.
Keep consistent tension while crocheting. Uneven stitches may distort Santa’s face, especially around the beard or hat section. Practice a few rounds to get your feel for the yarn.
Use stitch markers to mark your corners and important transitions in the square. This ensures your granny square stays even and symmetrical, especially in the final shaping rounds.
For better contrast, use bright, vibrant yarns. White yarns should be clean and crisp. If your red or skin-tone yarn is dull, Santa’s features won’t pop.
Always block your granny squares before joining them. This helps shape and flatten each piece for a more polished final product. Use steam or wet blocking based on your yarn type.
If you want your squares to last for many holiday seasons, consider lining or reinforcing the back with cotton fabric. This also hides yarn ends and embroidery knots.
Keep your project organized by working in batches: crochet several faces, then all the hats, then beards, etc. This method speeds up production and ensures uniformity if you’re making multiples.
Final Thoughts and Holiday Joy
The Crochet Christmas Santa Granny Square is a delightful way to celebrate the season with handmade charm. It’s a perfect weekend project and a great use of leftover yarn. Plus, it makes for heartfelt and reusable gifts that friends and family will cherish for years.
With a basic knowledge of crochet stitches and a bit of festive imagination, you can bring Santa to life one stitch at a time. This square can easily be customized with colors or details like rosy cheeks, glasses, or even a little smile.
Whether you’re making one or a dozen, the joy is in the making. Include the whole family by teaching children or friends to crochet alongside you—it’s a beautiful way to pass down the tradition.
If you’re selling finished squares or holiday decor, this project is also a hit at craft fairs or online shops. Handmade Santa squares are always in demand during the Christmas season.
Don’t forget to share your finished Crochet Christmas Santa Granny Square on social media or your blog to inspire others. Add tags like #crochetsanta, #christmasgrannysquare, and #holidaycrochet for better reach.
From our crafting heart to yours, may your holiday be filled with creativity, color, and a touch of crochet magic!