
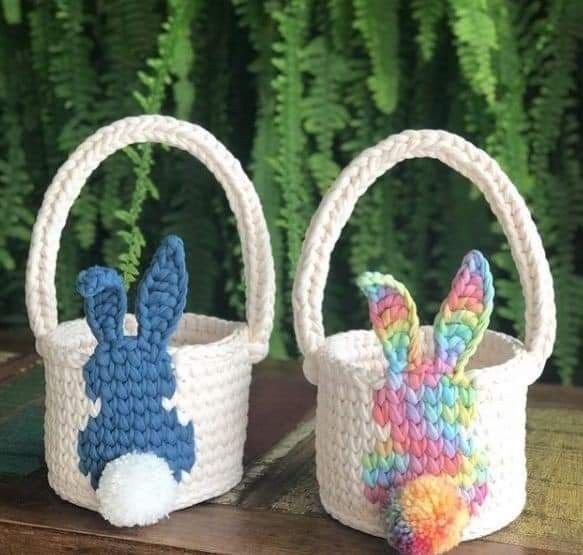
Crochet Easter Bunny Basket Pattern is the perfect project to celebrate spring with creativity, charm, and handmade love. If you are looking for a delightful seasonal craft that combines functionality with cuteness, this pattern will guide you step by step to create an adorable bunny-themed basket. Whether you want to surprise a child, decorate your home, or sell handmade pieces, this project is a beautiful way to express your crochet skills while staying festive.
The beauty of the Crochet Easter Bunny Basket Pattern lies in its versatility. You can customize colors, yarn textures, and facial expressions to make every basket unique. This project works wonderfully as an Easter decoration, candy holder, gift basket, or even as a nursery accessory. Because it is beginner-friendly yet detailed enough for intermediate crocheters, it attracts crafters of all levels who want a rewarding seasonal project.
In this complete guide, you will learn how to create your own Crochet Easter Bunny Basket Pattern from start to finish. We will cover materials, stitches, shaping techniques, finishing touches, and practical tips to ensure your basket is sturdy and adorable. This article is designed to be well-structured, easy to follow, and optimized with helpful crochet terminology so you can confidently complete your project.
Materials and Tools for the Crochet Easter Bunny Basket Pattern
Choosing the right materials is essential for a sturdy and professional-looking basket. For the Crochet Easter Bunny Basket Pattern, medium-weight cotton yarn is highly recommended. Cotton yarn provides structure and durability, helping the basket hold its shape even when filled with treats.
You will need a crochet hook that matches your yarn weight. Typically, a 4.0 mm to 5.0 mm hook works well with worsted-weight cotton yarn. If you prefer a firmer basket, choose a slightly smaller hook to create tighter stitches and extra stability.
Additional supplies include a yarn needle for weaving in ends and attaching details. Scissors are essential for clean cuts, and stitch markers help keep track of rounds when working in continuous spirals.
For the bunny details, you will need small amounts of pink yarn for the inner ears and nose. Black embroidery thread or safety eyes can be used to create expressive facial features, depending on whether the basket is decorative or intended for small children.
Polyester fiberfill is optional but useful if you want slightly padded ears or a raised nose. This small detail adds dimension and makes your Crochet Easter Bunny Basket Pattern even more charming.
Finally, consider using a sturdy base insert, such as a piece of plastic canvas cut to size. While optional, this addition reinforces the basket bottom and helps it maintain structure over time.
Step-by-Step Instructions for the Crochet Easter Bunny Basket Pattern
Begin your Crochet Easter Bunny Basket Pattern by creating a magic ring. This adjustable loop forms the center of the basket base and ensures there is no visible hole in the middle. Work single crochet stitches into the ring and tighten it securely.
Increase evenly in each round to create a flat circular base. Typically, you will add six stitches per round to maintain a smooth, even circle. Continue increasing until you reach your desired base diameter, usually between 5 and 7 inches.
Once the base is complete, stop increasing and crochet one stitch into each stitch around. This transition forms the sides of the basket. You will notice the piece naturally curving upward as you build the walls.
To create sturdy sides, consider using single crochet or half double crochet stitches. These tighter stitches provide structure, which is essential for a basket meant to hold treats or small gifts.
Continue crocheting in rounds until the basket reaches the desired height. Most Crochet Easter Bunny Basket Pattern designs measure between 4 and 6 inches tall, depending on preference.
Finish the basket body with a slip stitch and fasten off. Weave in all loose ends carefully to maintain a clean and professional finish before moving on to the decorative elements.
Creating the Bunny Ears and Facial Features
The bunny ears are the highlight of the Crochet Easter Bunny Basket Pattern. To make them, start with a foundation chain and work in rows using single crochet or half double crochet stitches. Shape the ear by decreasing near the top to create a gentle curve.
Make two identical outer ears using the main basket color. For the inner ear detail, crochet smaller pieces in pink yarn and sew them onto the center of each ear for a soft contrast.
If you want extra dimension, lightly stuff the ears with fiberfill before attaching them. This step is optional but gives a slightly plush appearance that enhances the overall design.
Attach the ears securely to the back inside edge of the basket using a yarn needle. Make sure they are evenly spaced so the basket looks balanced when viewed from the front.
For the face, you can embroider simple oval eyes using black thread. Alternatively, safety eyes can be installed before finishing the inner lining if the basket is decorative only.
Finish the face by embroidering a small triangular pink nose and adding simple whisker lines. These small details bring personality to your Crochet Easter Bunny Basket Pattern and make it irresistibly cute.
Adding the Handle and Final Assembly
A functional handle completes the Crochet Easter Bunny Basket Pattern. To create the handle, chain a length that comfortably arches over the basket. Ensure it is long enough for carrying but not so long that it becomes floppy.
Work back along the chain using single crochet stitches to strengthen the handle. For added durability, you can crochet two rows or even attach a second layer of stitches for reinforcement.
Attach each end of the handle to opposite sides of the basket. Use strong stitching and weave the yarn through several stitches to secure it firmly. Since the handle bears weight, this step must be done carefully.
Check the balance of the basket by holding it up. If it tilts, adjust the handle placement slightly to ensure even weight distribution.
Before finishing, inspect all seams and attachments. Reinforce any loose areas and trim excess yarn to give your basket a polished look.
At this stage, your Crochet Easter Bunny Basket Pattern is complete. You now have a handmade Easter decoration that is both practical and heartwarming.
FAQ About Crochet Easter Bunny Basket Pattern
What skill level is required for the Crochet Easter Bunny Basket Pattern?
This project is suitable for beginners who know basic stitches like single crochet and increasing in the round. Intermediate crocheters will find it quick and enjoyable.
How long does it take to complete the Crochet Easter Bunny Basket Pattern?
Depending on your experience level, it typically takes between 3 to 6 hours to complete the basket, including assembly and finishing details.
What type of yarn works best for the Crochet Easter Bunny Basket Pattern?
Cotton yarn is ideal because it provides structure and durability. Acrylic yarn can be used, but the basket may be softer and less firm.
Can I wash the Crochet Easter Bunny Basket Pattern?
Yes, if made with washable yarn like cotton. Hand washing is recommended to maintain shape and preserve decorative details.
Is the Crochet Easter Bunny Basket Pattern safe for children?
If you are making it for small children, avoid using safety eyes and instead embroider the facial features to prevent choking hazards.
Can I resize the Crochet Easter Bunny Basket Pattern?
Absolutely. Simply increase or decrease the base rounds and adjust the side height to customize the basket size according to your needs.
Can I sell items made from the Crochet Easter Bunny Basket Pattern?
Yes, handmade items created from your own work are typically fine to sell. Just ensure your final product meets safety and quality standards.
VIDEO TUTORIAL
In this complete guide to the Crochet Easter Bunny Basket Pattern, you learned how to choose the right materials, crochet a sturdy basket base, shape the sides, create adorable bunny ears, embroider expressive facial features, and attach a strong handle. By following these detailed steps, you can confidently create a festive and functional Easter basket that reflects your creativity and skill.
This pattern offers flexibility, customization, and a rewarding crafting experience. Whether you are making it for your family, as a thoughtful gift, or as part of your handmade business, the Crochet Easter Bunny Basket Pattern is a delightful seasonal project that brings joy to any Easter celebration.
If you enjoyed this tutorial, please leave your honest opinion and share your suggestions. Your feedback helps improve future patterns and inspires more creative crochet ideas. Happy crocheting!