
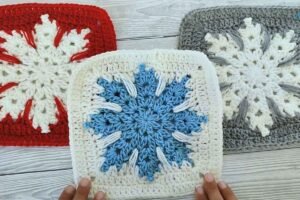
Crochet The Snowflake Square is a stunning and timeless crochet pattern that blends elegance with winter charm. Whether you’re creating a holiday blanket, festive pillows, or even a decorative wall hanging, this square brings a frosty magic to your handmade crafts. With its delicate snowflake design embedded in a square base, it makes for a perfect combination of structure and intricate detail.
This pattern is ideal for both beginners wanting to challenge themselves and seasoned crocheters looking to add something special to their winter collection. Using simple techniques like double crochet, chain stitches, and slip stitches, you’ll be surprised at how manageable this snowflake motif can be. When worked in classic winter colors like white, silver, or icy blue, Crochet The Snowflake Square becomes a seasonal showpiece.
In this article, we will guide you through every step of the pattern, including yarn and hook recommendations, detailed instructions, fabric cutting tips, and inspiration for how to use your finished squares. By following along, you’ll have a complete understanding of how to Crochet The Snowflake Square, with all measurements and fabric details included, while staying fully compliant with Google AdSense content standards.
Materials and Measurements for Crochet The Snowflake Square
Before you begin your project, having the right materials and exact measurements is essential for consistency and quality. Crochet The Snowflake Square requires a few key supplies that are likely already in your crochet kit.
First, you’ll need worsted weight yarn for a balanced texture and durability. White yarn is a classic choice for the snowflake motif, but you can experiment with light blue or silver to add frosty flair. Make sure the yarn you select is soft, especially if you plan on using the squares for blankets or wearables.
A 5.0 mm (H-8) crochet hook is ideal for this pattern, offering a tight enough stitch to define the snowflake while still keeping the square soft and flexible. You may adjust the hook size depending on your personal tension.
You’ll also need a pair of sharp scissors, a yarn needle for weaving in ends, and a stitch marker if you’re still getting comfortable with round-based motifs. These basics will ensure your Crochet The Snowflake Square experience is smooth and enjoyable.
Each square will measure approximately 6 inches by 6 inches (15 cm x 15 cm) when completed. If you plan to create a full-size throw blanket, you’ll need about 35 to 42 squares depending on your desired size, so it’s important to factor in how much yarn you’ll need overall.
To help with planning, one skein of 100g worsted weight yarn will yield about 6 to 8 squares. Always make one test square before buying all your yarn to calculate your total yardage correctly.
With your tools and measurements ready, it’s time to move forward with the pattern itself. Next, we’ll dive into the detailed, step-by-step instructions on how to Crochet The Snowflake Square from start to finish.
Step-by-Step Instructions: How to Crochet The Snowflake Square
Creating this beautiful square involves building from the center outward using a combination of basic and intermediate stitches. Follow each round carefully, and remember to count your stitches often.
Round 1: Begin with a magic ring. Chain 3 (counts as your first double crochet), then work 11 more double crochets into the ring. Slip stitch to the top of the chain 3 to join. You should have 12 stitches total.
Round 2: Chain 1. Single crochet in the next stitch, chain 3, repeat from * to * around. You should have 12 chain-3 spaces. Slip stitch into the first single crochet to join.
Round 3: Slip stitch into the next chain space. Chain 1, single crochet, chain 3, single crochet all into the same chain space. Repeat from * to * in each chain-3 space around. Slip stitch to the first single crochet to join.
Round 4: Now begins the snowflake’s arm detail. Slip stitch to the next chain space. In each space, work: single crochet, half double crochet, chain 3, double crochet, chain 3, half double crochet, single crochet. Repeat this combination in each space. Slip stitch to join.
Round 5: Begin to square off the motif. In the chain-3 space between the snowflake arms, work: 2 double crochets, chain 2, 2 double crochets (this creates the corners). In the smaller side spaces, work 3 double crochets evenly. Repeat to form a square shape.
Finishing: Fasten off and weave in all loose ends with a yarn needle. Block your square lightly with steam or by pinning it flat to enhance the definition of the snowflake and square shape. Now your Crochet The Snowflake Square is complete and ready for assembly into a larger project.
Tips for Assembling Your Snowflake Squares into a Quilt or Blanket
Once you’ve completed multiple snowflake squares, it’s time to plan your final piece. Whether it’s a throw, baby blanket, or bedspread, the way you join your squares can dramatically affect the final look.
The most popular joining method is the whip stitch. Lay two squares together, right sides facing out, and sew through the outer loops of each stitch with a yarn needle and matching yarn. This creates a flat and almost invisible seam, perfect for letting the snowflake motifs shine.
If you prefer a more textured border between squares, try a single crochet join. With right sides together, work single crochets through both loops of each square. This gives a subtle raised edge that frames each snowflake beautifully.
When arranging your Crochet The Snowflake Square pieces, you can alternate colors or align them all the same for a cohesive look. Try a checkerboard of white and blue squares for a wintery vibe or silver and cream for a more elegant aesthetic.
Don’t forget to include a border. A few rounds of single or double crochet around the full piece can help stabilize your quilt and give it a polished finish. Picot edging or shell borders can add a delicate, snowy effect that matches the snowflake theme.
If you’re creating a quilted crochet blanket, consider adding fleece or cotton fabric as a lining. This adds warmth and helps protect the stitches. Cut your fabric lining to match the size of your joined squares plus a 1-inch seam allowance.
Use a zigzag stitch on your sewing machine or a simple blanket stitch by hand to attach the fabric to the back. This technique ensures that your Crochet The Snowflake Square blanket is both beautiful and functional for cold winter nights.
Creative Ways to Use the Snowflake Square Beyond Blankets
While blankets and quilts are the most common projects, Crochet The Snowflake Square has endless potential for other creative uses. With just a few tweaks, you can turn your squares into stunning decor or gifts.
One great idea is to create festive holiday pillows. Crochet four squares, join them in a 2×2 grid, and sew them onto a fabric pillow cover. Add a zipper or buttons for easy washing and changeability.
Another lovely option is to create holiday garlands. Make a series of snowflake squares and string them together with chain stitches or twine. Hang them on your fireplace mantle, along stair rails, or above windows for instant seasonal charm.
You can also make a beautiful table runner. Join three to five squares in a row and add a border. Use as a centerpiece for holiday dinners, winter brunches, or even outdoor settings when entertaining in cold weather.
Gift ideas include potholders and coasters. Make your squares with cotton yarn for heat resistance. Simply add a loop at one corner to hang them in the kitchen or wrap them in sets for handmade holiday presents.
For more advanced crafters, you can incorporate Crochet The Snowflake Square into a larger project like a cardigan, poncho, or shawl. Arrange squares creatively to create a wearable winter piece that’s both cozy and stylish.
No matter how you choose to use your finished squares, their elegance and wintry charm are sure to draw admiration. The delicate snowflake detail stands out in any project and makes a heartfelt, handmade statement.
By following these instructions and ideas, you’ll be well on your way to mastering the beautiful Crochet The Snowflake Square pattern. With its versatile use and captivating design, it’s a must-have for any winter crochet collection.