
The 3D Tumbling Quilt Block Pattern is one of the most fascinating and visually striking designs in the quilting world. From the very first glance, this classic block creates a powerful optical illusion that makes fabric appear three-dimensional. The magic lies in the careful arrangement of light, medium, and dark fabrics, which together form cubes that seem to pop off the surface of the quilt. If you are looking to elevate your quilting skills and create something that truly stands out, mastering the 3D Tumbling Quilt Block Pattern is an exciting and rewarding challenge.
Quilters of all experience levels are drawn to this pattern because it blends geometry, color theory, and precision piecing into a single beautiful design. While it may look complex at first, the 3D Tumbling Quilt Block Pattern is built from simple shapes—usually diamonds or parallelograms—arranged in a thoughtful sequence. With patience and attention to detail, even confident beginners can achieve impressive results. The key is understanding how fabric placement affects the three-dimensional illusion.
In this complete guide, you will learn how to create the 3D Tumbling Quilt Block Pattern step by step. We will explore fabric selection, cutting measurements, assembly techniques, and design variations. This article is carefully structured and optimized with SEO best practices, using the main keyword 3D Tumbling Quilt Block Pattern throughout the text in a natural and helpful way. By the end, you will feel confident enough to start your own stunning 3D quilt project.
Understanding the 3D Tumbling Quilt Block Pattern Design
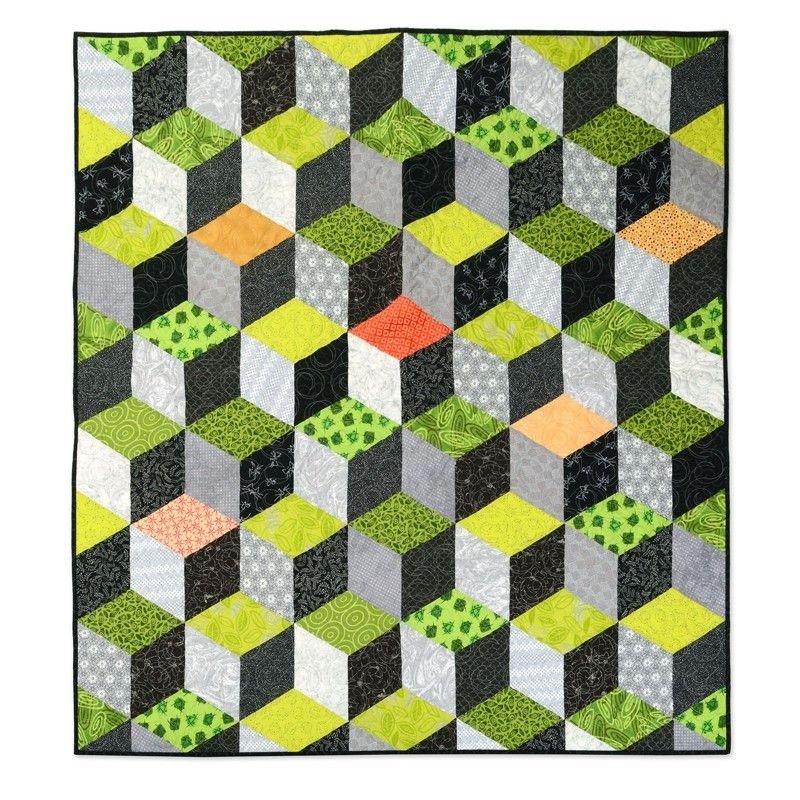
The 3D Tumbling Quilt Block Pattern is inspired by a traditional optical illusion often called “tumbling blocks.” This design creates the appearance of stacked cubes using carefully arranged diamond shapes. Each cube is formed by three diamond pieces: one light, one medium, and one dark.
The illusion of depth in the 3D Tumbling Quilt Block Pattern depends entirely on contrast. When you choose fabrics with clearly different values, the eye automatically interprets them as shadows and highlights. This is what makes the block look three-dimensional rather than flat.
Traditionally, this pattern was pieced using Y-seams, which can be intimidating for some quilters. However, modern quilting techniques allow you to simplify the process by using strip piecing or specialized rulers. This makes the 3D Tumbling Quilt Block Pattern more accessible than ever before.
One of the most beautiful aspects of this block is its versatility. You can create a full quilt made entirely of tumbling cubes, or you can use a single cube block as a focal point in a larger quilt design. The layout options are nearly endless.
The pattern works beautifully with solid fabrics because solids highlight the geometric illusion. However, carefully chosen prints can add personality without compromising the 3D effect. The most important rule is maintaining clear light, medium, and dark contrast.
Understanding the structure of the 3D Tumbling Quilt Block Pattern before cutting any fabric will save you time and frustration. Study diagrams, visualize how the cubes connect, and plan your color placement carefully before starting your project.
Fabric Selection and Cutting Measurements
Choosing the right fabric is crucial when making the 3D Tumbling Quilt Block Pattern. The success of the 3D illusion depends on selecting three fabrics with distinct values: one light, one medium, and one dark. Hold your fabrics together and squint slightly—if you can clearly see the difference in tone, they will likely work well.
For beginners, solid cotton fabrics are highly recommended. Solids make it easier to see alignment and avoid visual confusion. Once you gain confidence, you can experiment with subtle prints or textured fabrics.
To create one cube in the 3D Tumbling Quilt Block Pattern, you will need three identical diamond shapes. A common size is a 60-degree diamond with 4-inch sides, but you can adjust the size depending on your desired finished quilt dimensions.
If you are cutting diamonds manually, use a rotary cutter, quilting ruler, and cutting mat. Specialty 60-degree rulers are extremely helpful for achieving precise angles. Precision cutting is essential because small inaccuracies can affect the alignment of the cubes.
For a baby quilt measuring approximately 36 x 45 inches, you may need around 120 to 150 diamonds, depending on layout. Always cut a few extra pieces to account for mistakes or design adjustments.
Before sewing, lay out all your diamonds on a design wall or large flat surface. Arrange them into cube formations and step back to evaluate the visual balance. Adjust color placement as needed to maintain a consistent 3D effect throughout your 3D Tumbling Quilt Block Pattern project.
Step-by-Step Assembly Guide
Now that your pieces are cut and arranged, it is time to assemble the 3D Tumbling Quilt Block Pattern. Begin by sewing one light diamond to one medium diamond along one side. Use a ¼-inch seam allowance and press the seam carefully.
Next, attach the dark diamond to complete the cube unit. This step often requires a Y-seam if you are assembling individual cubes. Take your time and sew slowly, stopping exactly at the seam intersection points.
If Y-seams feel intimidating, consider assembling your diamonds into rows instead. By sewing strips of diamonds together first, you can reduce the number of Y-seams needed in the overall quilt.
Pressing plays a critical role in achieving a flat, professional finish. Some quilters prefer pressing seams open to reduce bulk, while others press to one side for strength. Choose the method that feels most comfortable for you.
Continue assembling cubes and connecting them row by row. Double-check alignment frequently to ensure points meet precisely. The beauty of the 3D Tumbling Quilt Block Pattern depends on sharp, accurate intersections.
Once the quilt top is complete, add batting and backing fabric. Quilt as desired—straight-line quilting enhances the geometric look, while free-motion quilting can add softness. Finish by trimming and binding your quilt for a polished result.
Creative Variations and Design Ideas
The 3D Tumbling Quilt Block Pattern offers countless creative possibilities. One popular variation is creating a gradient effect, where the cubes gradually shift from light to dark across the quilt. This adds dramatic movement and depth.
Another idea is to use bold, modern colors instead of traditional neutrals. Bright blues, vibrant yellows, and deep purples can create a playful and contemporary version of the pattern.
You can also experiment with scale. Oversized diamonds create large, dramatic cubes, while smaller pieces result in intricate, detailed designs. Adjusting scale changes the entire personality of the quilt.
For a unique twist, consider adding sashing between cube sections. While traditional tumbling block quilts often avoid sashing, modern interpretations sometimes use thin borders to frame each section.
Scrap quilting is another wonderful approach. As long as you maintain clear light, medium, and dark values, you can mix various prints and colors to create a lively, scrappy 3D Tumbling Quilt Block Pattern.
Finally, consider combining this block with other geometric quilt patterns. Pairing tumbling blocks with stars or solid panels can create a balanced and visually exciting composition.
Frequently Asked Questions (FAQ)
One common question about the 3D Tumbling Quilt Block Pattern is whether it is suitable for beginners. While the pattern looks complex, confident beginners can absolutely succeed with careful cutting and patience, especially if they practice Y-seams beforehand.
Another frequent concern is how to avoid bulky seam intersections. Pressing seams open and trimming excess fabric can significantly reduce bulk and help your quilt lie flat.
Many quilters ask how to ensure the 3D illusion works properly. The answer lies in fabric value contrast. Always choose one clearly light fabric, one medium fabric, and one dark fabric to maintain the cube effect.
People also wonder whether templates are necessary. While templates are helpful, especially for precision, specialty quilting rulers designed for 60-degree diamonds can make cutting faster and more accurate.
A common question involves quilting designs. Straight-line quilting that follows the cube edges enhances the geometric look, but soft echo quilting around cubes can also create beautiful texture.
Lastly, quilters often ask how much fabric is required. The answer depends on quilt size and diamond dimensions. Planning your layout and calculating total diamond counts in advance will help you purchase the correct yardage.
VIDEO TUTORIAL
The 3D Tumbling Quilt Block Pattern is a timeless and visually stunning design that combines precision, creativity, and color theory into one unforgettable quilt. Throughout this guide, you learned how the block creates its three-dimensional illusion, how to select the right fabrics with strong value contrast, how to cut accurate diamond shapes, and how to assemble the cubes step by step. You also explored creative variations and gained clarity through a detailed FAQ section addressing the most common questions about this pattern.
By understanding the structure and practicing careful piecing, you can confidently create your own beautiful quilt using the 3D Tumbling Quilt Block Pattern. Whether you choose classic neutrals or bold modern colors, the result will be a striking quilt that captures attention and showcases your craftsmanship.
If you found this guide helpful, please leave your honest opinion and share your suggestions. Your feedback helps improve future tutorials and supports the quilting community. Happy quilting and enjoy bringing your three-dimensional masterpiece to life!