
If you’re looking for a striking and meaningful quilt pattern, the Navajo Quilt Block – Tutorial is an excellent choice. Inspired by the rich artistry of Navajo textiles, this quilt block combines geometric precision with bold color contrasts, making it a standout piece in any quilt project.
Whether you’re a beginner or an experienced quilter, this tutorial will guide you through the process step by step.
Quilting is a fantastic way to express creativity while honoring traditional designs. The Navajo Quilt Block is particularly special because of its historical significance and intricate patterns.
By following this guide, you’ll be able to recreate a stunning quilt block that pays homage to Navajo craftsmanship while adding a modern twist.
This tutorial provides detailed instructions on fabric selection, cutting techniques, assembly, and finishing touches to ensure a professional and visually appealing final product.
1. Materials and Tools Needed
Before starting your Navajo Quilt Block – Tutorial, it’s essential to gather all the necessary materials and tools.
Choose high-quality quilting cotton in contrasting colors. Traditional Navajo-inspired colors include deep reds, blues, and earth tones, but feel free to select hues that match your style.
A rotary cutter, quilting ruler, and self-healing cutting mat are crucial for precise fabric cutting. Accuracy is key in achieving sharp geometric patterns.
Use a sewing machine with a quarter-inch presser foot for even seams. A well-maintained machine ensures smooth stitching and professional results.
Having fabric markers or chalk helps mark stitching lines and guides, making it easier to align pieces correctly during assembly.
Pins or fabric clips keep fabric layers in place while sewing. This prevents shifting and ensures the design stays symmetrical.
An iron and ironing board are essential for pressing seams open or to the side, ensuring a flat and crisp quilt block.
2. Cutting and Preparing Fabric
Once you have all the materials ready, the next step is cutting and preparing the fabric for your Navajo Quilt Block.
Begin by washing and ironing your fabric to remove any creases and ensure an even surface for cutting.
Use your rotary cutter and ruler to cut squares, triangles, and strips according to the pattern specifications. Precision is crucial for maintaining symmetry in the block.
Label each piece using fabric markers to keep track of different sections. This makes the assembly process more organized and efficient.
Arrange the cut pieces on a flat surface in the desired layout before sewing. This allows you to visualize the final design and make any necessary adjustments.
Pair up corresponding pieces and sew them together using a quarter-inch seam allowance. Press seams as you go to keep the fabric flat and manageable.
Double-check measurements after sewing each section to ensure accuracy. If necessary, trim edges slightly to maintain a clean and even block.
3. Assembling the Navajo Quilt Block
Now that all the fabric pieces are prepared, it’s time to assemble the Navajo Quilt Block with precision.
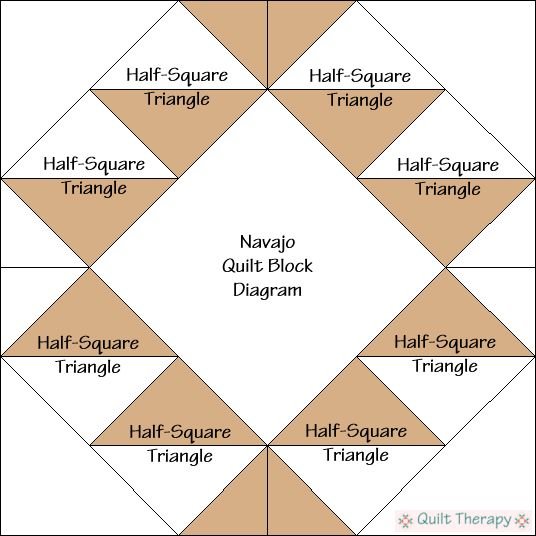
Start by sewing smaller sections together to form larger units. For example, join half-square triangles before attaching them to the central block.
Align seams carefully and use pins to hold pieces in place before stitching. This helps maintain pattern continuity and ensures a clean finish.
Work methodically from the center outward, ensuring each section is sewn accurately before moving on to the next.
Check for symmetry and adjust seam allowances if necessary. Small misalignments can be corrected before finalizing the block.
Once all sections are sewn together, give the block a final press with an iron, setting the seams for a professional appearance.
If making multiple blocks for a larger quilt, repeat the process while maintaining consistent seam allowances and measurements.
4. Finishing Touches and Variations
The final steps in the Navajo Quilt Block – Tutorial focus on finishing touches and creative variations to personalize your quilt.
Trim any uneven edges to ensure the quilt block is perfectly square. Precision at this stage improves the final quilt’s assembly.
Consider adding a border around the block to enhance its visual impact. Borders can provide contrast or complement the existing color scheme.
Experiment with different fabric prints and textures to create unique variations. Traditional solid colors work well, but subtle prints can add depth and interest.
If using multiple blocks in a quilt, arrange them in various layouts to see what best suits your design vision. Playing with orientation can create stunning effects.
Hand-quilt or machine-quilt the finished piece using complementary thread colors. This step enhances the texture and durability of the quilt.
Finally, share your finished Navajo Quilt Block with the quilting community or gift it to a loved one. Quilts are a beautiful way to celebrate tradition and creativity.
FAQ
Q: Is the Navajo Quilt Block suitable for beginners?
A: Yes! The Navajo Quilt Block – Tutorial provides step-by-step instructions, making it accessible to beginners while still engaging for advanced quilters.
Q: What is the best fabric type for this quilt block?
A: Quilting cotton is the best choice due to its durability and ease of use. It holds its shape well and is available in a wide range of colors.
Q: How do I ensure my quilt block remains symmetrical?
A: Careful cutting, precise seam allowances, and pressing seams correctly all contribute to maintaining symmetry in the design.
Q: Can I use different color schemes for this pattern?
A: Absolutely! While traditional Navajo colors are a great option, you can experiment with any color combination that suits your aesthetic.
Q: What are some common mistakes to avoid?
A: Avoid rushing the cutting process, skipping pressing steps, and neglecting seam allowances, as these can impact the final quilt block’s accuracy.
Join our VIP broadcast list and gain access to exclusive patterns, all for free. As a VIP member, you’ll receive the best patterns daily, delivered directly to your device. ✨📱 It’s a unique opportunity to stay up-to-date with the latest trends and designs, curated just for you. Don’t miss out on enhancing your projects and discovering new inspirations with the best patterns every day! 🎨🔝
Conclusion
The Navajo Quilt Block – Tutorial is a rewarding project that combines history, artistry, and skill. By following this guide, you’ll be able to create a beautiful quilt block that reflects the elegance of Navajo design while embracing your unique touch.
Quilting is not just about fabric and stitches—it’s about storytelling, tradition, and creativity. If you enjoyed this tutorial, share your thoughts in the comments below and let us know if you have any suggestions for future quilting guides!