
The nine patch block quilt is a timeless pattern that has remained a favorite among quilters for generations. Known for its simplicity and versatility, this classic design is often one of the first patterns beginner quilters learn. It’s also a favorite of advanced quilters for its endless creative possibilities. Whether you’re making a small wall hanging or a full-size bedspread, the nine patch block quilt offers a perfect balance of tradition and artistry.
This pattern gets its name from the arrangement of nine square patches—three rows of three—that come together to create a unified block. These blocks are then combined to form larger quilt tops, resulting in visually appealing and often complex-looking designs. Despite its elegant results, the nine patch block quilt is surprisingly simple to construct, making it ideal for all skill levels.
In this guide, you’ll learn everything you need to create your own nine patch block quilt, from selecting fabrics and cutting squares to sewing and assembling your quilt top. We’ll walk you through each step in detail while keeping SEO-friendly formatting and language. Let’s dive into this beautiful quilting journey together.,
What Is a Nine Patch Block Quilt?
A nine patch block quilt is made from individual blocks consisting of nine equally sized squares arranged in a three-by-three grid. These blocks can be simple with alternating light and dark fabrics or more complex with variations in color placement.
Each block typically uses just two or three different fabrics, creating a checkerboard or symmetrical pattern. However, quilters often experiment with scraps, prints, or gradient color schemes for a more dynamic look.
One of the key benefits of this quilt design is its adaptability. You can scale it up or down, make it scrappy or uniform, and use it for everything from table runners to king-sized quilts.
When multiple nine patch block quilt squares are joined, they create interesting secondary patterns depending on how they are arranged. The simplicity of the individual block makes it easy to produce a large quilt top in a relatively short time.
This pattern is excellent for using up fabric scraps or practicing precision piecing. It’s also a great way to teach children or beginners how to sew.
The basic design makes it easy to customize, and you can alternate nine patch blocks with plain squares or other blocks for even more variety. It’s a truly foundational skill in quilting.
Materials and Fabric Cutting Instructions
Before starting your nine patch block quilt, it’s important to gather the right materials and understand your fabric cuts. Planning ahead ensures consistency and a clean final result.
You’ll need quilting cotton in at least two contrasting colors or patterns. Choose one light and one dark fabric for a classic look. You can use scraps or fat quarters depending on your preferences.
For each nine patch block, you need nine squares. A common finished square size is 3” x 3”, so your cut squares should be 3.5” x 3.5” to allow for a ¼” seam allowance.
Here’s what you’ll need to make one nine patch block quilt square:
-
5 squares of Fabric A (light or patterned)
-
4 squares of Fabric B (dark or contrasting)
Each square should measure 3.5” x 3.5”.
To make a lap quilt that measures approximately 45” x 60”, you’ll need 60 blocks. That means cutting:
-
300 squares of Fabric A
-
240 squares of Fabric B
Don’t forget batting and backing fabric. You’ll also need rotary cutters, a cutting mat, a quilting ruler, pins or clips, thread, and a sewing machine.
Pre-wash and press your fabric before cutting to ensure accuracy and prevent shrinkage after the quilt is complete.
Once everything is prepared and cut, you’re ready to start sewing your nine patch blocks.
Step-by-Step Instructions: How to Sew a Nine Patch Block
Now that your fabrics are ready, let’s walk through how to make a nine patch block quilt square from start to finish. These steps are beginner-friendly and can be adapted for more complex patterns later.
Step 1: Layout the Squares
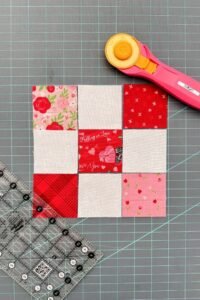
Start by arranging your 9 cut squares into a 3×3 grid. Place Fabric A in the center and the corners, with Fabric B in the cross positions for a balanced look.
Step 2: Sew Rows Together
Sew the top row: square 1 + square 2 + square 3, using a ¼” seam allowance. Repeat for the middle and bottom rows. Press the seams of the top and bottom rows outward and the middle row inward. This helps the seams nest together later.
Step 3: Join the Rows
Pin the top row to the middle row, right sides together, aligning the seams. Sew using a ¼” seam. Press. Then, pin the bottom row and sew it to the middle. Press again.
Step 4: Trim the Block
Use your ruler to square up your block to 9.5” x 9.5” (this includes seam allowance). Consistent block size is key for assembling your quilt top smoothly.
Step 5: Repeat and Chain Piece
Continue sewing additional blocks in batches. You can chain piece similar fabric rows to save time and thread.
Step 6: Assemble Your Quilt Top
Lay out your blocks in rows and columns according to your desired quilt size. Sew each row together, then join the rows, matching seams. Press all seams flat.
Once all blocks are assembled into the quilt top, your nine patch block quilt is ready for quilting and finishing.
Quilting and Finishing Your Nine Patch Block Quilt
With your quilt top complete, it’s time to add batting, backing, quilting stitches, and binding to finish your nine patch block quilt beautifully.
First, cut your quilt backing fabric and batting to be 2–3 inches larger than your quilt top on all sides. This gives you room to baste and quilt without shifting.
Lay the backing fabric wrong side up, followed by batting, then the quilt top right side up. Smooth each layer and pin or spray baste to hold them together.
Next, quilt as desired. You can use straight-line quilting, stitching in the ditch (along the seams), or free-motion quilting if you’re experienced. The nine patch block quilt is ideal for practicing quilting skills.
After quilting, trim the excess batting and backing so everything is even with the quilt top. This makes binding easier.
Prepare your binding strips (typically 2.5” wide) and sew them to the front of the quilt, folding and hand-stitching to the back for a clean finish.
Label your quilt with your name and date if desired. This adds a personal touch and preserves the story behind your nine patch block quilt.
Give your finished quilt a final press and enjoy your cozy, handmade creation. It makes a perfect gift, family heirloom, or treasured item for your home.
Creative Ideas and Variations for Nine Patch Quilts
One of the best things about the nine patch block quilt is its flexibility. Once you master the basic block, you can get creative with layouts, color choices, and design enhancements.
Try alternating nine patch blocks with solid blocks in a checkerboard layout. This adds negative space and lets your nine patch designs shine.
Use a gradient or ombré fabric selection to create a modern, flowing look. Arrange your blocks from light to dark across the quilt top.
For a scrappy look, use a wide variety of fabrics in the same color family. The consistent block structure keeps the design cohesive even with many different prints.
Consider adding sashing (strips between blocks) or cornerstones (small squares between sashing) to frame each block and add visual interest.
You can also experiment with shrinking or enlarging the block size. Miniature nine patch blocks are perfect for doll quilts or pillows, while jumbo blocks create bold, modern quilts.
Another option is to make a disappearing nine patch quilt. This involves cutting a finished nine patch block into quarters and rearranging the pieces to form new patterns—an easy way to add complexity to a simple design.
With endless options for color, layout, and embellishment, the nine patch block quilt continues to inspire quilters of all skill levels. It’s a project you’ll return to again and again with fresh ideas and renewed creativity.