
Creating a Winter Fun Block – Tutorial is a fantastic way to bring a cozy and festive touch to your quilting projects.
Whether you are an experienced quilter or a beginner, this tutorial will guide you through each step to craft a beautiful quilt block that embodies the joy and magic of winter.
With its intricate patterns and winter-themed aesthetics, this block is perfect for holiday quilts, seasonal decorations, or even a heartfelt gift.
Quilting is not only a relaxing and creative hobby but also an art form that allows you to express your personality through fabric and stitching.
The Winter Fun Block is a delightful addition to any quilt, featuring patterns that resemble snowflakes, winter trees, or even playful designs that evoke the spirit of the season. This tutorial ensures that you will have clear, step-by-step guidance to create a stunning quilt block with ease.
By following this Winter Fun Block – Tutorial, you will learn essential quilting techniques, including fabric selection, precise cutting, and accurate stitching. Whether you’re making a single block for a wall hanging or multiple blocks for a quilt, this guide will provide you with everything you need to know to complete your project successfully.
1. Materials and Tools Needed
Before you start your Winter Fun Block project, it is essential to gather all the necessary materials and tools. Having everything ready will make the process smoother and more enjoyable.
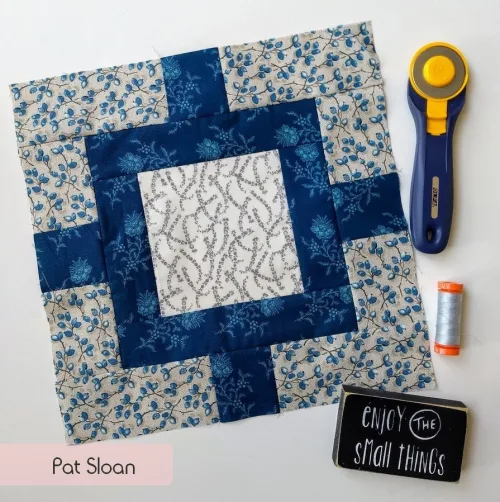
- Fabric Selection: Choose winter-themed fabrics with colors like blues, whites, and greys to capture the essence of the season.
- Cutting Tools: A rotary cutter, quilting ruler, and cutting mat will help ensure precise cuts.
- Sewing Machine: A well-maintained sewing machine with a 1/4-inch presser foot for accurate seams.
- Thread: Use high-quality cotton thread that complements your fabric choices.
- Pins and Clips: These will help hold fabric pieces in place while sewing.
- Iron and Ironing Board: Pressing seams will make assembly easier and give your block a polished look.
Gathering all your supplies before starting will save you time and ensure a stress-free quilting experience. Preparation is key to achieving a neat and professional-looking quilt block.
Selecting the right fabrics is crucial, as they will determine the final appearance of your Winter Fun Block. Consider using solid colors combined with patterned fabrics to create depth and interest.
Using high-quality quilting cotton is recommended since it provides durability and ease of stitching. Pre-washing your fabric is also a good idea to prevent any shrinkage or color bleeding after your quilt is completed.
If you are new to quilting, investing in a quilting ruler and rotary cutter will make a significant difference in the accuracy of your cuts. These tools help achieve perfect squares and triangles, which are essential for a well-structured block.
2. Step-by-Step Instructions
Now that you have gathered all your materials, it is time to start assembling your Winter Fun Block. Follow these steps carefully to achieve the best results.
- Step 1: Cutting the Fabric Cut your fabric into the required shapes, including squares, triangles, and strips. Accurate cutting is essential to ensure precise piecing.
- Step 2: Arranging the Pieces Lay out all fabric pieces according to the design pattern. This step will help visualize how the final block will look and ensure proper alignment.
- Step 3: Sewing the Units Begin sewing smaller units together, such as half-square triangles or strips. Press each seam carefully to maintain accuracy.
- Step 4: Assembling the Block Once all smaller units are completed, start piecing them together to form the final block. Align edges and corners for a seamless look.
- Step 5: Pressing the Seams Press seams open or to one side to reduce bulk and ensure a smooth finish.
- Step 6: Trimming the Block Trim any excess fabric and square up the block to the correct dimensions.
Taking your time with each step will ensure a well-crafted quilt block. Precision and patience are key to achieving a professional-looking design.
3. Tips for a Perfect Quilt Block
Achieving a perfect Winter Fun Block requires attention to detail and some helpful tips.
- Measure Twice, Cut Once Double-check all fabric measurements before making any cuts to avoid errors.
- Use a Quarter-Inch Seam Allowance Consistently sewing with a 1/4-inch seam allowance ensures all pieces fit together correctly.
- Press, Don’t Iron Pressing seams with an up-and-down motion prevents fabric distortion compared to ironing back and forth.
- Chain Piecing for Efficiency Sewing multiple units in a continuous chain can save time and thread.
- Maintain a Clean Workspace Keeping your work area organized helps prevent misplacing fabric pieces or making mistakes.
- Practice Makes Perfect If you’re a beginner, practice on scrap fabric before starting on your final quilt block.
These tips will enhance your quilting experience and help you create a high-quality Winter Fun Block with ease.
4. Adding the Winter Fun Block to a Quilt
Once you have completed your Winter Fun Block, you can incorporate it into a quilt project.
- Choose a Quilt Layout Decide whether you want a traditional block layout, a modern design, or a sampler quilt.
- Plan Your Color Scheme Coordinating colors across multiple blocks ensures a cohesive look for the entire quilt.
- Add Borders and Sashing Borders and sashing can frame your block and enhance its visual appeal.
- Consider Quilting Designs Adding free-motion quilting or stitch-in-the-ditch techniques can highlight your block’s pattern.
- Binding the Quilt Choose a binding fabric that complements the colors in your quilt.
- Display or Gift Your Quilt Whether you keep it as a decoration or gift it to a loved one, your quilt will be a cherished creation.
Incorporating the Winter Fun Block into a larger quilt project is a rewarding experience that brings warmth and creativity to your home.
FAQ
1. What size should my Winter Fun Block be? Most quilt blocks are designed in standard sizes like 12×12 inches, but you can adjust dimensions to fit your project.
2. Can I hand-sew the block instead of using a machine? Yes, hand-sewing is an option, but it will take longer. Ensure even stitches for durability.
3. How do I choose fabric patterns for my block? Select fabrics with winter-themed prints or colors that complement each other.
4. Can beginners make this quilt block? Absolutely! This tutorial is beginner-friendly and includes step-by-step instructions.
5. How do I prevent my fabric from fraying? Using a rotary cutter with a sharp blade and finishing edges with a zigzag stitch can help prevent fraying.
Join our VIP broadcast list and gain access to exclusive patterns, all for free. As a VIP member, you’ll receive the best patterns daily, delivered directly to your device. ✨📱 It’s a unique opportunity to stay up-to-date with the latest trends and designs, curated just for you. Don’t miss out on enhancing your projects and discovering new inspirations with the best patterns every day! 🎨🔝
Conclusion
The Winter Fun Block – Tutorial provides everything you need to create a stunning and festive quilt block. By following the step-by-step instructions, using the right materials, and applying helpful tips, you can craft a beautiful winter-themed block for your next quilting project. Whether you make a single block or incorporate it into a full quilt, this pattern is a wonderful way to celebrate the season through creativity.
We would love to hear your thoughts! Leave a comment with your feedback and any suggestions for future tutorials. Happy quilting!
