
Crochet lovers are always on the lookout for unique and stylish accessories, and the Snail Shell Hat Free Crochet Pattern: A Stylish and Cozy Accessory – Tutorial is a fantastic project for both beginners and experienced crafters.
This snail shell hat design combines texture, warmth, and style, making it an eye-catching addition to any wardrobe. Whether you want to create a cozy winter hat or a stylish fashion statement, this pattern is perfect for your next crochet adventure.
The snail shell hat gets its name from its spiraled, textured pattern that resembles the natural beauty of a snail shell.
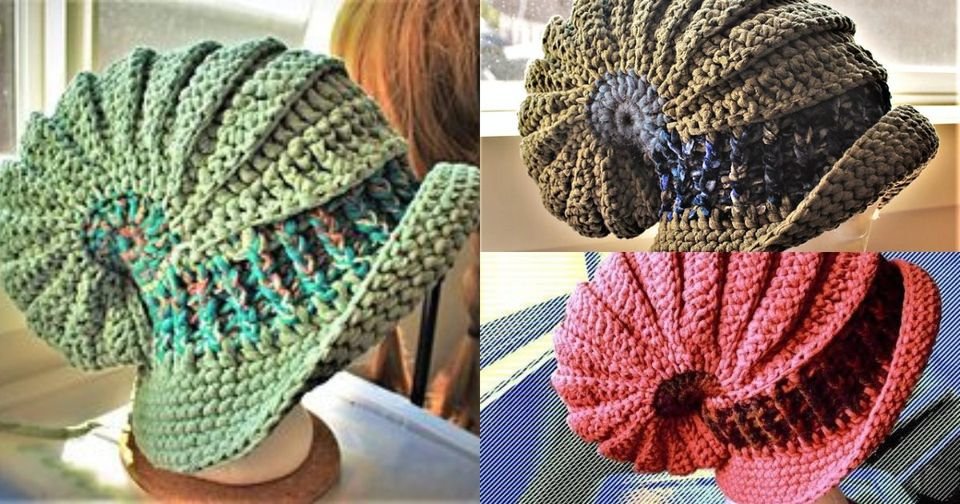
The intricate design is not only visually appealing but also provides extra warmth and comfort, making it an excellent choice for colder months. Plus, it’s an enjoyable project that allows you to play with different colors and yarn textures.
In this tutorial, we will guide you step by step on how to create your own Snail Shell Hat using a free crochet pattern. With clear instructions, helpful tips, and easy-to-follow techniques, you will be able to craft this stylish hat in no time. Grab your crochet hooks and let’s get started!
1. Materials and Tools Needed
Before you begin crocheting your Snail Shell Hat, it’s essential to gather all the necessary materials. Having the right tools and supplies will make the process smoother and more enjoyable.
- Yarn Selection: Choose a medium-weight yarn (worsted or bulky) for better texture and warmth. Acrylic or wool blends work best.
- Crochet Hook: A size H/8 (5.0mm) or I/9 (5.5mm) hook is ideal for this pattern.
- Scissors: A sharp pair of scissors for cutting yarn.
- Tapestry Needle: Useful for weaving in ends and sewing pieces together.
- Stitch Markers: Helps keep track of rounds and stitch placements.
- Measuring Tape: Ensures the correct sizing of your hat.
Having all these materials ready before starting will make your crocheting experience more seamless and enjoyable.
2. Basic Stitches and Techniques
To create the perfect Snail Shell Hat, you need to be familiar with some essential crochet stitches and techniques. Even if you’re a beginner, these stitches are easy to learn and master.
- Magic Ring: This technique is used to start the hat seamlessly.
- Chain Stitch (ch): The foundation of most crochet projects.
- Single Crochet (sc): A simple, tight stitch that adds structure.
- Half-Double Crochet (hdc): Provides a slightly looser stitch for a soft texture.
- Double Crochet (dc): Creates height and texture in the spiral pattern.
- Front Post Double Crochet (fpdc): Adds depth and the signature spiral effect.
- Slip Stitch (sl st): Used to join rounds and finish the project neatly.
If you are new to any of these stitches, practice them on a swatch before beginning your hat.
3. Step-by-Step Crochet Instructions
Now that you have your materials and understand the basic stitches, let’s begin crafting your Snail Shell Hat step by step.
- Start with the Magic Ring: Create a magic ring and secure it with a slip stitch.
- Round 1: Work six single crochets into the ring and pull it tight.
- Round 2: Increase by working two single crochets in each stitch (12 stitches total).
- Round 3: Alternate between one single crochet and an increase stitch (18 stitches total).
- Continue Increasing: Follow the pattern of increasing stitches until the base reaches the desired diameter.
- Create the Spiral Texture: Switch to front post double crochet stitches to achieve the spiral effect.
As you progress, ensure your stitches remain even and the hat maintains its shape.
4. Finishing Touches and Customization
Once you have completed the main body of your Snail Shell Hat, it’s time to add some finishing touches and personalize your creation.
- Edging: Use a row of single crochet or slip stitches for a neat finish.
- Brim Options: Choose between a folded brim for extra warmth or a simple ribbed edging.
- Color Combinations: Experiment with different yarn colors to create unique designs.
- Embellishments: Add buttons, pom-poms, or appliques for a fun and stylish touch.
- Size Adjustments: Modify stitch counts to fit different head sizes, from children to adults.
- Blocking: Lightly steam or block your hat to enhance its shape and texture.
Customizing your hat makes it even more special and tailored to your personal style.
FAQ
Q: Is this crochet pattern suitable for beginners?
A: Yes! While the Snail Shell Hat Free Crochet Pattern involves some advanced stitches, beginners can follow along with practice and patience.
Q: How long does it take to complete the Snail Shell Hat?
A: Depending on your skill level, it can take anywhere from 2 to 5 hours to complete the hat.
Q: Can I use a different type of yarn?
A: Absolutely! However, using medium-weight yarn provides the best structure and warmth.
Q: How do I adjust the hat size?
A: To make a larger or smaller hat, modify the number of increase rounds and stitch counts accordingly.
Q: Can I sell hats made from this pattern?
A: Yes, as long as you credit the original pattern source and follow any licensing guidelines.
Q: What if I make a mistake in the pattern?
A: Simply unravel the mistake and redo the stitches. Using stitch markers helps prevent errors.
Join our VIP broadcast list and gain access to exclusive patterns, all for free. As a VIP member, you’ll receive the best patterns daily, delivered directly to your device. ✨📱 It’s a unique opportunity to stay up-to-date with the latest trends and designs, curated just for you. Don’t miss out on enhancing your projects and discovering new inspirations with the best patterns every day! 🎨🔝
Conclusion
The Snail Shell Hat Free Crochet Pattern: A Stylish and Cozy Accessory – Tutorial is a fantastic crochet project that is both stylish and practical. With its unique spiral design, it adds a fun and elegant touch to any wardrobe while keeping you warm during colder months. Whether you’re making it for yourself or as a gift, this hat is a must-try project for crochet enthusiasts.
VIDEO TUTORIAL
We hope this tutorial has been helpful! If you enjoyed this pattern, feel free to leave a comment with your thoughts and suggestions. Happy crocheting!