
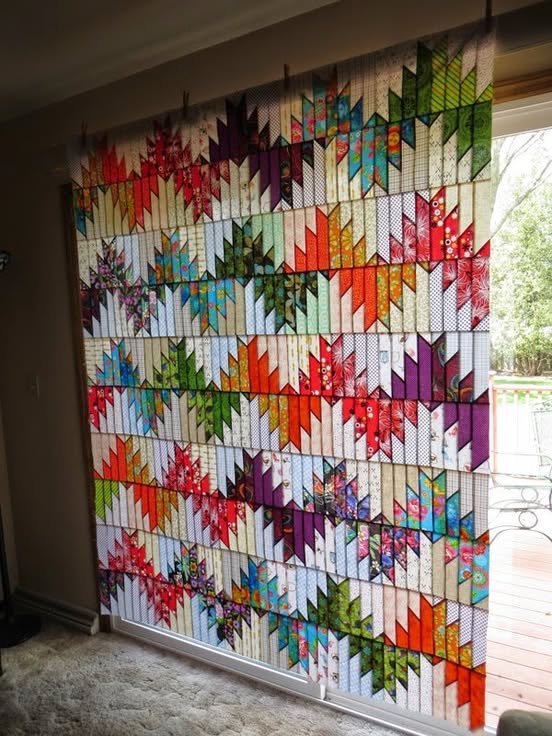
The Scrappy Mountain Majesties Quilt by Paulette is a timeless masterpiece that combines creativity, intricate design, and a deep love for quilting. It’s a pattern that is often admired by quilting enthusiasts for its versatility and beauty.
Whether you’re a seasoned quilter or just starting, this tutorial will guide you step by step through the process of creating your very own Scrappy Mountain Majesties Quilt, all while providing valuable insights for both beginners and experts alike.
With Paulette’s design, you can take your quilting skills to the next level by incorporating various fabrics and colors to create a quilt that is uniquely yours.
Before diving into the details of the quilt tutorial, let’s take a moment to appreciate the appeal of the Scrappy Mountain Majesties Quilt. This design offers quilters the opportunity to work with an array of fabrics, combining colors and patterns in a way that tells a story.
The quilt is known for its geometric structure, which gives it a modern yet cozy feel. The scrappy nature of the design allows for creativity, making it a great choice for quilters who want to use up fabric scraps or create a quilt with a variety of different tones and textures.
The Scrappy Mountain Majesties Quilt design is based on a series of triangles that come together to form beautiful, mountain-like shapes. It’s a layout that is both visually striking and satisfying to assemble.
Paulette’s pattern provides clear instructions, making the process accessible to quilters of all skill levels. Whether you’re looking to create a small wall hanging or a full-sized quilt, this tutorial will provide you with the techniques you need to complete your project with confidence.
1. Choosing the Right Fabrics for Your Scrappy Mountain Majesties Quilt
When starting the Scrappy Mountain Majesties Quilt by Paulette, one of the first things you’ll need to do is choose your fabrics. The beauty of this quilt lies in its scrappy nature, meaning you’ll have the freedom to combine a variety of fabrics. While traditional quilts often use coordinated fabric collections, scrappy quilts embrace an eclectic mix, which can add a lot of character and warmth to your design.
Start by selecting fabric scraps or cut pieces from different fabric collections. Try to include a variety of colors and patterns to give your quilt a dynamic, lively look. You can go for a more monochromatic color scheme or mix bold, contrasting colors for a more dramatic effect. Fabrics with different textures—such as cotton, flannel, or linen—can also add an extra layer of depth to your quilt, so don’t be afraid to experiment.
One helpful tip when choosing fabrics is to consider the value of the fabrics. The value refers to how light or dark the fabric is, and this can play a huge role in the overall look of your quilt. Try to mix light, medium, and dark fabrics to create contrast and dimension. Remember that the Scrappy Mountain Majesties Quilt relies on these contrasts to highlight the mountain-like shapes that give the quilt its signature style.
Another important factor is the scale of the prints. For a more cohesive look, mix large prints with smaller prints. If all the fabrics have the same size print, the quilt may look flat. By choosing a variety of sizes and styles, you can ensure your Scrappy Mountain Majesties Quilt is visually interesting and full of life.
Lastly, make sure to prepare enough fabric for the entire project. Since this quilt pattern involves many pieces, you’ll want to make sure you have plenty of fabric to cut out the triangles and other shapes needed for your quilt top. Don’t forget to include some fabric for the quilt’s backing and binding as well.
2. Cutting Your Fabric Pieces
Once you’ve chosen your fabrics, the next step in making the Scrappy Mountain Majesties Quilt by Paulette is cutting your fabric pieces. Cutting your fabrics accurately is crucial to the success of your quilt, so take your time and make sure to follow the pattern instructions closely. Paulette’s tutorial provides detailed cutting instructions, so be sure to refer to it throughout the process.
The Scrappy Mountain Majesties Quilt pattern uses a variety of triangle shapes, so having a rotary cutter, ruler, and cutting mat will make the cutting process much easier and more precise. For beginners, it’s a good idea to use a fabric cutting template or a triangular quilting ruler to help with the accuracy of your cuts.
When cutting your fabric, be sure to follow the pattern’s measurements for each triangle piece. Paulette’s pattern provides specific dimensions for the various shapes that make up the mountain design, so make sure you adhere to those measurements for consistency. To achieve a balanced look, you may also want to mix up the fabrics when cutting your triangles. Some pieces can be cut from light fabrics, while others can be cut from darker or more patterned fabrics.
Additionally, remember that quilting requires seam allowances, so you’ll need to account for these when cutting your fabric pieces. Be sure to include an extra quarter inch on all edges to ensure your pieces fit together properly during assembly. Paulette’s tutorial also provides tips for trimming fabric pieces after sewing, which is an essential step for achieving clean seams and a polished finished quilt.
After cutting all your fabric pieces, organize them into separate piles based on their color or pattern. This will make the assembly process much easier and help you maintain the structure of your quilt as you sew it together.
3. Sewing the Triangles and Assembling the Quilt Top
Now that your fabric pieces are cut, it’s time to start assembling your Scrappy Mountain Majesties Quilt by Paulette. The quilt top is made up of a series of triangles that come together to form mountain-like peaks. The trick is to sew the triangles together in rows, carefully matching seams to create sharp points.
Start by sewing two triangles together along one edge, creating a smaller triangle shape. Then, continue sewing additional triangles to each side, working your way across the row. Paulette’s pattern will provide instructions on how many triangles to sew in each row and how to arrange them to achieve the desired design.
It’s important to press your seams as you go along to ensure the fabric lays flat and the points of the triangles align properly. Pressing helps eliminate any wrinkles in your fabric, which can interfere with the sewing process and make your quilt top look uneven. Be sure to follow the pressing instructions in the tutorial to achieve the best results.
Once you’ve sewn all the rows of triangles, it’s time to join the rows together to form the quilt top. Take care to match the seams as you sew the rows together. Pinning the seams can help you achieve better accuracy when joining rows. Once all the rows are sewn, you should have the completed quilt top ready for the next step.
At this point, you may want to lay the quilt top out to check the overall design. Step back and take a look at the quilt from a distance to see how the colors and patterns are coming together. You can always make small adjustments if needed before moving on to the next phase of the quilting process.
4. Quilting, Binding, and Finishing Your Scrappy Mountain Majesties Quilt
After completing the quilt top, the final steps in creating the Scrappy Mountain Majesties Quilt by Paulette are quilting, binding, and finishing the quilt. First, you’ll need to add the quilt backing and batting, which will give your quilt the right amount of weight and warmth.
Layer the quilt top, batting, and backing fabric, ensuring everything is smooth and wrinkle-free. Pin the layers together and then begin quilting. There are several quilting methods to choose from, including hand quilting or machine quilting. Machine quilting is often faster and easier for beginners, but hand quilting can add a personal touch and extra texture.
For the binding, cut strips of fabric that will be used to encase the edges of the quilt. Fold and sew the strips to create a clean, finished edge. The binding adds a professional touch and helps to secure all the layers of fabric in place. Be sure to sew the binding carefully, and use a needle that’s appropriate for quilting fabric.
Once the quilt is bound, give it a final press to smooth out any wrinkles. You may also want to give it a light wash to help set the seams and soften the fabric. After this, your Scrappy Mountain Majesties Quilt is complete and ready to be displayed or used as a cozy addition to your home.
FAQ
1. Can I use any type of fabric for the Scrappy Mountain Majesties Quilt?
Yes, you can use a wide variety of fabrics for the Scrappy Mountain Majesties Quilt by Paulette. Whether you prefer traditional cotton, flannel, or linen, the choice is up to you. Just be sure to choose fabrics that are comfortable to work with and that will hold up over time.
2. How can I make my quilt larger or smaller?
To adjust the size of your quilt, you can either add or reduce the number of rows and columns in the pattern. This will change the dimensions of the finished quilt. You can also use larger or smaller fabric pieces for a different effect.
3. What’s the best way to choose colors for a scrappy quilt?
For a scrappy quilt, the fun lies in mixing and matching fabrics. Choose a variety of colors, textures, and patterns, and don’t be afraid to experiment. Consider working with fabrics that have complementary values (light, medium, dark) to create contrast and visual interest.
4. How do I prevent my triangles from getting wonky when sewing?
To prevent wonky seams, be sure to press your seams flat after each step. This helps ensure your pieces align properly. Additionally, always measure and trim your pieces accurately before sewing to prevent any distortion.
Join our VIP broadcast list and gain access to exclusive patterns, all for free. As a VIP member, you’ll receive the best patterns daily, delivered directly to your device. ✨📱 It’s a unique opportunity to stay up-to-date with the latest trends and designs, curated just for you. Don’t miss out on enhancing your projects and discovering new inspirations with the best patterns every day! 🎨🔝
Conclusion
In this tutorial, we’ve walked through the steps to create the stunning Scrappy Mountain Majesties Quilt by Paulette. From choosing fabrics and cutting your pieces to sewing and finishing the quilt, each stage offers opportunities for creativity and personalization. Whether you’re a seasoned quilter or just starting out, this quilt is a great way to practice your skills and create something beautiful.
We hope you found this tutorial helpful! Feel free to leave a comment with your thoughts, suggestions, or any questions you might have. Happy quilting!