
The Churn Dasher Quilt Block Pattern is a timeless and classic design that has been a favorite among quilters for generations. This pattern features a striking geometric layout that can be customized with various fabric choices to create unique and beautiful quilts.
Whether you are a beginner or an experienced quilter, mastering the Churn Dasher pattern is a great way to enhance your quilting skills.
The versatility of the Churn Dasher Quilt Block Pattern makes it perfect for quilts of all sizes, from small decorative wall hangings to large bed quilts.
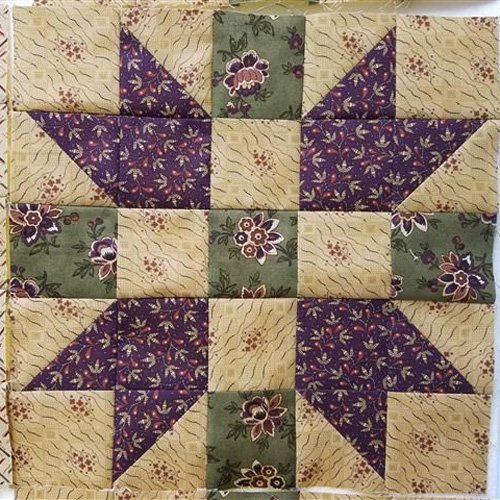
Its traditional yet dynamic design is achieved through a combination of half-square triangles, rectangles, and strips. This creates a visually appealing block that can be arranged in different ways to create stunning quilt layouts.
In this Churn Dasher Quilt Block Pattern tutorial, we will guide you through every step, including choosing the right materials, cutting fabric pieces accurately, assembling the block, and adding finishing touches. Let’s get started!
1. Choosing Materials and Preparing Your Fabric
Before you start sewing, gathering the right materials is essential. The quality of your materials affects the final look and durability of your quilt block.
First, select cotton fabric for its durability and ease of handling. Choosing high-quality quilting cotton ensures crisp and precise stitching. You can opt for a traditional color palette or experiment with modern hues to personalize your quilt.
Using a rotary cutter, self-healing mat, and quilting ruler is key to achieving accurate fabric cuts. Properly cut fabric pieces ensure that all components of the quilt block fit together seamlessly.
Starch and press your fabric before cutting to prevent fraying and distortion. Pressing the fabric flat helps achieve sharp, professional-looking seams.
For thread, choose a 100% cotton thread that matches your fabric. A neutral-colored thread is a versatile choice that blends well with most fabrics.
Lastly, ensure you have pins, a sewing machine, and a quarter-inch presser foot. These tools will help maintain accuracy and precision while piecing the block together.
2. Cutting and Piecing the Churn Dasher Block
Now that you have gathered your materials, it’s time to cut and piece your Churn Dasher Quilt Block Pattern. Precise cutting and sewing are crucial to maintaining a symmetrical and balanced design.
Begin by cutting the necessary fabric pieces: squares, rectangles, and half-square triangles. Each component plays a role in forming the churn dasher design.
To create half-square triangles (HSTs), place two squares right sides together, draw a diagonal line, and sew a quarter-inch seam on both sides. Cut along the diagonal and press open for perfect HST units.
Assemble the center square first. This acts as the foundation of the block and determines overall alignment. Using a quarter-inch seam allowance ensures all pieces fit together precisely.
Next, sew the half-square triangles and rectangles in place. Arrange them according to the traditional churn dasher layout and double-check placement before stitching.
Press seams as you go, alternating directions to reduce bulk. Pressing correctly helps create crisp intersections and an even quilt block.
Once all pieces are sewn together, square up the block using a quilting ruler. Trimming any excess fabric ensures all blocks in your quilt match in size.
3. Assembling Multiple Blocks into a Quilt
Once you’ve mastered making a single Churn Dasher Quilt Block Pattern, you can begin assembling multiple blocks into a full quilt. Consistency and precision are key to achieving a professional finish.
Decide on your quilt layout. The churn dasher block can be arranged in various ways to create different effects, from traditional grid layouts to more modern asymmetrical designs.
Sew blocks together in rows, ensuring seam intersections align perfectly. Using sashing between blocks can help define each unit and add visual separation.
Press seams between rows in opposite directions to reduce bulk. This technique makes it easier to match seams when assembling the quilt top.
After assembling all rows, attach borders if desired. Borders frame the quilt and can enhance the overall design. Consider using a coordinating fabric that complements the churn dasher blocks.
Once the quilt top is complete, prepare it for quilting by adding batting and a backing fabric. Basting the layers together with safety pins or spray adhesive prevents shifting during quilting.
4. Quilting and Finishing Touches
The final step in completing your Churn Dasher Quilt Block Pattern quilt is quilting and binding. This process secures the layers together and adds texture to the finished quilt.
Choose a quilting design that enhances the churn dasher block. Straight-line quilting, free-motion quilting, or echo quilting are all great options.
If using a sewing machine, ensure your stitch length is appropriate for quilting. A slightly longer stitch length works well for securing multiple fabric layers.
After quilting, trim excess batting and backing fabric to match the quilt top dimensions. Squaring up the quilt ensures a neat and professional appearance.
Next, attach the quilt binding using a double-fold binding method. This technique provides durability and a clean finish around the edges.
Hand-stitch or machine-stitch the binding in place. Taking your time during this step ensures a polished look.
Once completed, wash and press the quilt for a soft and finished feel. This final touch brings out the beauty of your quilt and makes it ready for use or display.
FAQ
1. What size should a churn dasher quilt block be?
Common sizes range from 6 inches to 12 inches, but you can adjust measurements to fit your project.
2. Can I use different fabrics for each block?
Yes! Mixing different fabrics adds variety and makes the quilt more visually interesting.
3. What is the best way to press seams in a churn dasher quilt block?
Press seams open for a flatter finish or to one side to reduce bulk, depending on your preference.
4. How can I make my quilt more modern?
Use bold colors, larger block sizes, or asymmetrical layouts for a contemporary twist.
Join our VIP broadcast list and gain access to exclusive patterns, all for free. As a VIP member, you’ll receive the best patterns daily, delivered directly to your device. ✨📱 It’s a unique opportunity to stay up-to-date with the latest trends and designs, curated just for you. Don’t miss out on enhancing your projects and discovering new inspirations with the best patterns every day! 🎨🔝
Conclusion
In this Churn Dasher Quilt Block Pattern tutorial, we covered everything from choosing materials and cutting fabric to piecing, assembling, and finishing a quilt. This timeless pattern is a fantastic addition to any quilter’s repertoire.
We hope you enjoyed this guide! Have you made a churn dasher quilt before? Let us know in the comments, and feel free to share your tips and experiences. Happy quilting!