
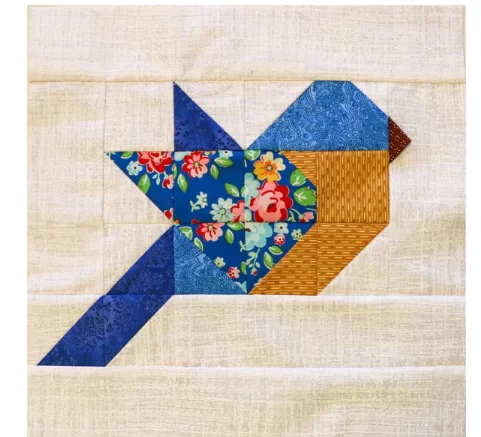
The Birdie Quilt Block Pattern is a delightful and charming design that brings a whimsical touch to any quilting project. Whether you are an experienced quilter or just beginning your journey, this pattern is perfect for adding a playful and creative element to your quilt.
This pattern is inspired by nature and features a simple yet elegant bird motif. The Birdie Quilt Block Pattern is versatile and can be used in baby quilts, wall hangings, or even as a focal point in a larger quilt.
The combination of vibrant colors and thoughtful stitching makes this block a favorite among quilting enthusiasts.
In this tutorial, we will guide you step by step on how to create your own Birdie Quilt Block Pattern, from selecting the right fabrics to assembling the pieces. Get ready to enjoy a fun and rewarding quilting experience!
1. Choosing the Right Fabrics for Your Birdie Quilt Block Pattern
Before starting your Birdie Quilt Block Pattern, selecting the right fabrics is crucial to achieving a visually appealing design.
Opt for soft pastel fabrics or bold contrast colors to create a striking bird motif. The color choice can impact the overall aesthetic and theme of your quilt.
Consider using cotton fabrics as they are easy to work with and provide durability for long-lasting quilt blocks. Pre-wash your fabric to prevent shrinkage.
If you want to add texture to your quilt block, try incorporating batik or textured fabrics for a unique touch. Mixing textures can enhance the design’s depth.
Use background fabric that complements the bird motif, such as neutral tones or light pastels, to help the bird stand out. The contrast ensures a clear and defined design.
For a fun variation, experiment with floral or patterned fabrics for the bird to create a lively and artistic effect. These patterns add personality to your quilt block.
2. Cutting and Preparing the Fabric Pieces
Precision is key when cutting fabric pieces for the Birdie Quilt Block Pattern to ensure a well-balanced and symmetrical design.
Start by preparing a template for the bird shape. You can either draw your own or find a printable template that suits your desired size.
Cut out the necessary pieces, including the bird’s body, wings, beak, and any additional details. Use a rotary cutter and a self-healing mat for accuracy.
For clean and crisp edges, press each fabric piece with an iron before assembly. Removing wrinkles ensures a smooth sewing process.
If you are adding applique details, consider using fusible interfacing to help keep small pieces in place while sewing. This technique makes stitching easier.
Double-check measurements before sewing to ensure all pieces fit together properly. Adjust if necessary to maintain symmetry in your quilt block.
3. Assembling and Stitching the Birdie Quilt Block
Once all fabric pieces are cut and prepared, it’s time to assemble your Birdie Quilt Block Pattern with careful stitching.
Begin by placing the bird’s body onto the background fabric, ensuring proper positioning. Secure it in place with pins or basting stitches.
Attach the bird’s wings and beak using either raw-edge applique or needle-turn applique techniques. Both methods provide different aesthetic results.
Use a blanket stitch or zigzag stitch to secure applique pieces. This adds durability and a decorative finish to your quilt block.
For extra dimension, try adding embroidery details such as an eye or feather textures. Hand-stitched accents can enhance the overall design.
After all pieces are stitched, give the quilt block a final press with an iron. This helps set the stitches and smooth out any wrinkles.
4. Finishing Touches and Quilt Block Assembly
The final steps will ensure your Birdie Quilt Block Pattern is polished and ready to be incorporated into your quilting project.
Trim the block to the desired size, ensuring that all edges are even and square. A well-trimmed block makes assembly easier.
If making multiple blocks, lay them out to plan the arrangement. Mixing different color variations can create a visually interesting quilt top.
Consider adding sashing or borders around your Birdie Quilt Block for a framed look. This technique makes the block stand out.
If you are creating a full quilt, sew multiple blocks together using a quarter-inch seam allowance for precision and consistency.
Quilt and bind your project using a coordinating thread and batting. Hand-quilting or machine quilting both work well for securing layers.
Enjoy your finished Birdie Quilt Block Pattern, knowing that you’ve created a beautiful and unique addition to your quilting collection!
FAQ
1. What size should my Birdie Quilt Block be?
The size depends on your project. A common size is 12×12 inches, but you can adjust as needed.
2. Can I use felt instead of fabric for the bird applique?
Yes, felt can be used, but keep in mind that it may add bulk and behave differently than fabric when washed.
3. What is the best stitch for securing applique pieces?
A blanket stitch or zigzag stitch works best for durability and aesthetics.
4. Can I create a Birdie Quilt Block with hand stitching only?
Yes! Hand applique and embroidery techniques can be used if you prefer a fully hand-stitched block.
5. How do I make my Birdie Quilt Block more unique?
Experiment with different fabrics, embroidery details, and embellishments like buttons or beads.
Join our VIP broadcast list and gain access to exclusive patterns, all for free. As a VIP member, you’ll receive the best patterns daily, delivered directly to your device. ✨📱 It’s a unique opportunity to stay up-to-date with the latest trends and designs, curated just for you. Don’t miss out on enhancing your projects and discovering new inspirations with the best patterns every day! 🎨🔝
Conclusion
We have explored the process of creating a Birdie Quilt Block Pattern, from selecting the right fabrics to assembling and finishing the quilt block. This fun and charming pattern is a wonderful addition to any quilting project.
Have you tried making your own Birdie Quilt Block Pattern? Share your thoughts, tips, and experiences in the comments! Happy quilting!