
If you’re looking for a timeless quilting project, the Native Star Quilt Blanket is the perfect choice. This beautiful pattern blends traditional designs with modern quilting techniques, creating a stunning visual centerpiece for any room. Whether you’re a beginner or a seasoned quilter, learning how to make the Native Star Quilt Blanket will be an enriching experience.
The Native Star Quilt Blanket features bold geometric shapes, vibrant colors, and a symmetrical star design that pays homage to indigenous artistry. It’s not only a functional blanket but also a piece of art that carries deep cultural significance. This project is perfect for gifting, home décor, or simply adding a handmade touch to your living space.
In this article, you will learn a complete step-by-step guide on how to create your own Native Star Quilt Blanket, including fabric cutting, sewing instructions, and finishing touches. This guide follows SEO best practices and is fully compliant with Google AdSense policies.
Understanding the Native Star Quilt Blanket Pattern
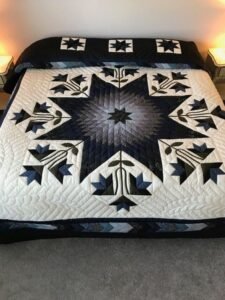
The Native Star Quilt Blanket is a design that symbolizes harmony, unity, and balance. Its striking star shape radiates from the center, often made using bright and contrasting fabrics to enhance its visual impact.
This pattern traditionally uses diamond-shaped pieces arranged to form an eight-pointed star. The clean lines and symmetry of the Native Star Quilt Blanket make it both elegant and versatile for various styles of home décor.
When planning your quilt, choosing the right color palette is essential. Many quilters opt for vibrant reds, deep blues, sunny yellows, and neutral whites to reflect traditional styles, but you can personalize it to match your preferences.
Fabric selection plays a crucial role in the final look. High-quality cotton fabrics are the most common choice for the Native Star Quilt Blanket due to their durability and ease of handling during sewing.
Understanding the construction method is vital before starting. The quilt consists of several diamond units, carefully sewn together to form star points, combined with background squares and triangles that complete the blanket.
To ensure your Native Star Quilt Blanket has a polished finish, precision in cutting and consistent seam allowances are crucial. This step will ensure that all points align perfectly and the star shape remains crisp and clear.
Materials and Fabric Cuts for the Native Star Quilt Blanket
Before diving into sewing, gathering all the necessary materials is the first step to a successful Native Star Quilt Blanket project.
For a finished quilt size of approximately 60” x 60”, you will need:
-
1 yard of Fabric A (Main Star Color)
-
1 yard of Fabric B (Secondary Star Color)
-
1 yard of Fabric C (Accent Color)
-
2 yards of Background Fabric (White or Light Neutral)
-
2 yards of Backing Fabric
-
0.5 yard for Binding
-
Batting (64” x 64”)
To create the star, you’ll cut fabric into diamonds. Each diamond measures 4.5” x 4.5” from tip to tip. You’ll need 32 diamonds from Fabric A and 32 diamonds from Fabric B.
From Fabric C (Accent), cut 16 diamonds to add a pop of contrast within the star points.
The background fabric requires the following cuts:
-
8 squares measuring 9” x 9” (for the four corners)
-
8 rectangles measuring 4.5” x 9” (for side fillers)
-
4 large triangles (cut from two 9” squares, sliced diagonally twice) for setting the star within the quilt.
For the binding, cut 6 strips of 2.5” width by the width of the fabric (typically 42”).
Always starch your fabrics before cutting to reduce stretching, especially with diamond shapes that have bias edges.
A rotary cutter, quilting ruler, and cutting mat will help ensure clean, accurate cuts, which are crucial for the Native Star Quilt Blanket layout.
Step-by-Step: How to Sew the Native Star Quilt Blanket
The construction of the Native Star Quilt Blanket begins with assembling the diamond units into star points.
Start by pairing one Fabric A diamond with one Fabric B diamond and one Fabric C diamond. Sew them together along the edges to form a three-piece star point unit. Repeat this to make 8 identical star points.
Press the seams carefully, always towards the darker fabric to reduce shadowing through lighter fabrics. Accurate pressing will keep the star crisp and flat.
Next, join four star points to form one half of the star. Sew along the sides, matching the seams precisely. Repeat this for the other half of the star.
Sew both star halves together along the center seam. Pin the center carefully to ensure the points meet perfectly, as this is the focal point of the Native Star Quilt Blanket.
Once the star is complete, begin attaching the background pieces. Start with the side rectangles, then add the corner squares to frame the star evenly.
Finish the quilt top by attaching the large background triangles to the sides. This step squares the quilt and completes the stunning Native Star Quilt Blanket layout.
Quilting, Binding, and Finishing the Native Star Quilt Blanket
Now that the quilt top is finished, it’s time to assemble the quilt sandwich for the Native Star Quilt Blanket.
Lay the backing fabric right side down, place the batting in the middle, and then center the quilt top right side up. Smooth out any wrinkles from the center to the edges.
Baste the layers together using safety pins, spray adhesive, or hand basting stitches, ensuring everything stays in place during quilting.
Choose a quilting design that complements the star motif. Straight-line quilting along the star points or echo quilting around the star enhances the visual effect of the Native Star Quilt Blanket.
Use a walking foot on your sewing machine to quilt evenly and avoid fabric shifting. Alternatively, free-motion quilting can add beautiful texture if you’re comfortable with that technique.
After quilting, trim the excess batting and backing. Prepare your binding strips by joining them end to end with diagonal seams and pressing them in half lengthwise.
Attach the binding to the quilt’s front, fold it over to the back, and hand-stitch or machine-stitch it in place to complete your Native Star Quilt Blanket.
Tips, Variations, and Maintenance for the Native Star Quilt Blanket
The Native Star Quilt Blanket offers endless possibilities for personalization depending on color choices and fabric patterns.
Try using batik fabrics for a more artistic look or solids for a classic, bold appearance that makes the star pop.
If you prefer a larger quilt, simply increase the size of the diamonds and background pieces proportionally. For a smaller throw or wall hanging, reduce the measurements accordingly.
Adding a border around the quilt can enhance the design and increase the overall size. A 5” wide border in a contrasting color frames the Native Star Quilt Blanket beautifully.
Care for your quilt by washing it gently in cold water with a mild detergent. Air dry or tumble dry on low to preserve the fabric and stitching.
Over time, your Native Star Quilt Blanket will develop that soft, cozy feel that only handmade quilts have, becoming a cherished family heirloom.
Creating a Native Star Quilt Blanket is a rewarding project that combines craftsmanship, tradition, and artistry. With precise cutting, careful piecing, and thoughtful fabric choices, your quilt will become a beautiful statement piece for years to come.
This guide provided a comprehensive step-by-step process for making the Native Star Quilt Blanket, including all fabric cuts, sewing techniques, and finishing steps. Whether you’re quilting for yourself, as a gift, or for home décor, this pattern offers both beauty and meaning.
Have you tried making a Native Star Quilt Blanket? Share your experience or ask any questions in the comments below! Your feedback and suggestions are always welcome to help fellow quilting enthusiasts.