
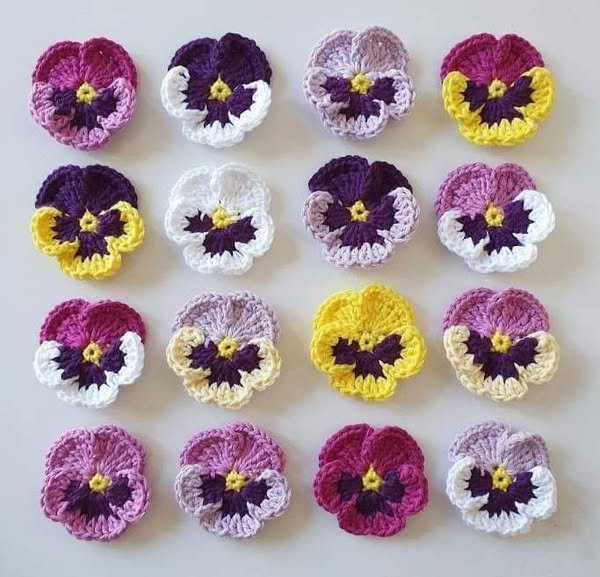
If you’re a fan of crochet and love creating beautiful flowers, the Crochet Pansies Flower – Free Pattern is a perfect project to add to your collection! Pansies are vibrant, versatile flowers that can be used in a variety of crochet projects, from decorative pieces to accessories.
Whether you are a beginner or an experienced crocheter, this free pattern will guide you step by step to make stunning crochet pansy flowers.
Crocheting flowers like pansies can be incredibly satisfying. With just a few simple stitches, you can bring life to your crochet projects. Crochet Pansies Flower patterns are often used in everything from scarves and hats to blankets and home décor.
This pattern allows you to create intricate, layered flowers that can be used to embellish many different items, adding a touch of nature’s beauty to your creations.
In this tutorial, we’ll walk you through the process of crocheting your own Crochet Pansies Flower using an easy-to-follow pattern. You will learn how to make the flower’s petals, its center, and how to assemble them into a full bloom. So grab your yarn, hook, and let’s start crocheting!
1. Materials Needed for Crochet Pansies
Before you begin your Crochet Pansies Flower, it’s important to gather all the materials you’ll need. Having everything ready at hand will make your crocheting experience smoother and more enjoyable.
-
Yarn: To make your Crochet Pansies Flower, you’ll need yarn in multiple colors. Typically, you’ll need a main color for the petals, a secondary color for the center, and a contrasting color for the details like the leaves. A lightweight yarn, such as a sport weight or worsted weight, works best for this project.
-
Crochet Hook: A standard size hook (around 3.5 mm to 4 mm) is perfect for creating tight stitches that will hold the shape of the petals. Adjust the hook size based on the thickness of your yarn.
-
Scissors: You’ll need a pair of scissors to cut your yarn when you’re done with each section of the flower.
-
Yarn Needle: A yarn needle is helpful for weaving in any loose ends at the end of your crochet project. It’s also essential for stitching the petals and center together.
-
Stitch Marker: A stitch marker is optional but can help you keep track of your rounds and where to start and end each part of the flower.
-
Stuffing (optional): If you want your flower to have a bit more dimension and puff, you can use a small amount of fiberfill stuffing to make the center of the flower pop.
Once you’ve gathered all the necessary materials, you’re ready to begin. Now, let’s move on to the next step: crocheting the flower petals.
2. How to Crochet the Pansy Petals
The petals are the heart of the Crochet Pansies Flower, and getting them just right is key to achieving the beautiful look of this flower. Follow these steps to create the petals.
-
Make a Magic Ring: Start by creating a magic ring with your yarn. This is an easy way to start crocheting in the round, and it will give you a nice, tight center. To make a magic ring, wrap your yarn around your fingers, pull through a loop, and then crochet your first stitches into the ring.
-
Crochet the First Round of Petals: For the first round, crochet a set number of single crochets into the magic ring. The exact number of stitches will vary depending on the pattern, but it’s typically around 6 to 8 single crochets. This first round forms the base for your petals.
-
Work the Petal Stitches: After your base is ready, work into each single crochet stitch to form the petals. You’ll typically crochet a combination of double crochets, treble crochets, and chain stitches to create the petal shape. Be sure to follow the pattern carefully to get the correct petal length and shape.
-
Increase for Full Petals: As you work your way around the ring, increase the number of stitches at the tip of each petal to give it volume. You may also need to adjust the size of the petals depending on the size of your project or personal preference.
-
Shape the Petals: After completing all the petals, you’ll likely need to shape them. You can do this by gently pulling on the stitches or using a small amount of stuffing to give the petals a more rounded look.
-
Finish the Petals: Once the petals are shaped and attached, tie off your yarn and weave in the ends. You’ll repeat this process for each petal in the flower, ensuring they all have the same size and shape.
Now that you’ve crocheted the petals, it’s time to create the center of the Crochet Pansies Flower. Let’s look at how to make the center!
3. Creating the Center of the Pansy
The center of the Crochet Pansies Flower is where all the magic happens, and it brings the flower to life. Follow these steps to make the center of your flower stand out.
-
Start with a Magic Ring: Just like with the petals, you’ll begin by creating a magic ring for the center. This time, you’ll work fewer stitches because the center of the flower is smaller.
-
Crochet the Center: Work several single crochet stitches into the magic ring. You can also add color-changing techniques if you want the center to have multiple colors, such as yellow with a hint of orange.
-
Add Texture to the Center: To add some texture to the center of your flower, you can crochet puff stitches or a combination of treble crochets. These stitches create a raised effect that makes the center look fuller.
-
Attach the Center to the Petals: Once the center is finished, you’ll need to attach it to the base of the flower. Position the center carefully within the petals and sew it into place using a yarn needle. Be sure to stitch securely so the center doesn’t move.
-
Weave in Loose Ends: After attaching the center, make sure to weave in any loose ends from the yarn. This ensures that your flower looks neat and tidy.
-
Optional Embellishments: If you’d like, you can add small decorative elements to the center, such as beads or small stitches, to make it stand out even more.
Once the center is completed and securely attached, your flower will begin to take shape! Now let’s move on to the final step: assembling your Crochet Pansies Flower.
4. Assembling the Crochet Pansies Flower
Assembling your Crochet Pansies Flower is the final step in bringing everything together. This is where you combine all your crochet pieces into one beautiful bloom.
-
Arrange the Petals: Lay out the petals in a circular pattern. The number of petals you choose will depend on your pattern, but typically, 5 to 7 petals make a nice full flower.
-
Sew the Petals to the Center: Once you’re happy with the arrangement, carefully sew the petals to the center of the flower using a yarn needle and matching thread. Ensure that the petals are evenly spaced and securely attached.
-
Shape the Flower: Gently shape the flower by curving the petals and pulling them into the desired position. This may take a bit of time and adjustment to make sure the petals are all pointing outward evenly.
-
Add Leaves (Optional): If your pattern includes leaves, crochet a few simple leaves using green yarn. Attach them to the base of the flower, either between the petals or on the sides.
-
Final Touches: After assembling your flower, check for any loose ends and weave them in. You can also add a little steam from an iron or use your fingers to smooth out the petals for a more professional finish.
-
Admire Your Creation: Congratulations! You’ve just completed your Crochet Pansies Flower. Admire your work and get ready to use your beautiful flower in whatever crochet project you’ve been planning!
FAQ: Frequently Asked Questions
-
How long does it take to make a Crochet Pansies Flower? The time required depends on your experience and how detailed the flower is. On average, it takes about 30 to 60 minutes to complete one flower.
-
Can I use other colors for the flower petals? Absolutely! You can customize the colors to suit your personal preference or project. Pansies come in many colors, including purple, yellow, white, and orange.
-
Can I make the flower bigger or smaller? Yes! You can adjust the size of the flower by using thicker or thinner yarn and adjusting the number of petals.
-
Can I use this pattern for other flower types? While this pattern is specifically for pansies, you can modify it slightly to create other types of flowers, like violets or daisies.
-
How do I make a bouquet of Crochet Pansies? To make a bouquet, simply crochet several flowers and arrange them together. You can bind the stems with a decorative ribbon or even crochet a stem for each flower.
-
Can I use this pattern in other crochet projects? Yes! These Crochet Pansies Flowers can be used to decorate a variety of items, such as hats, scarves, bags, and even blankets.
Join our VIP broadcast list and gain access to exclusive patterns, all for free. As a VIP member, you’ll receive the best patterns daily, delivered directly to your device. ✨📱 It’s a unique opportunity to stay up-to-date with the latest trends and designs, curated just for you. Don’t miss out on enhancing your projects and discovering new inspirations with the best patterns every day! 🎨🔝
Conclusion
In conclusion, learning how to make a Crochet Pansies Flower is a rewarding and enjoyable experience. With this free pattern, you can create beautiful, colorful flowers to use in a variety of crochet projects. Whether you’re making a bouquet, a scarf, or adding embellishments to your home décor, crochet pansies will always add a charming and lively touch.
We hope this tutorial has helped you get started with your crocheting journey. Feel free to share your creations, leave comments, and let us know how you’ve used your pansy flowers in your crochet projects!