
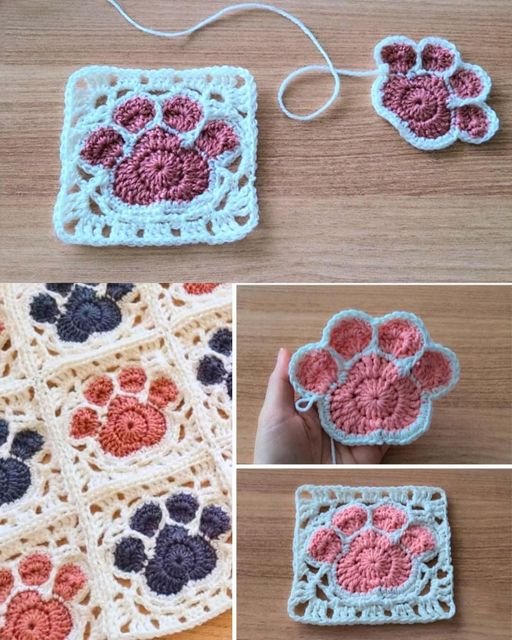
Crocheting adorable designs is a fun and rewarding hobby, and one of the cutest projects you can make is a supercute paw print. Whether you’re an animal lover, a pet owner, or simply someone who enjoys making unique crochet pieces, this tutorial will guide you through every step.
Using basic crochet stitches, you can create this charming design to add to blankets, keychains, or even pet accessories.
One of the best things about learning how to crochet a supercute paw print is its versatility. You can make it in different sizes and colors to match any project you have in mind.
With just a few materials and a little time, you’ll have a delightful paw print that showcases your creativity. Plus, this tutorial includes easy-to-follow steps, making it perfect for beginners and experienced crocheters alike.
If you’ve been searching for a step-by-step crochet guide that is both fun and practical, you’ve come to the right place. This project is not only enjoyable but also an excellent way to improve your crochet skills. Now, let’s get started on creating your own adorable paw print!
1. Materials Needed for Your Crochet Paw Print
Before you begin, it’s essential to gather the right materials. Having everything ready will make the process smoother and more enjoyable.
- Yarn Choice: Soft acrylic or cotton yarn works best for crochet appliqués.
- Crochet Hook: A hook size that complements your yarn choice, typically between 3.5mm to 5mm.
- Scissors: For trimming excess yarn.
- Tapestry Needle: Helps weave in ends neatly.
- Stitch Marker: Useful for keeping track of rounds.
Choosing the right yarn is crucial for a clean and well-defined paw print. Thicker yarn will create a larger print, while thinner yarn will result in a more delicate design.
Using a proper crochet hook ensures you achieve the right tension in your stitches. If your stitches are too tight or too loose, adjusting the hook size may help.
A good pair of scissors is essential for cutting the yarn cleanly without fraying. Investing in sharp, high-quality scissors can make a significant difference.
A tapestry needle is handy for weaving in loose ends, giving your crochet paw print a neat and professional look.
Stitch markers are optional but can be beneficial, especially if you are working in rounds or need to keep track of stitch placement.
2. Step-by-Step Guide to Crocheting the Paw Print
Now that you have your materials ready, let’s begin the process of crocheting the paw print.
Start by creating a magic ring, which serves as the foundation for your paw print design.
Work a series of single crochet stitches into the magic ring to form the base of the paw pad.
Next, crochet four smaller circles to create the individual toes of the paw. These circles can be made using half-double or double crochet stitches for a slightly raised texture.
Attach the toes to the base by sewing them securely in place using a tapestry needle or slip stitches.
If you want to make your paw print more unique, consider adding a contrasting color for the toe pads.
Once everything is attached, weave in any loose ends and trim the excess yarn for a polished look.
3. Customization Ideas for Your Paw Print
Customizing your crochet paw print can make it even more special. Here are a few ideas to personalize your design.
Use different yarn colors to match a pet’s fur or to create a playful and vibrant look.
Add a small loop or keyring attachment to turn your paw print into a keychain or bag charm.
Sew the paw print onto hats, scarves, or blankets to give them a personalized touch.
Create multiple paw prints and connect them to form a crochet garland for pet lovers.
Embroider initials or small details onto the paw pads to make them unique gifts.
Experiment with different stitch techniques, such as puff stitches, to give the paw print a textured look.
4. Common Mistakes and How to Avoid Them
Even experienced crocheters can run into challenges when working on new designs. Here are some common mistakes and how to fix them.
If your paw print is uneven or misshapen, ensure you are maintaining even tension throughout your stitches.
Struggling with attaching the toes neatly? Try blocking the individual pieces before sewing them together.
If the stitches appear too tight, consider using a larger crochet hook or loosening your grip.
For beginners, keeping track of stitch counts can be difficult. Using stitch markers can help prevent mistakes.
If the yarn splits while working, opt for high-quality, non-fraying yarn for better stitch definition.
Finally, if the finished paw print curls up, gently steam block or press it with a damp cloth to help it lay flat.
FAQ About Crocheting a Supercute Paw Print
Q: What is the best yarn to use for a crochet paw print?
A: Cotton or acrylic yarn works best since they provide good stitch definition and durability.
Q: Can I make a larger or smaller paw print?
A: Yes! Adjusting your yarn weight and hook size will change the final dimensions of the paw print.
Q: Is this project beginner-friendly?
A: Absolutely! This tutorial includes basic stitches, making it perfect for beginners.
Q: How can I attach the paw print to a garment?
A: You can sew it on with a tapestry needle or use fabric glue for a non-sewing option.
Q: What can I use the crochet paw print for?
A: It can be used as a patch, keychain, appliqué, or decoration for crochet projects.
Q: How do I keep my crochet stitches even?
A: Practice consistent tension and consider using a stitch marker to track your progress.
Join our VIP broadcast list and gain access to exclusive patterns, all for free. As a VIP member, you’ll receive the best patterns daily, delivered directly to your device. ✨📱 It’s a unique opportunity to stay up-to-date with the latest trends and designs, curated just for you. Don’t miss out on enhancing your projects and discovering new inspirations with the best patterns every day! 🎨🔝
Conclusion
Learning how to crochet a supercute paw print is a fun and creative way to enhance your crochet skills while making adorable appliqués. This step-by-step tutorial covers everything from materials to customization options, helping you create the perfect paw print for any DIY project.
VIDEO TUTORIAL
We hope you enjoyed this guide! If you have any feedback or suggestions, please leave a comment with your thoughts. Happy crocheting!