
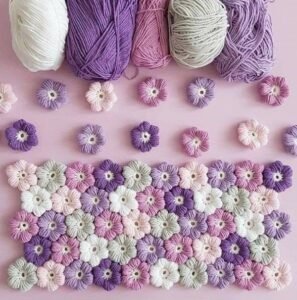
The Puff flower – Crochet Pattern has become one of the most loved and versatile crochet motifs among crafters. Its delicate, textured design makes it perfect for creating accessories, home décor, or adding a special touch to larger projects like blankets and shawls. This charming crochet motif combines simplicity with creativity, giving beginners and experienced crocheters alike the chance to explore their skills. Whether you want to make a single puff flower or a collection of them for a larger project, this pattern offers endless possibilities.
Crocheting puff flowers can also be an incredibly relaxing activity. The repetitive stitches allow you to unwind while still producing something beautiful and functional. By using the Puff flower – Crochet Pattern, you can experiment with different yarn textures, sizes, and colors, which makes the motif adaptable for almost any type of project. Crafters especially love using multiple flowers joined together to create vibrant and textured designs. The flexibility of this pattern ensures that no two projects look the same, giving you full freedom to personalize your work.
Another reason why so many people enjoy this crochet design is its practicality. The Puff flower – Crochet Pattern can be created quickly, making it an ideal project for those who prefer instant results. Unlike larger projects that may take weeks or months, puff flowers can be finished in just a short amount of time. They are also an excellent way to use leftover yarn from other projects, which means you can reduce waste while creating beautiful and useful items. This balance between beauty and functionality is what makes the puff flower a timeless crochet motif.
Understanding the Puff Flower – Crochet Pattern
To begin with, the Puff flower – Crochet Pattern is built around puff stitches. These stitches create a raised, rounded effect that makes each petal look soft and three-dimensional. The puff stitch itself is easy to master, requiring multiple yarn overs pulled together to form a single stitch. Once you become comfortable with this technique, you can create petals that resemble little puffs of yarn, giving your flower its distinctive texture.
When working on this design, many crocheters start with a magic ring or a small chain loop. This becomes the center of the flower where all the petals will be attached. The number of petals can vary, but most puff flowers usually feature six to eight petals. Each petal is made by forming a puff stitch, often separated by chains that allow the flower to spread naturally. This method ensures that the flower remains symmetrical while still looking soft and organic.
The beauty of the Puff flower – Crochet Pattern is that it can be adjusted based on personal preference. You can choose to make large puff flowers by using thicker yarn and a larger hook, or opt for delicate and small flowers with lightweight yarn. Many crafters enjoy mixing and matching sizes to create dynamic patterns for blankets, cushion covers, or even wall hangings. By experimenting with different yarns, you can produce puff flowers that look elegant, playful, or rustic, depending on the project you are working on.
Another interesting aspect is that puff flowers can be used as standalone pieces or connected together. When joined, they form a stunning mosaic-like effect that works beautifully for home décor projects. Many crocheters love to join puff flowers into garlands, table runners, or bedspreads. This modular approach allows you to crochet at your own pace, adding one flower at a time until you reach the desired size for your project.
Color choice also plays an important role in this pattern. Using contrasting colors for the center and petals makes each flower stand out. On the other hand, using a monochromatic palette gives a soft, cohesive look that is perfect for subtle home decorations. Because of this flexibility, the Puff flower – Crochet Pattern adapts to different styles and purposes, making it a must-learn motif for anyone passionate about crochet.
Finally, this pattern is great for beginners who want to practice new techniques. While the puff stitch may seem complicated at first, with a little practice it quickly becomes second nature. Once mastered, you can use it not only for flowers but also in other crochet projects like scarves, bags, and cardigans. This makes learning the puff stitch an investment in your overall crochet skills.
Step-by-Step Guide to Making a Puff Flower
Creating the Puff flower – Crochet Pattern begins with a simple foundation. Start by making a magic ring or chaining four and joining with a slip stitch to form a loop. This loop will serve as the base for the flower’s petals. Into this loop, you will begin forming your puff stitches that create the flower’s iconic design.
To make a puff stitch, yarn over and insert your hook into the loop. Pull up a long loop, yarn over again, and insert your hook back into the loop. Repeat this process several times until you have multiple loops on your hook. The exact number can vary, but most patterns recommend four to six yarn overs. Once you have enough loops, yarn over and pull through all of them at once, then secure with a chain. This creates the puff effect that gives the flower its three-dimensional look.
After completing your first puff stitch, chain one or two to create space between the petals. Continue working puff stitches into the center loop until you have the desired number of petals, usually six. As you progress, you will notice the flower taking shape, with each puff stitch forming a rounded petal.
Once all the petals are complete, close the flower by joining with a slip stitch into the first puff. At this point, you can fasten off the yarn and weave in the ends. Your puff flower is now ready to use on its own, or you can begin attaching multiple flowers together to create larger projects.
Experimenting with color changes is another way to make your puff flower unique. For example, you can start with a yellow yarn for the center, then switch to a different color for the petals, giving it a realistic floral appearance. Alternatively, you can use multicolored yarn to produce vibrant and playful flowers that require no extra effort in color changing.
The simplicity of this step-by-step process means that anyone can create puff flowers with just a little patience and practice. Whether you are new to crochet or an experienced crafter, the Puff flower – Crochet Pattern gives you endless opportunities to express your creativity.
Creative Uses for Puff Flowers
One of the most appealing aspects of the Puff flower – Crochet Pattern is its versatility. These small, textured flowers can be used in countless ways, adding both function and beauty to your projects. For many crafters, puff flowers are the perfect starting point for experimenting with design.
A popular use is to turn puff flowers into accessories. By attaching a simple clip or pin to the back, you can transform a puff flower into a hair accessory, brooch, or bag decoration. These little touches can brighten up everyday items and make wonderful handmade gifts.
Another creative application is incorporating puff flowers into home décor. Sew them onto cushion covers, throws, or tablecloths to add texture and a handmade feel. A collection of puff flowers stitched together can even become a beautiful wall hanging or centerpiece for your dining table. The options are as varied as your imagination.
Many crocheters also enjoy using puff flowers to create jewelry. Lightweight yarn makes delicate earrings or necklaces that are unique and stylish. These accessories are perfect for summer outfits or as thoughtful gifts for friends and family.
For larger projects, puff flowers can be joined to form blankets or bedspreads. This modular approach allows you to build your project flower by flower, making it easier to manage. Each puff flower adds dimension and color, resulting in a cozy and visually appealing finished piece.
Finally, puff flowers can serve as embellishments for clothing. A simple cardigan or plain scarf becomes special when decorated with a few strategically placed puff flowers. This is a wonderful way to refresh old clothing items or personalize handmade garments.
Tips for Perfecting the Puff Flower – Crochet Pattern
Although the Puff flower – Crochet Pattern is beginner-friendly, there are a few tips that can help you achieve the best results. Paying attention to small details will ensure that your flowers look neat, even, and professional.
First, make sure to keep your tension consistent. Uneven tension can cause petals to look lopsided or uneven in size. Practicing your puff stitches on a scrap piece of yarn before starting your main project can help you get the feel for it.
Second, consider your yarn choice carefully. Softer yarns like cotton or acrylic work well for puff flowers because they create defined stitches while still being easy to work with. Bulky yarns, on the other hand, produce larger and fluffier flowers, which may be ideal for blankets or cushions.
Third, experiment with different hook sizes. A smaller hook will create tighter petals, while a larger hook will give a softer, looser appearance. Adjusting the hook size allows you to control the look of your puff flowers and customize them for different projects.
Another tip is to plan your color palette before you begin. Deciding on complementary or contrasting colors ensures that your final project has a cohesive look. Keeping a color wheel handy can help you choose shades that work well together.
When joining multiple puff flowers, take care to sew them together securely. Weak joins may come apart over time, especially in items that will be handled frequently like blankets or bags. Using a whip stitch or slip stitch join can give you strong and clean connections.
Lastly, don’t be afraid to practice. Like any crochet technique, the puff flower improves with repetition. The more you practice, the more natural the stitches will feel, and the more consistent your flowers will look.
FAQ about Puff Flower – Crochet Pattern
1. What is the Puff flower – Crochet Pattern used for?
The puff flower is used to create decorative motifs for accessories, home décor, and larger projects like blankets and cushions.
2. Is the Puff flower – Crochet Pattern suitable for beginners?
Yes, it is beginner-friendly. Once you learn the puff stitch, you can easily create puff flowers with practice.
3. How long does it take to make a puff flower?
Depending on your skill level, a puff flower can be completed in about 10–20 minutes.
4. What yarn is best for the Puff flower – Crochet Pattern?
Cotton or acrylic yarns are commonly recommended because they give a defined and neat appearance to the puff stitches.
5. Can I use puff flowers in clothing?
Yes, puff flowers are perfect as embellishments for cardigans, scarves, hats, or even baby clothes.
6. How many puff flowers do I need for a blanket?
This depends on the size of the blanket and the size of the flowers. On average, you may need several dozen to a few hundred puff flowers for a full-sized blanket.
7. Do puff flowers need blocking?
While not always necessary, blocking can help puff flowers lay flat and look more polished, especially if they will be joined together.
8. Can puff flowers be washed?
Yes, but it depends on the yarn used. Always check the yarn label for care instructions.
9. Can puff flowers be made with multicolored yarn?
Absolutely! Using multicolored or variegated yarn produces unique and vibrant puff flowers without needing to change colors.
10. How do I join puff flowers together?
You can use slip stitches, whip stitches, or crochet them together as you go, depending on the look you want.
Video Tutorial:
The Puff flower – Crochet Pattern is a delightful project that combines beauty, creativity, and practicality. From small accessories to large home décor pieces, this crochet motif adapts to countless applications. With a little practice, you can master the puff stitch and begin exploring the many ways to use these textured flowers.
If you are looking for a project that is both fun and rewarding, the puff flower is a wonderful choice. Now that you know the techniques, tips, and creative possibilities, you are ready to try it yourself. I would love to hear your thoughts—share your opinion and suggestions about this pattern so we can continue learning and creating together.