
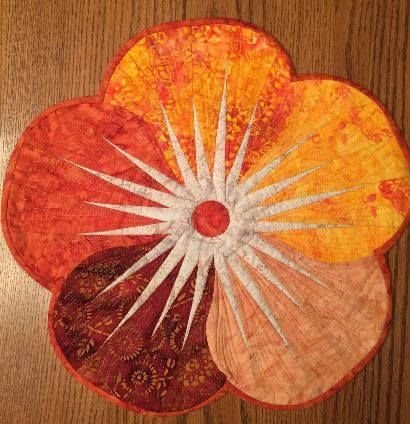
How to finish Quiltworx Petals placemats Pattern is one of the most searched topics among quilters who fall in love with the vibrant design but feel unsure about the final steps. Finishing a placemat may seem simple at first glance, yet when working with a detailed pattern like this one, precision and technique truly matter. From trimming and squaring to binding and pressing, every stage influences the final look and durability of your project. If you have invested time in piecing the petals beautifully, you deserve a flawless finish that highlights your effort.
The beauty of the Quiltworx Petals placemats Pattern lies in its structured approach and striking petal shapes. Designed to showcase color transitions and curved piecing effects, this pattern allows quilters to explore creative combinations while maintaining professional results. However, the final assembly process is where many makers hesitate. Questions about quilting density, binding choices, or fabric alignment are common, especially for those who want their placemats to look polished and long-lasting.
In this complete guide, you will learn exactly how to finish Quiltworx Petals placemats Pattern step by step, using proven quilting techniques. We will explore trimming, layering, quilting, binding, and final pressing methods that elevate your placemats from beautiful tops to functional works of art. Whether you are a confident beginner or an experienced quilter refining your skills, this guide will provide clarity, structure, and professional tips to ensure outstanding results.
Preparing and Trimming Your Quiltworx Petals Placemats
The first crucial step in how to finish Quiltworx Petals placemats Pattern is accurate trimming. Once your petal blocks are fully pieced, you must square them carefully. Using a large quilting ruler and rotary cutter ensures straight edges and consistent measurements across all placemats.
Before trimming, press your placemat top thoroughly. Proper pressing flattens seams and prevents fabric distortion. Always press rather than iron to avoid stretching the bias edges, especially since petal shapes often include angled seams.
Measure the pattern’s recommended finished size and confirm your block matches or slightly exceeds it. It is better to trim down than to discover the placemat is too small. Accuracy at this stage guarantees clean, even binding later.
Check each corner carefully. Uneven corners can affect the final alignment of the binding. Use a square ruler to ensure perfect 90-degree angles for professional results.
After trimming, inspect seam allowances along the edges. If any seams are too close to the edge, consider reinforcing them with a narrow line of stitching. This extra step improves durability during everyday use.
Finally, stack all trimmed placemat tops together and compare their sizes. Consistency is key in a coordinated table setting. Identical measurements will make the finishing process smoother and more satisfying.
Layering and Quilting Techniques for a Professional Finish
Layering is essential when learning how to finish Quiltworx Petals placemats Pattern properly. Each placemat requires three layers: the quilt top, batting, and backing fabric. Choose a medium-weight cotton batting for structure without excessive thickness.
Cut your batting and backing slightly larger than the trimmed top. This margin allows for shifting during quilting and ensures full coverage. Smooth each layer carefully to prevent wrinkles or folds.
Secure the layers using quilting pins or temporary spray adhesive. Even small placemats benefit from proper basting, which prevents puckering during stitching.
When selecting a quilting design, consider the petal shapes. Echo quilting around each petal enhances the dimensional effect and emphasizes the pattern’s beauty. Straight-line quilting also works well for a modern, clean finish.
Maintain balanced quilting density across the placemat. Too much stitching can stiffen the fabric, while too little may reduce durability after washing. Aim for evenly spaced lines that stabilize all layers.
After quilting, trim excess batting and backing flush with the quilt top. Take your time during this step to maintain clean edges, which will simplify the binding process.
Binding Your Quiltworx Petals Placemats with Precision
Binding is the defining stage of how to finish Quiltworx Petals placemats Pattern successfully. It frames your work and protects the edges from wear. Choose a binding fabric that complements or contrasts with the petals for visual impact.
Cut binding strips on the straight grain for stability. For placemats, 2.25-inch-wide strips are commonly used, but confirm based on your preferred seam allowance and thickness.
Join the strips with diagonal seams to reduce bulk. Press the seams open to create a smooth, even binding strip ready for application.
Attach the binding to the front of the placemat using a consistent quarter-inch seam allowance. Start along one side, leaving a small tail for joining at the end.
At each corner, fold the binding carefully to create neat mitered corners. This detail significantly enhances the professional appearance of your finished placemat.
Finally, fold the binding to the back and secure it by hand stitching or machine stitching. Hand stitching offers an invisible finish, while machine stitching provides durability and speed.
Final Pressing, Care, and Presentation Tips
The last phase of how to finish Quiltworx Petals placemats Pattern involves refining the final details. Begin with a gentle final press to flatten the binding and enhance the crisp edges.
Use steam carefully and avoid pressing too aggressively over quilted areas. Excessive heat may distort the texture created by your stitching lines.
Inspect both front and back for loose threads. Trim them carefully to maintain a clean finish and prevent unraveling over time.
Wash the placemats on a gentle cycle if you prefer a soft, slightly textured look. Alternatively, keep them unwashed for a crisp presentation at formal gatherings.
Consider adding a small fabric label on the back. Personal touches like labels add authenticity and are especially meaningful if you plan to gift your placemats.
Store the finished placemats flat or gently rolled to preserve their shape. Proper storage prevents creasing and keeps them ready for use at any time.
Frequently Asked Questions About How to Finish Quiltworx Petals Placemats Pattern
What is the best batting for Quiltworx Petals placemats?
A medium-weight cotton batting is generally ideal. It provides structure without making the placemat too stiff or bulky, allowing it to lie flat on the table.
Should I quilt before trimming the edges?
No, trimming should be done after piecing the top and before layering. Final trimming happens again after quilting to clean up the edges prior to binding.
Can beginners successfully complete the Quiltworx Petals placemats Pattern?
Yes. While the pattern includes detailed piecing, careful trimming and step-by-step finishing make it manageable for confident beginners willing to follow instructions closely.
Is machine binding acceptable for placemats?
Absolutely. Machine binding is durable and efficient, especially for items that will be washed frequently. Many quilters prefer it for everyday placemats.
How do I ensure perfectly square placemats?
Use large quilting rulers, measure twice before trimming, and confirm 90-degree corners with a square ruler before attaching binding.
Do I need to prewash fabrics before starting?
Prewashing is optional but recommended if you are concerned about color bleeding or shrinkage. It ensures consistency after the first wash.
VIDEO TUTORIAL
Learning how to finish Quiltworx Petals placemats Pattern transforms your beautifully pieced blocks into durable, elegant table décor. In this guide, you discovered how to trim accurately, layer and quilt effectively, apply binding with precision, and refine the final presentation. Each stage contributes to a polished result that highlights the artistry of the Quiltworx Petals placemats Pattern while ensuring functionality for everyday use.
By applying these structured techniques, you can confidently complete your placemats with professional quality and long-lasting durability. Take your time, focus on accuracy, and enjoy the finishing process as much as the piecing itself. If this guide helped you understand how to finish Quiltworx Petals placemats Pattern, please leave your honest opinion and share your suggestions. Your feedback helps improve future quilting guides and supports a creative community passionate about craftsmanship.