
If you’re looking to learn how to make a Blazing Arrows, you’ve come to the right place! This exciting and creative project combines fun, skill, and a dash of artistry to create a beautiful and striking design.
Whether you’re a seasoned crafter or a beginner eager to learn a new technique, this tutorial will guide you through the process step by step. By the end, you’ll have a stunning Blazing Arrows piece that you can proudly display or use for your own purposes.
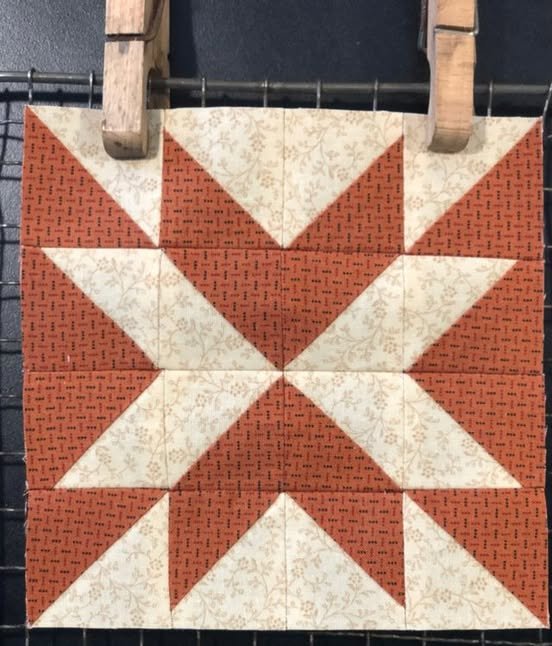
The Blazing Arrows pattern is a unique and bold design, often used in quilting or fabric art. The beauty of this pattern lies in its simplicity and the striking contrast of sharp arrows, making it an excellent choice for beginners and experienced crafters alike.
This design can be adapted to many different crafts, from quilts to wall hangings or even table runners. In this tutorial, we’ll focus on guiding you through the process of creating a Blazing Arrows piece, from choosing the right materials to piecing the blocks together.
This design can be customized in various ways, depending on your style, fabric choices, and even your skill level. Follow the instructions, and you’ll soon be able to create your own Blazing Arrows masterpiece. Let’s get started!
1. Understanding the Blazing Arrows Pattern
Before diving into the process of making a Blazing Arrows, it’s essential to understand the pattern’s structure and how it all comes together. The Blazing Arrows design features sharp, triangular shapes that point in different directions. These triangles are often arranged in a way that gives the impression of arrows blazing across the fabric.
-
Basic Shape of the Arrows: The Blazing Arrows pattern is characterized by a series of triangles that are sewn together to create the arrows. The arrows are typically composed of two or more triangles, which can be combined to form a larger arrow shape. The angles of the triangles and the way they are pieced together create the appearance of arrows soaring in different directions.
-
Fabric Selection: To create the Blazing Arrows design, you’ll need to choose fabrics that contrast well with each other. The traditional approach is to use a combination of solid fabrics and patterned fabrics to make the arrows stand out against the background. You can also experiment with different colors to add vibrancy and uniqueness to your design.
-
Block Construction: The Blazing Arrows design is typically made up of several individual blocks that are then pieced together to form the larger quilt or piece of artwork. Each block consists of multiple triangles, and the triangles are sewn together in specific ways to create the arrow shapes.
-
Arrow Direction and Layout: One of the most striking features of the Blazing Arrows design is the way the arrows are laid out. The arrows can be arranged to point in all directions, creating a dynamic and eye-catching pattern. You can experiment with different layouts to see which one works best for your project.
-
Design Variations: There are many variations of the Blazing Arrows pattern. Some designs incorporate more arrows, while others focus on larger individual arrows. The overall layout and direction of the arrows can also be adjusted to create different visual effects.
-
Skill Level: The Blazing Arrows design is beginner-friendly, though it does require some precision when cutting and piecing the triangles together. If you’re a novice, don’t worry! This tutorial will walk you through each step, ensuring you create a beautiful Blazing Arrows piece that you can be proud of.
Understanding the basic principles of the Blazing Arrows pattern will make it easier for you to assemble the blocks and create a stunning final product. Now let’s dive into the step-by-step process of making your very own Blazing Arrows design!
2. Materials You Will Need
To get started with creating a Blazing Arrows design, you’ll need to gather a few essential materials. These items will help you construct your piece and ensure that you get clean, precise cuts and stitches.
-
Fabric: Choose several different fabrics for the arrows and the background. You’ll need at least two contrasting fabrics for the arrows themselves (one for the triangle’s body and one for the arrow’s tip). A solid or patterned fabric will work for the background.
-
Rotary Cutter and Mat: A rotary cutter and cutting mat will make cutting your fabric pieces much easier and more accurate. This is especially helpful for cutting triangles and squares.
-
Ruler: A quilting ruler will help ensure that your cuts are straight and even. Use it to measure and mark the fabric before cutting.
-
Needles and Thread: For piecing the blocks together, you’ll need a sewing machine, needles, and thread. Make sure to choose a thread color that blends well with your fabric choice.
-
Iron: Pressing your fabric and seams will ensure that your blocks are crisp and precise. An iron is essential for making sure everything lays flat.
-
Pins or Fabric Clips: Pins or fabric clips will be needed to hold the fabric pieces in place as you sew them together. These are particularly helpful when working with triangles.
With all of your materials in hand, you’ll be ready to start piecing together the Blazing Arrows design. Let’s move on to the next step: creating the arrow blocks!
3. Step-by-Step Guide to Creating the Blazing Arrows Blocks
Creating the individual blocks is the heart of the Blazing Arrows design. Follow these steps to make your arrow blocks and prepare them for assembly.
-
Cutting the Triangles: Begin by cutting triangles from your chosen fabrics. You’ll need two different fabrics for each arrow, so cut one set of triangles for the arrow’s body and another for the tip. Use your rotary cutter, mat, and ruler to ensure accurate cuts. A typical Blazing Arrows block consists of two triangles for each arrow.
-
Sewing the Triangles: Once your triangles are cut, it’s time to sew them together. Start by placing the fabric pieces right sides together, aligning the edges. Use a quarter-inch seam allowance to sew along the edges, and press the seam flat once it’s sewn.
-
Making the Arrow Blocks: Now that you have two sewn-together triangles, it’s time to arrange them into a square block. Arrange the arrow pieces as desired, making sure the points of the arrows face in the direction you want. Pin the pieces in place, then sew them together to form the finished block.
-
Adding the Background: Once you’ve created your arrow blocks, you’ll need to add a background fabric. Cut squares or rectangles of your background fabric and sew them around the edges of your arrow blocks. This will help the arrows stand out against the backdrop and create a balanced design.
-
Pressing the Seams: After piecing together the blocks, press the seams flat. This will give your blocks a crisp, professional finish and make assembly easier.
-
Arranging the Blocks: Once you’ve completed several arrow blocks, arrange them into the layout of your choice. You can position them in rows or place them randomly for a more organic look. Experiment with different configurations until you’re happy with the design.
Once your blocks are arranged, you can move on to the final step of creating your Blazing Arrows piece: assembling the entire design.
4. Assembling Your Blazing Arrows Design
Now that you have all your arrow blocks ready, it’s time to assemble your Blazing Arrows design into a complete project.
-
Joining the Blocks: Begin by joining the blocks together in rows. Pin the blocks together and sew along the edges using a quarter-inch seam allowance. Press the seams flat after each row is joined.
-
Joining the Rows: Once you have several rows of blocks, it’s time to sew them together. Pin the rows together, making sure the seams align. Use the same quarter-inch seam allowance, and press the seams as you go.
-
Adding Borders (Optional): If you want to add a border to your Blazing Arrows design, now is the time. Choose a complementary fabric for the border, and sew it around the entire piece to frame the arrows and give the project a finished look.
-
Final Pressing: After the entire design is assembled, give the whole piece a final press to smooth out any wrinkles or seams.
-
Quilting (Optional): If you’re making a quilt, you can quilt your Blazing Arrows design by sewing through all the layers. You can quilt by hand or machine, depending on your preference.
-
Binding: To complete your piece, add a quilt binding around the edges to give it a polished, professional finish. Choose a binding fabric that complements the overall design and sew it into place.
Congratulations! You’ve now completed your Blazing Arrows design. Whether you made a quilt, wall hanging, or another project, you can proudly display your beautiful creation.
FAQ: Frequently Asked Questions About Making Blazing Arrows
-
Can I use other shapes instead of triangles for the arrows? While the traditional Blazing Arrows pattern uses triangles, you can experiment with other shapes if you prefer a more unique design.
-
Is this project suitable for beginners? Yes! The Blazing Arrows pattern is beginner-friendly, especially if you take your time with the cutting and piecing steps.
-
What type of fabric should I use for the arrows? Choose fabrics that contrast well with the background. Solid fabrics work well for the arrows, but patterned fabrics can also add visual interest.
-
How can I make my Blazing Arrows design larger? To make a larger piece, simply add more blocks and arrange them as desired.
-
Do I need special tools to make this project? The basic tools you’ll need are a rotary cutter, mat, ruler, pins, and a sewing machine. These tools will help ensure accurate cuts and seams.
-
Can I use the Blazing Arrows design for other crafts? Yes! The Blazing Arrows pattern can be adapted for quilts, wall hangings, pillow covers, or even tote bags.
Join our VIP broadcast list and gain access to exclusive patterns, all for free. As a VIP member, you’ll receive the best patterns daily, delivered directly to your device. ✨📱 It’s a unique opportunity to stay up-to-date with the latest trends and designs, curated just for you. Don’t miss out on enhancing your projects and discovering new inspirations with the best patterns every day! 🎨🔝
Conclusion
In conclusion, learning how to make a Blazing Arrows design is an exciting and rewarding project that will help you build your crafting skills while creating something beautiful. Whether you’re working on a quilt, a wall hanging, or another project, the Blazing Arrows pattern allows for creative expression and customization.
VIDEO TUTORIAL
We hope this tutorial has helped you get started with the Blazing Arrows design. If you have any questions or would like to share your own experiences with this project, feel free to leave a comment. Happy crafting!
