
How to make a flower trivet pattern is a question many craft lovers ask when they want to combine beauty and functionality in their kitchen décor. Whether you enjoy crochet, sewing, quilting, or other DIY crafts, creating a floral-inspired trivet is a rewarding and practical project. A trivet not only protects your surfaces from hot pots and pans but also adds a charming handmade touch to your home. In this comprehensive guide, you will learn everything you need to confidently start and complete your own flower trivet design.
Learning how to make a flower trivet pattern allows you to explore creativity while improving your crafting skills. This project is ideal for beginners who want to practice basic stitches or techniques, as well as for experienced artisans looking to design unique handmade gifts. The floral shape offers versatility in color combinations, textures, and styles, making it easy to personalize your creation according to your kitchen theme or seasonal décor.
In this detailed article, we will break down the entire process of how to make a flower trivet pattern, from choosing materials and understanding pattern structure to assembling and finishing your project. You will also discover useful tips for durability, safety, and style. By following these steps and techniques, you can create a beautiful and heat-resistant trivet that is both decorative and functional.
Materials and Tools Needed to Make a Flower Trivet Pattern
Before starting how to make a flower trivet pattern, gathering the right materials is essential. Choosing quality supplies will significantly affect the final result and durability of your trivet. Depending on the crafting method you prefer, the materials may vary slightly, but the core items remain similar.
First, select a heat-resistant yarn or fabric. Cotton yarn is one of the best options for crochet or knit trivets because it can withstand high temperatures without melting. Avoid synthetic materials, as they may warp or become damaged when exposed to heat. If sewing, choose thick cotton fabric or quilted layers for added insulation.
Next, you will need basic crafting tools. For crochet, this includes a suitable crochet hook that matches your yarn weight. For sewing projects, you will need scissors, pins, a sewing needle or sewing machine, and thread that complements your chosen fabric colors.
You may also want stitch markers, measuring tape, and a tapestry needle for finishing. These tools help maintain accuracy in your flower trivet pattern and ensure even shaping of petals. Proper measurement keeps your trivet symmetrical and visually appealing.
Another important material is thermal batting if you are sewing. Adding a heat-resistant layer between fabric pieces increases protection for your countertops. This step enhances the functionality of your flower trivet while maintaining its decorative charm.
Finally, consider embellishments. Although optional, details such as embroidered centers, textured stitches, or layered petals can elevate your design. Just ensure all additions remain heat-safe and securely attached to preserve the trivet’s purpose.
Step-by-Step Instructions on How to Make a Flower Trivet Pattern
Understanding the construction process is key when learning how to make a flower trivet pattern. Begin by deciding the size of your trivet. A standard trivet typically measures between 7 and 9 inches in diameter, providing enough space for most pots and dishes.
Start with the flower center. In crochet, this often involves creating a magic ring and working several single or double crochet stitches into the circle. For sewing, cut a circular fabric piece that will serve as the base layer. The center forms the foundation of the entire pattern.
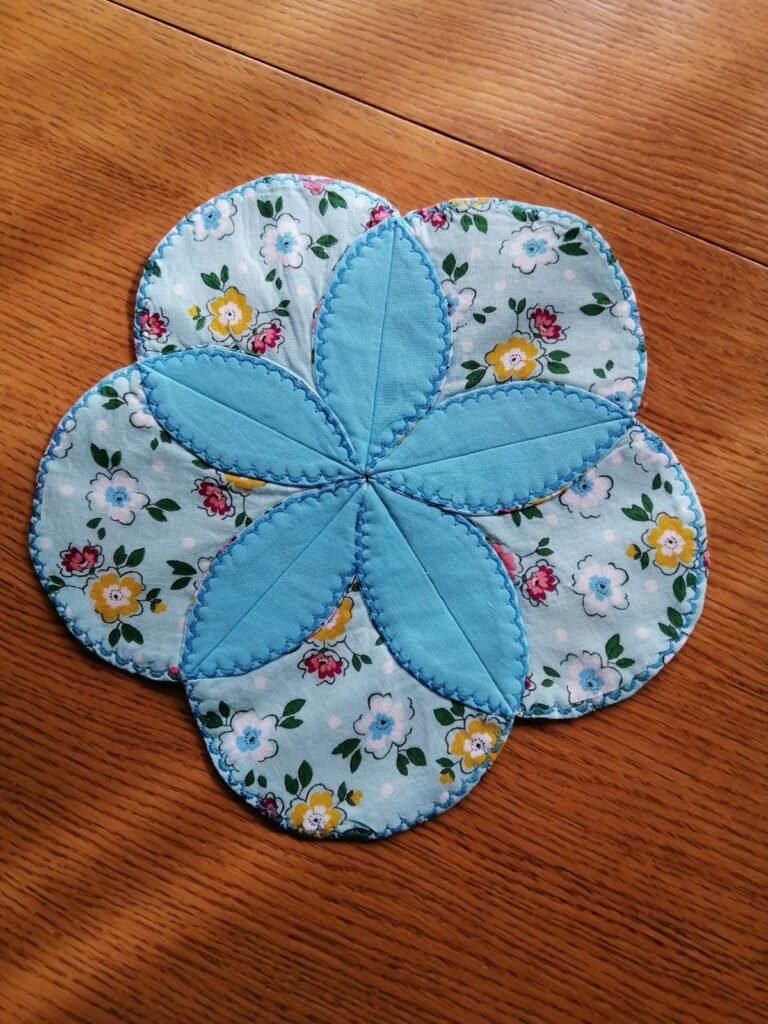
Once the center is complete, build the petals. In crochet, petals are formed by working clusters of stitches into specific points around the circle. This creates a natural floral shape. In fabric versions, cut petal shapes and attach them evenly around the base circle.
Maintaining consistent spacing is essential in how to make a flower trivet pattern. Count stitches carefully and ensure each petal mirrors the others in size and shape. Uniformity gives the finished piece a professional and polished look.
After completing the petal layer, reinforce the structure. For crochet, consider adding a second round in a tighter stitch to strengthen the trivet. For sewn versions, stitch around the edges and secure all layers together with even seams.
Finish by weaving in loose ends or trimming excess threads. Blocking crochet pieces can help flatten and shape the petals evenly. This final step ensures your flower trivet lies flat and remains stable under hot cookware.
Design Variations and Creative Customization
One of the most enjoyable aspects of learning how to make a flower trivet pattern is exploring design variations. Flowers come in countless shapes and sizes, giving you unlimited creative possibilities. You can experiment with simple five-petal designs or create more elaborate layered blossoms.
Color selection plays a major role in customization. Choose bright, contrasting colors for a cheerful kitchen accent, or opt for neutral tones for a minimalist aesthetic. Seasonal palettes, such as pastels for spring or warm hues for autumn, can make your trivet part of your décor theme.
Texture is another design element to consider. Using bobble stitches, puff stitches, or layered fabric techniques adds dimension and visual interest. Textured petals not only enhance appearance but also improve insulation by increasing thickness.
You may also adjust the number of petals. A six- or eight-petal flower provides a fuller look, while a simpler five-petal version is quicker to complete. Modifying the petal count slightly changes the geometry and style of your finished trivet.
Adding a hanging loop is a practical enhancement. A small loop made from yarn or fabric allows you to hang your trivet when not in use. This keeps it accessible and doubles as decorative wall art.
For those interested in gifting, consider personalizing the center with initials or embroidery. Handmade trivets make thoughtful housewarming presents, holiday gifts, or additions to handmade kitchen sets.
Tips for Durability, Safety, and Long-Term Use
When mastering how to make a flower trivet pattern, safety and durability should always be priorities. Since trivets are exposed to high temperatures, selecting appropriate materials is essential to prevent damage or hazards.
Always use 100% cotton yarn or fabric for heat resistance. Synthetic fibers can melt under hot cookware, which may cause burns or damage. Thick cotton layers provide better protection for countertops and dining tables.
Double-layering your trivet increases insulation. In crochet projects, you can create two identical flower pieces and stitch them together. In sewn versions, include thermal batting between layers for added safety.
Ensure tight stitching throughout your flower trivet pattern. Loose stitches or gaps may reduce heat resistance. Keeping stitches compact enhances durability and ensures the trivet maintains its shape over time.
Wash your trivet gently in cool or warm water. Avoid high heat drying, which may shrink cotton fibers. Air drying helps preserve the shape and structural integrity of the petals.
Finally, periodically inspect your trivet for wear and tear. If you notice thinning areas or loose threads, repair them promptly. Proper maintenance ensures your handmade flower trivet remains functional and attractive for years.
FAQ About How to Make a Flower Trivet Pattern
What is the best material for making a flower trivet pattern?
The best material is 100% cotton yarn or fabric because it is heat-resistant and durable. Avoid synthetic fibers as they may melt under high temperatures.
Is a flower trivet suitable for beginners?
Yes, learning how to make a flower trivet pattern is beginner-friendly. Simple petal designs and basic stitches make it an excellent starter project.
How thick should a trivet be?
A trivet should be thick enough to protect surfaces from heat. Double layers of cotton or added thermal batting provide sufficient insulation.
Can I wash a handmade flower trivet?
Yes, most cotton trivets are washable. Use gentle cycles and air dry to maintain shape and durability.
How long does it take to complete a flower trivet?
Depending on skill level and design complexity, it can take anywhere from one to three hours to complete a standard-sized flower trivet.
Can I sell flower trivets I make?
Yes, handmade trivets can be sold at craft fairs or online marketplaces, provided the pattern is your original design or allows commercial use.
VIDEO TUTORAL
In this complete guide on how to make a flower trivet pattern, you learned how to select the right materials, follow step-by-step construction techniques, customize your design, and ensure long-term durability and safety. By choosing high-quality cotton materials, maintaining consistent stitching, and adding thoughtful finishing touches, you can create a beautiful and functional kitchen accessory that protects surfaces while enhancing your décor. Now that you understand the full process of how to make a flower trivet pattern, it’s time to put your creativity into action. If you found this guide helpful, please leave your honest opinion and share any suggestions or ideas you would like to see in future crafting tutorials. Your feedback is always welcome and greatly appreciated.