
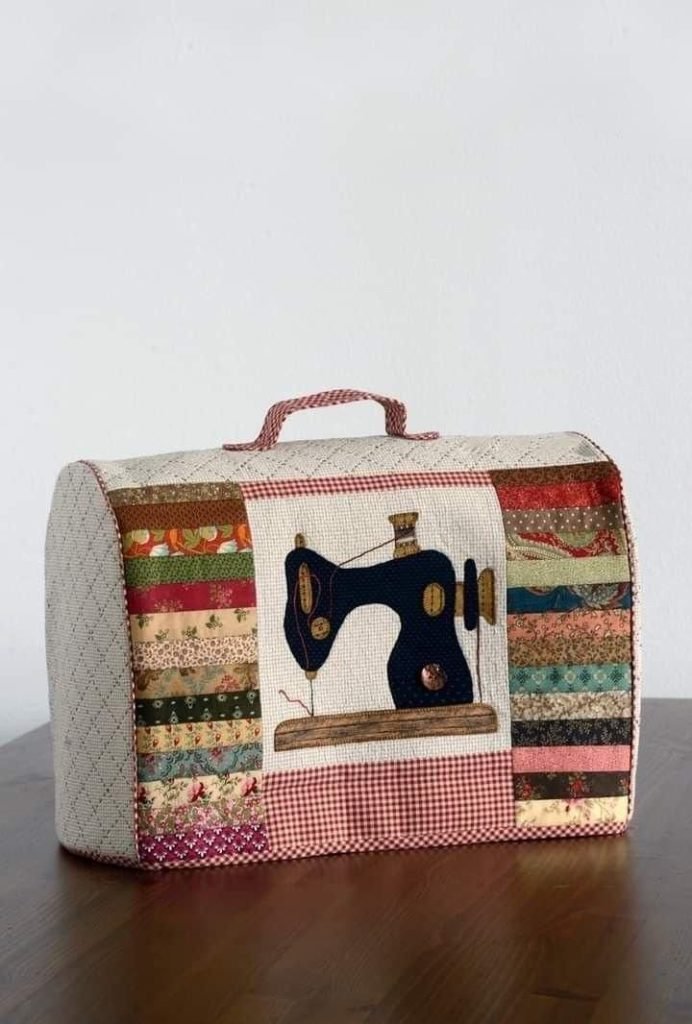
If you love quilting and want to protect your sewing machine from dust while adding a personalized touch to your workspace, this Machine Cover Quilt Tutorial is perfect for you.
A quilted machine cover is not only practical but also a great way to showcase your creativity with beautiful patterns and fabrics. In this guide, we will walk you through the steps to create a custom quilted machine cover that fits your sewing machine perfectly.
Quilting a machine cover allows you to experiment with colors, stitches, and patterns while ensuring your machine stays in top condition. Whether you are a beginner or an experienced quilter, this tutorial will help you create a stylish and functional piece.
By following these steps, you’ll have a unique machine cover that reflects your personality and skills.
Let’s dive into this Machine Cover Quilt Tutorial and learn how to craft a stunning and protective cover for your sewing machine!
1. Materials Needed for Your Quilted Machine Cover
Before starting your Machine Cover Quilt, gather the necessary materials to ensure a smooth quilting process. Having the right tools and fabric will make the project easier and more enjoyable.
- Fabric Selection: Choose a combination of cotton fabrics for durability and easy handling. You can opt for coordinating prints or solid colors.
- Batting: A medium-weight batting will provide the necessary thickness and structure for your quilted cover.
- Lining Fabric: A soft cotton lining adds a neat finish to the inside of your cover.
- Thread: Use high-quality cotton or polyester thread that complements your fabric choices.
- Measuring Tape: To take accurate measurements of your sewing machine dimensions.
- Rotary Cutter and Cutting Mat: For precise fabric cutting.
- Sewing Machine: To stitch your quilt layers together.
Gathering these supplies beforehand ensures a smooth workflow and prevents unnecessary interruptions while working on your Machine Cover Quilt.
2. Measuring and Cutting Your Fabric
Accurate measurements are essential for creating a well-fitted Machine Cover Quilt. Follow these steps to measure and cut your fabric correctly.
- Measure Your Machine: Take the width, height, and depth of your sewing machine, adding an extra inch for seam allowances.
- Cut Main Fabric Pieces: Cut two large rectangles for the front and back panels and one long strip for the sides and top.
- Prepare Batting and Lining: Cut pieces of batting and lining fabric matching the dimensions of your outer fabric pieces.
- Mark Seam Allowances: Use a fabric marker to indicate seam lines, ensuring precise sewing.
- Cut Decorative Pieces: If you plan to add appliqué or patchwork, cut these pieces at this stage.
- Press the Fabric: Ironing the fabric before sewing helps in achieving clean and crisp seams.
Taking the time to measure and cut correctly will ensure that your Machine Cover Quilt fits perfectly over your sewing machine.
3. Assembling and Quilting the Cover
Once your fabric is cut, it’s time to start assembling and quilting your Machine Cover Quilt.
- Layer the Fabric: Place the outer fabric, batting, and lining together, securing them with quilting pins.
- Choose a Quilting Pattern: Opt for straight-line quilting, free-motion designs, or decorative stitches.
- Sew the Quilting Lines: Stitch along the marked lines, keeping your fabric layers smooth and even.
- Trim Excess Batting: After quilting, trim any excess batting or lining to keep the edges neat.
- Assemble the Cover: Sew the side and top panel to the front and back pieces, ensuring a snug fit.
- Finish the Edges: Use binding or a serger to give your quilted machine cover a polished look.
This process adds both beauty and durability to your Machine Cover Quilt, ensuring it lasts for years to come.
4. Adding Decorative Touches and Finishing
Personalizing your Machine Cover Quilt with decorative elements enhances its beauty and uniqueness. Here are some ideas:
- Appliqué Designs: Stitch on fabric shapes or motifs that match your sewing room’s theme.
- Embroidery Details: Add initials, floral designs, or sewing-related motifs for an extra touch.
- Pockets for Accessories: Sew small pockets to hold sewing tools like scissors and measuring tape.
- Ribbon or Lace Trim: Embellish the edges with decorative trims to add a charming look.
- Adjustable Straps or Velcro: Incorporate straps to secure the cover in place, preventing it from slipping off.
- Labeling Your Cover: Add a quilt label with your name and date to commemorate your creation.
By adding these details, your Machine Cover Quilt becomes a functional and decorative piece that enhances your sewing space.
FAQ – Frequently Asked Questions
1. What size should my machine cover quilt be? Measure your sewing machine and add an inch to each side for seam allowances.
2. Can I use different fabrics for the front and back? Yes! Mixing and matching fabrics add a unique and creative touch to your cover.
3. What is the best batting for a quilted machine cover? A medium-weight cotton or polyester batting works best for a structured yet flexible cover.
4. How do I clean my quilted machine cover? Machine wash on a gentle cycle or hand wash for longevity. Air drying is recommended.
5. Can I make a reversible machine cover quilt? Absolutely! Using two different fabric designs for the lining and outer fabric allows for versatility.
6. How long does it take to make a machine cover quilt? Depending on skill level, it can take anywhere from a few hours to a full day.
Join our VIP broadcast list and gain access to exclusive patterns, all for free. As a VIP member, you’ll receive the best patterns daily, delivered directly to your device. ✨📱 It’s a unique opportunity to stay up-to-date with the latest trends and designs, curated just for you. Don’t miss out on enhancing your projects and discovering new inspirations with the best patterns every day! 🎨🔝
Conclusion
Creating a Machine Cover Quilt is a rewarding and practical quilting project that protects your sewing machine while adding a personal touch to your workspace. By following this tutorial, you’ve learned how to measure, cut, quilt, and assemble a customized cover tailored to your machine.
We hope you enjoyed this tutorial! Share your thoughts, feedback, and any creative modifications you made. We’d love to hear your experiences and see your finished projects!