
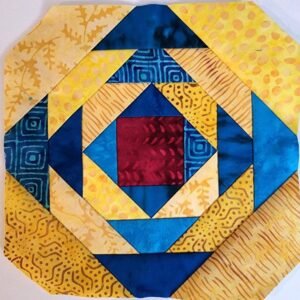
The Pineapple Block Quilt Pattern is one of the most visually captivating and timeless designs in the world of quilting. Known for its radiating geometric look and complex yet rewarding construction, this quilt pattern combines precision, symmetry, and creativity. The design resembles the overlapping layers of a pineapple, creating a beautiful interplay of colors and textures that instantly catches the eye.
Whether you are an experienced quilter or just starting your journey, the Pineapple Block Quilt Pattern offers a fantastic way to practice accuracy in piecing and fabric coordination. The structure of this block is related to the log cabin style, but with added angles that make it more intricate and exciting to sew. Despite its appearance, this pattern can be simplified with modern techniques like foundation paper piecing or strip piecing, which help ensure perfect results every time.
In this tutorial, we’ll explore everything you need to know to create your own Pineapple Block Quilt Pattern—from fabric selection to cutting measurements, assembly, pressing, and finishing. We’ll also touch on its relation to other classic blocks such as the nine patch block quilt, showing how traditional and modern quilting techniques can beautifully come together in one cohesive project.
Choosing Fabrics and Preparing for the Pineapple Block
When creating a Pineapple Block Quilt Pattern, fabric choice plays a crucial role in defining the overall aesthetic. Because this pattern builds outward in layers, color contrast and value transitions create depth and visual rhythm. Many quilters choose a light center, medium midtones, and dark outer rings to give the illusion of movement and dimension.
Start by selecting 100% cotton quilting fabric, as it’s easy to cut, press, and stitch. A combination of solids and small prints works beautifully, helping the pineapple shape stand out clearly. For a traditional look, use a limited palette with a consistent color progression. For a modern twist, try bright, bold colors or even a rainbow gradient effect.
Before cutting, always pre-wash and press your fabric to prevent shrinking and color bleeding later. Ironing ensures accuracy in measurement, which is essential in a block as detailed as this one. Starch your fabrics lightly if you prefer crisp edges that help keep the bias cuts stable.
Accurate cutting is the foundation of a successful Pineapple Block Quilt Pattern. Here are standard measurements for a 10-inch finished block:
-
Center square: 2½” × 2½”
-
First round strips: 1½” × 2½” (cut 4 pieces)
-
Second round strips: 1½” × 4½” (cut 4 pieces)
-
Third round strips: 1½” × 6½” (cut 4 pieces)
-
Fourth round strips: 1½” × 8½” (cut 4 pieces)
Each round builds the pineapple’s layered effect, and you’ll trim the corners as you progress to form the signature pointed angles.
Once all your pieces are cut, organize them by round and color to maintain consistency. Keeping your workspace neat will make assembly much easier and reduce errors. Label your fabric piles if necessary, especially if working on multiple blocks at once for a larger nine patch block quilt layout.
Step-by-Step Guide to Sewing the Pineapple Block Quilt Pattern
To construct the Pineapple Block Quilt Pattern, begin from the center and work your way outward in a precise, methodical manner. Patience and consistency are key, as every layer builds upon the previous one.
Step 1: Assemble the Center.
Start by sewing your four 1½” × 2½” strips around the center 2½” square. Use a ¼-inch seam allowance throughout the project. Press seams open or to one side after each addition. This creates the foundation for your pineapple block and sets the tone for symmetry.
Step 2: Add the Second Round.
Sew the next set of strips (1½” × 4½”) to each side, trimming any excess at the corners. After attaching these strips, you’ll begin to see the pineapple pattern emerge. Remember to keep your lines straight and press each seam carefully to avoid bulk.
Step 3: Create the Angled Corners.
Now trim off each corner of the square at a 45-degree angle, about 1¼” from the corner point. Attach your next strips (1½” × 6½”) aligning them carefully along each cut edge. Stitch, press, and trim again. Continue this process as you add rounds, always trimming corners at equal distances to maintain even angles.
Step 4: Continue Building Layers.
Repeat the process with the fourth round of strips (1½” × 8½”), trimming and sewing each time. As the pattern expands, the Pineapple Block Quilt Pattern will show its characteristic starburst shape.
Step 5: Square Up Your Block.
When all layers are complete, square up your block to 10½” (for a 10″ finished size). Use a large quilting ruler to align your seams and keep the angles sharp. Trimming ensures clean edges that will align perfectly with other blocks when assembling the quilt top.
Step 6: Join Blocks Together.
Once you have all your blocks finished, arrange them in a layout that complements your chosen colors. The pineapple pattern creates stunning secondary designs when placed together—especially when alternated with nine patch block quilt sections or solid sashing strips.
Design Variations and Creative Options
One of the best things about the Pineapple Block Quilt Pattern is its versatility. You can modify it in size, color, or layout to suit different aesthetics or project types, from wall hangings to full-size bed quilts.
For a modern look, experiment with negative space by alternating pineapple blocks with plain white or neutral squares. This allows the intricate geometry of the blocks to shine individually while giving the overall quilt a clean, airy feel.
Alternatively, try using scrap fabrics to create a scrappy pineapple quilt. The varying prints and tones add energy and visual interest, making each block unique. Just make sure to balance light, medium, and dark fabrics so the pineapple shape remains distinct.
If you enjoy structured designs, pair your Pineapple Block Quilt Pattern with nine patch block quilt units. This combination offers contrast between the linear simplicity of the nine-patch and the complex angles of the pineapple block. The resulting quilt blends traditional charm with a contemporary twist.
You can also scale your block size up or down. For mini quilts or cushions, reduce each measurement proportionally. For larger quilts, increase the strip width to 2″ instead of 1½” for a bolder, more dramatic look.
Add interest with quilting stitches that echo the pineapple’s shape—radiating lines or spiral motifs complement the block perfectly. Hand quilting enhances the texture, while machine quilting offers precision and speed.
Finally, consider finishing your project with a border that frames the pineapple design. Simple sashing or a pieced border made of leftover strips ties the whole quilt together beautifully.
Finishing Your Pineapple Quilt: Binding, Backing, and Care
After piecing and quilting, the final steps bring your Pineapple Block Quilt Pattern to life. Choosing the right backing, batting, and binding ensures durability and a professional finish.
Select a soft cotton or flannel backing fabric that complements your top. For batting, use a medium-weight cotton or cotton-blend to provide structure without too much bulk. Baste your layers carefully using safety pins or basting spray, ensuring no wrinkles between layers.
Quilting your pineapple design can be as simple or elaborate as you wish. Straight-line quilting along the seams highlights the pattern’s geometry, while free-motion quilting can add artistic flair. Stitch in the ditch to emphasize the precise angles, or create a custom design that mimics the pineapple’s radiating effect.
Once quilting is complete, trim the excess batting and backing. For binding, cut 2½” strips of coordinating fabric, join them into one long piece, and press in half lengthwise. Attach the binding to the quilt’s front, fold over to the back, and hand-stitch or machine-stitch it down for a neat edge.
Wash your finished quilt gently in cold water and tumble dry on low heat or air-dry flat. This will soften the fibers and give your quilt that beautiful, crinkled texture quilters love.
Video Tutorial
The Pineapple Block Quilt Pattern is more than just a technique—it’s a creative expression of patience, precision, and artistry. Its intricate layers represent growth and warmth, much like the pineapple itself, a symbol of hospitality and welcome.
Completing this pattern will give you a deep sense of satisfaction, along with a timeless quilt that you’ll treasure for years to come. Whether you use it as a cozy throw, a wall hanging, or a centerpiece in a nine patch block quilt combination, this project is sure to inspire admiration and pride.