
The Jewel Box Block Quilt Pattern is one of the most elegant and visually stunning quilt designs that combines geometric harmony with a timeless look. This pattern is adored by quilters because it beautifully balances color placement and block structure, creating an eye-catching mosaic that truly sparkles—just like a jewelry box full of precious gems. Whether you are a beginner or an experienced quilter, learning how to create a Jewel Box Block Quilt will elevate your quilting skills and bring a new level of sophistication to your handmade creations.
What makes the Jewel Box Block Pattern so beloved is its versatility. This quilt pattern can be created in a wide variety of color combinations, from soft pastels to deep jewel tones. The blocks feature a simple yet clever arrangement of squares and triangles, which when joined together, form a fascinating interlocking design. It’s a perfect pattern to showcase your favorite fabrics and an excellent way to experiment with light, medium, and dark color values to produce stunning depth and dimension in your quilt.
If you are someone who loves structured patterns with a touch of creativity, then the Jewel Box Block Quilt Pattern is ideal for you. It allows you to work with traditional patchwork techniques while also encouraging personal artistic expression through fabric selection. The finished quilt is not only a work of art but also a cozy and meaningful handmade piece that can be treasured for years to come. Let’s explore how to bring this classic design to life step-by-step.
Understanding the Structure of the Jewel Box Block
The Jewel Box Block Pattern is built around a simple grid system that combines half-square triangles (HSTs) and small squares. Typically, each block forms a 4×4 grid, consisting of sixteen smaller units. Within these, half of the units are usually solid squares, while the others are HSTs arranged strategically to create diagonal movement and sparkle within the quilt.
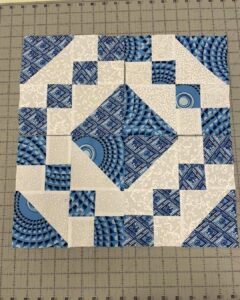
One of the reasons this block is so visually appealing is the interplay between light and dark fabrics. When arranged correctly, these values mimic the glimmer and facets of jewels inside a treasure box. To achieve this, quilters often choose a consistent color scheme—like emerald greens, ruby reds, or sapphire blues—paired with contrasting neutral tones such as cream, white, or black. This balance enhances the “jewel box” illusion.
Cutting your fabric with precision is essential. Each square and triangle must be cut to the same size to ensure the seams align perfectly. Using a rotary cutter and quilting ruler is highly recommended for accuracy. The size of your finished quilt can vary depending on how many blocks you choose to make, but each block should remain uniform for a polished and professional look.
When it comes to piecing, start by making all of your half-square triangles first. These are the heart of the Jewel Box Block Quilt Pattern, creating the sparkle effect. Once those are complete, lay out your squares and HSTs on a flat surface or design wall to visualize your final arrangement. This preview step allows you to adjust colors before stitching everything together.
Sewing the blocks together is done row by row, ensuring that the seams are pressed alternately for easy nesting. This technique helps achieve sharp, aligned corners—a hallmark of a beautifully made quilt. Once your individual blocks are complete, join them together to form the quilt top, paying attention to how the diagonal lines flow across the entire piece.
Finally, add borders and binding that complement your fabric choices. Borders can frame your quilt beautifully, while the right binding fabric gives it a cohesive, finished appearance. The final result is a sparkling quilt that lives up to its name—truly resembling a jewel box full of treasures.
Choosing Fabrics and Colors for the Jewel Box Block Quilt
Selecting the right fabrics is one of the most exciting parts of making the Jewel Box Block Quilt Pattern. The colors you choose will determine the overall impact of your quilt. Jewel tones such as amethyst, sapphire, emerald, ruby, and topaz work exceptionally well for this pattern. These vibrant hues pop against light backgrounds and give the quilt its signature radiance.
To achieve visual depth, combine fabrics of different values—light, medium, and dark. This contrast creates the illusion of movement and sparkle, which makes the design so captivating. For beginners, starting with a limited color palette of two or three main tones can make the process less overwhelming while still producing a stunning result.
Texture also plays an important role. Consider mixing solids with subtle prints or batiks to add dimension without overpowering the block design. Small-scale prints tend to work best, as large patterns may distract from the block geometry.
When planning your fabric layout, it’s helpful to create a digital or paper mock-up of your Jewel Box Block Pattern before cutting. Many quilters use design walls or software tools to visualize color placement and symmetry. This step prevents mistakes and ensures that the finished quilt will have a balanced, harmonious appearance.
Pre-cut fabric bundles, such as fat quarters or charm packs, can simplify the process and guarantee coordinated colors. However, for a truly unique quilt, consider mixing fabrics from your stash—this gives your quilt a personal story and creative flair.
Finally, always remember to prewash your fabrics before cutting. This prevents shrinkage and color bleeding later on. Once your fabrics are pressed and ready, you can begin the exciting part—assembling your Jewel Box Block Quilt and watching the magic come together piece by piece.
Step-by-Step: Assembling the Jewel Box Block
To make your Jewel Box Block Quilt Pattern, begin by preparing your fabric pieces. You’ll need equal numbers of squares and half-square triangles for each block. For example, if each square is 2.5 inches, you’ll cut eight solid squares and eight pairs of triangles per block.
The first step is creating your half-square triangles. Place two squares of contrasting colors right sides together, draw a diagonal line across the lighter square, and sew a seam ¼ inch on both sides of the line. Cut along the line, press the seams open or to one side, and trim each HST to a consistent size.
Once your HSTs are ready, lay out your block on a flat surface following the Jewel Box Block Pattern layout. Typically, the HSTs are positioned in diagonal lines that intersect the solid squares, forming a diamond-like pattern. Play around with placement until you achieve the perfect balance of light and dark values.
Start assembling your block row by row. Sew the pieces with a ¼-inch seam allowance, taking care to align each corner accurately. Press your seams as you go, alternating directions between rows for easier nesting. When all four rows are complete, sew them together to finish the block.
Repeat this process to make multiple blocks until you reach your desired quilt size. Arrange the blocks on your design wall, rotating some of them if needed to create an appealing flow. This is where your quilt truly starts to shine, and you can admire how each “jewel” connects to the next.
Once all the blocks are sewn together, add any desired borders, baste your quilt, and begin quilting. Straight-line quilting works beautifully with this pattern, enhancing its geometric charm, while free-motion quilting adds a soft, flowing contrast to the structured blocks. Finish with your binding, and your masterpiece is complete!
Tips for Quilting and Finishing Touches
The Jewel Box Block Quilt Pattern offers endless creative opportunities when it comes to quilting designs. Whether you prefer simple straight lines or intricate free-motion patterns, your quilting stitches will help bring the final texture and movement to life.
If you are new to quilting, start with straight-line quilting using your walking foot. Follow the diagonal lines of your blocks to emphasize the jewel-like structure. This method is easy, forgiving, and produces a clean, elegant finish.
More experienced quilters may enjoy experimenting with free-motion designs such as swirls, feathers, or geometric echoes. These techniques add dimension and can highlight specific areas of the quilt. Just make sure your thread color complements your fabric choices without overpowering them.
When selecting batting, choose one that suits your desired quilt thickness and drape. Cotton batting provides a traditional feel, while polyester or blended batting adds loft and warmth. A good-quality batting also enhances the stitch definition, making your quilting lines stand out beautifully.
After quilting, carefully trim your quilt edges and prepare your binding. The binding fabric should coordinate with your overall color scheme, providing a neat frame for your quilt. Attach it using your preferred method—either by machine or hand-stitching for a more delicate finish.
Finally, don’t forget to label your quilt! Add your name, the date, and perhaps a special message. The Jewel Box Block Quilt Pattern deserves to be remembered as a timeless treasure—a reflection of your creativity, patience, and craftsmanship.
FAQ
1. What size should each Jewel Box Block be?
The size can vary depending on your preference, but a common size is a 12-inch finished block. You can easily adjust it by resizing your squares and triangles proportionally.
2. Is the Jewel Box Block suitable for beginners?
Yes! Although it looks intricate, the block is beginner-friendly once you master half-square triangles and consistent seam allowances.
3. How many fabrics should I use in my Jewel Box Block Quilt?
Most quilters use between three and six colors for good contrast and harmony. Too many fabrics can make the design appear busy.
4. Can I make this quilt using scraps?
Absolutely! The Jewel Box Block Pattern is perfect for using up fabric scraps. Just ensure you balance light and dark values.
5. What’s the best quilting method for this pattern?
Straight-line quilting works beautifully to highlight the geometric shapes, while free-motion quilting can add a softer touch.
6. How do I prevent fabric distortion when sewing half-square triangles?
Use a light starch spray before cutting and sew with a precise ¼-inch seam to keep your pieces stable and accurate.
Video Tutorial
The Jewel Box Block Quilt Pattern is a timeless design that combines simplicity, precision, and artistic expression. By learning to balance colors, cut fabrics accurately, and piece your blocks with care, you can create a quilt that truly shines like a box of jewels. Whether you’re making a small lap quilt or a large bedspread, the beauty of this pattern lies in its versatility and elegance.
We hope this guide inspired you to start your own Jewel Box Block Quilt. Now it’s your turn—try this pattern, play with your favorite fabrics, and let your creativity shine. Don’t forget to share your thoughts and suggestions below—we’d love to hear your honest opinion and see your beautiful results!