
If you love quilting, learning how to create a Sawtooth Star Quilt Block – Tutorial is a fantastic way to enhance your skills.
This classic design has been a favorite among quilters for generations, thanks to its simple yet elegant geometric pattern.
Whether you’re a beginner or an experienced quilter, mastering the Sawtooth Star block will open up endless creative possibilities for your quilting projects.
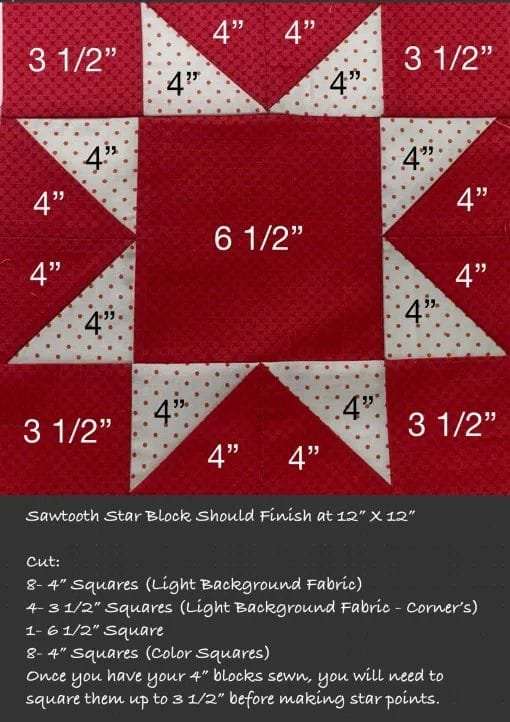
The Sawtooth Star Quilt Block consists of a central square surrounded by four flying geese units and four corner squares, forming a symmetrical star shape.
It is a versatile pattern that can be used in quilts, table runners, pillow covers, and more. With the right fabric choices, you can create anything from a traditional to a modern look, making it a must-know technique for any quilter.
In this tutorial, we will guide you through the process of making a Sawtooth Star Quilt Block, covering everything from fabric selection to precise stitching techniques. Follow along and get ready to create a stunning quilt block that will be a beautiful addition to your projects.
1. Materials and Fabric Selection
Before diving into the construction of your Sawtooth Star Quilt Block, it’s crucial to gather all necessary materials and choose the right fabric for a visually appealing and durable design.
Start with high-quality quilting cotton, as it provides the stability and smooth texture needed for accurate piecing.
Select a contrasting color palette for the star and background to ensure the design stands out beautifully.
Pre-wash and press your fabric to eliminate shrinkage and creases, which can affect the precision of your cuts.
Use a rotary cutter, self-healing cutting mat, and quilting ruler to achieve clean and accurate fabric cuts.
Gather basic sewing supplies such as a sewing machine, matching thread, and sharp fabric scissors for seamless stitching.
Consider using starch or fabric stabilizer to keep the pieces crisp and manageable throughout the sewing process.
2. Cutting and Preparing the Pieces
Once your fabric and materials are ready, it’s time to cut and prepare the necessary pieces for your Sawtooth Star Quilt Block.
For a standard 12-inch block, cut one large square for the center, four smaller squares for the corners, and eight triangles for the flying geese.
Use the stitch-and-flip method or the traditional flying geese construction technique to achieve accurate star points.
Ensure each piece is cut with precision to avoid distortion, which can affect the final assembly.
Label each piece before sewing to keep track of placement and prevent mistakes during the stitching process.
Press seams open or to one side using an iron to maintain a flat and professional-looking quilt block.
Check measurements after cutting to confirm that each piece aligns correctly with the desired dimensions.
3. Assembling the Sawtooth Star Block
Now that you have all your pieces cut and prepared, it’s time to assemble your Sawtooth Star Quilt Block step by step.
Start by sewing the flying geese units, ensuring that the points align properly to maintain a sharp star shape.
Arrange the pieces into three rows: the top and bottom rows with corner squares and flying geese, and the middle row with the center square and additional geese.
Sew the rows together, matching seams carefully to maintain an even and symmetrical block layout.
Use pins or clips to hold fabric pieces in place before stitching to avoid shifting and misalignment.
Press seams as you go to keep the quilt block smooth and free of bulk, which makes future assembly easier.
Double-check the final block size to ensure accuracy before incorporating it into a larger quilting project.
4. Variations and Creative Ideas
Once you’ve mastered the traditional Sawtooth Star Quilt Block, consider experimenting with creative variations and color schemes.
Try using patterned fabric for the star points while keeping a neutral background to create a striking contrast.
Combine multiple Sawtooth Star blocks with other quilt block designs to form a unique quilt layout with added depth.
Use different sizes of the Sawtooth Star block within the same project for a dynamic and visually interesting composition.
Incorporate applique or embroidery details within the center square for a personalized and artistic touch.
Play with seasonal color schemes, such as red and green for Christmas or pastel hues for a spring-inspired quilt.
Experiment with alternative construction methods, such as foundation paper piecing, for even greater precision and accuracy.
FAQ
Q: What size is the standard Sawtooth Star Quilt Block?
A: The most common size is 12 inches, but you can adjust measurements to create blocks of different sizes based on your project needs.
Q: Can I sew the Sawtooth Star block by hand instead of using a sewing machine?
A: Yes! Hand-sewing is possible using small, even stitches, but it may take more time compared to machine piecing.
Q: How do I prevent fabric from stretching while sewing?
A: Using a starch spray, cutting fabric with the grain, and handling pieces gently can help prevent stretching and distortion.
Q: What is the best way to ensure accurate points in the star design?
A: Precise cutting, careful seam allowances, and slow, deliberate sewing help maintain sharp and accurate star points.
Q: Can I mix different fabric types when making a Sawtooth Star block?
A: It’s best to use fabrics of similar weight and texture to ensure consistency in stitching and overall quilt durability.
Join our VIP broadcast list and gain access to exclusive patterns, all for free. As a VIP member, you’ll receive the best patterns daily, delivered directly to your device. ✨📱 It’s a unique opportunity to stay up-to-date with the latest trends and designs, curated just for you. Don’t miss out on enhancing your projects and discovering new inspirations with the best patterns every day! 🎨🔝
Conclusion
Now that you’ve learned How to Make a Sawtooth Star Quilt Block – Tutorial, you’re ready to incorporate this classic pattern into your quilting projects. With the right materials, accurate cutting, and careful stitching, you can create a stunning quilt block that showcases your craftsmanship and creativity.
The Sawtooth Star is a timeless design that fits beautifully into both traditional and modern quilting styles. Whether you’re making a full quilt or just experimenting with a single block, this tutorial has provided all the essential steps for success.+We’d love to hear about your experience with this pattern! Feel free to leave a comment with your thoughts, feedback, or any creative ideas you’ve tried with the Sawtooth Star Quilt Block. Happy quilting!