
If you are looking for a creative and sustainable quilting project, The Scrappy Tree Block – Free Pattern is a fantastic choice.
This pattern allows you to use fabric scraps to create a charming and unique tree block that can be used in quilts, wall hangings, or even festive decorations.
It’s a great way to repurpose leftover fabric while crafting something beautiful.
Quilting with scraps is not only eco-friendly but also a wonderful way to add personality and charm to your projects.
The Scrappy Tree Block – Free Pattern provides an opportunity to mix colors, textures, and patterns in a fun and imaginative way. Whether you are a beginner or an experienced quilter, this tutorial will guide you through each step, making the process enjoyable and fulfilling.
In this tutorial, you will learn how to choose fabrics, cut and arrange pieces, sew the block together, and add finishing touches. Follow along as we explore this easy and delightful quilting pattern.
1. Choosing and Preparing Your Fabrics
Selecting the right fabrics is essential for making a visually appealing scrappy tree block. Since this is a scrappy quilt project, you can mix different patterns and colors to create a unique look.
- Gather fabric scraps: Use leftover pieces from previous quilting projects to add variety and reduce waste.
- Mix colors and prints: A combination of solids, florals, stripes, and plaids adds visual interest to your block.
- Coordinate color tones: To maintain harmony, choose a mix of warm and cool tones that complement each other.
- Pre-wash fabric pieces: This prevents color bleeding and ensures your final quilt remains vibrant after washing.
- Press fabric before cutting: Wrinkle-free fabric leads to more precise cutting and accurate measurements.
- Organize by size: Sorting scraps by size helps streamline the cutting and assembly process.
2. Cutting and Arranging Your Scrappy Tree Block Pieces
Once you have your fabrics ready, the next step is cutting them into the required shapes and arranging them into a tree pattern.
- Use a rotary cutter and ruler: This ensures clean, straight cuts for a professional-looking block.
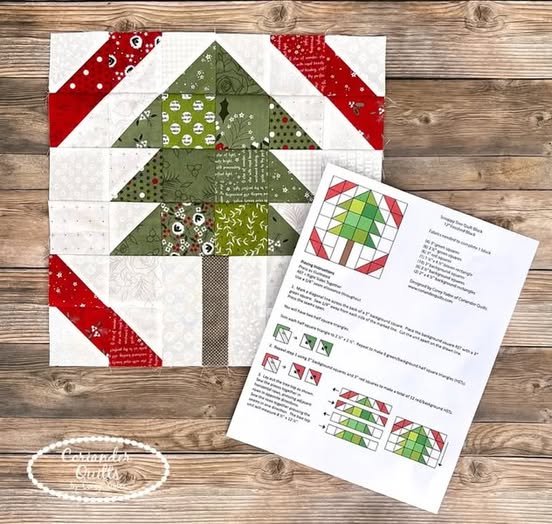
- Cut triangles for the tree shape: Varying sizes of triangles add a dynamic and scrappy effect.
- Create a trunk section: A small rectangle at the base forms the trunk, adding structure to the block.
- Lay out your pieces: Arrange the fabric on a flat surface before sewing to get a preview of the final look.
- Experiment with placement: Feel free to shuffle fabrics around to achieve the best color balance.
- Use a design board: A design board helps visualize the arrangement and keep pieces organized.
3. Sewing Your Scrappy Tree Block
With your pieces arranged, it’s time to start sewing them together. Accuracy in stitching is key to achieving a neat and polished quilt block.
- Start by sewing the triangle pieces: Join the fabric triangles together to create the tree shape.
- Press seams open or to one side: Pressing seams properly helps the block lie flat and reduces bulk.
- Sew the trunk section: Attach the fabric rectangle to the bottom of the tree shape to complete the block.
- Check for alignment: Ensure all edges match up before proceeding to the next step.
- Use a 1/4-inch seam allowance: This standard quilting seam allowance keeps blocks consistent in size.
- Trim any excess fabric: Neaten up the edges to ensure the block is perfectly square.
4. Finishing Touches and Assembling the Quilt
After completing individual scrappy tree blocks, you can add the final touches and incorporate them into a quilt or other sewing projects.
- Square up the block: Trim edges to ensure the block is even and ready for assembly.
- Add a border if desired: Borders can help frame the block and make it stand out in a quilt.
- Combine multiple blocks: Sew several scrappy tree blocks together for a festive or nature-themed quilt.
- Choose a coordinating backing fabric: A well-matched backing fabric enhances the overall design.
- Quilt the layers together: Use free-motion quilting or straight-line stitching to secure the layers.
- Bind the edges for a polished finish: Binding adds durability and completes the quilt beautifully.
FAQ: Common Questions About The Scrappy Tree Block
1. What size should my scrappy tree block be?
Most blocks range from 6” to 12” square, but you can adjust the size to fit your project.
2. Can I use different fabric types for this pattern?
Yes, but cotton works best since it’s easy to sew, press, and handle.
3. Do I need a sewing machine, or can I sew by hand?
A sewing machine is recommended for precision and speed, but hand sewing is also an option if preferred.
4. How do I ensure my tree blocks look cohesive in a quilt?
Stick to a general color scheme and use a mix of light, medium, and dark tones for contrast.
5. What’s the best way to store fabric scraps for future projects?
Sort them by color, pattern, or size in labeled bins or fabric organizers.
6. How can I make my scrappy tree block stand out?
Using bold prints, contrasting colors, or embellishments like embroidery can enhance the design.
Join our VIP broadcast list and gain access to exclusive patterns, all for free. As a VIP member, you’ll receive the best patterns daily, delivered directly to your device. ✨📱 It’s a unique opportunity to stay up-to-date with the latest trends and designs, curated just for you. Don’t miss out on enhancing your projects and discovering new inspirations with the best patterns every day! 🎨🔝
Conclusion
Creating The Scrappy Tree Block – Free Pattern is an enjoyable way to use up fabric scraps while making a unique and beautiful quilt block. By carefully selecting fabrics, cutting precise shapes, sewing with accuracy, and finishing with thoughtful details, you can create a stunning piece of quilt art.
We hope this tutorial has inspired you to try The Scrappy Tree Block – Free Pattern! If you give it a go, share your experience in the comments. Let us know how your project turned out and any suggestions you have for future quilting tutorials. Happy quilting!